 
 Main Menu
|
|
Nevada Classics
|
|
Advertise at CC
|
| S |
M |
T |
W |
T |
F |
S |
| |
|
|
|
|
|
1 |
| 2 |
3 |
4 |
5 |
6 |
7 |
8 |
| 9 |
10 |
11 |
12 |
13 |
14 |
15 |
| 16 |
17 |
18 |
19 |
20 |
21 |
22 |
| 23 |
24 |
25 |
26 |
27 |
28 |
|
|
|
CC Advertisers
|
|

05-25-2002, 09:12 AM
|
|
CC Member

|
|
|
Join Date: Dec 1999
Location: Dillon,
IL
Cobra Make, Engine: CMC Cobra ,351-Cleveland, 375 hp
Posts: 78
|
|

 Not Ranked
 Wind Wings problem
My cobras windwings on the bottom of has stripped out the threads on both sides. Must be from vibrations .. maybe I didn't keep them tight .... anyway they have both stripped out.
Any ideas on how to go about correcting this. Have not driven
car since we caught this last week. All ideas will be appreciated.
Thanks
Rich
|
05-25-2002, 10:02 AM
|
 |
CC Member
|
|
|
Join Date: Feb 2001
Location: St. Louis, Missouri,
MO
Cobra Make, Engine: SPO 2715
Posts: 1,648
|
|
Not Ranked
 maybe...
Temporary fix is a brass shim in between the screw and the hole. I did this once to get back home one day. It held up until I fixed it.
I fixed mine with a heli-coil. The tough part was tapping the windshield frame, but it worked great!
Great Asp  |
05-25-2002, 01:31 PM
|
 |
CC Member
|
|
|
Join Date: Jan 2002
Location: Northern California,
CA
Cobra Make, Engine: -Sold- Contemporary 427S/C # CCX-3152 1966 427 Med Rise Side Oiler, 8v 3.54:1 Salisbury IRS, Koni's.. (Now I'm riding Harleys)
Posts: 2,567
|
|
Not Ranked
There are a couple of really good epoxy based thread repair products which allow you to do a repair in the existing threads and not have to tap, you use a new, clean bolt to determine thread size and pitch, Permatex makes one but any good auto parts store will hook you up.. done right you will never see the epoxy.
__________________
michael
A man that is young in years, may be old in hours, if he have lost no time. But that happeneth rarely. Generally, youth is like the first cogitations, not so wise as the second. For there is a youth in thoughts, as well as in ages... Sir Francis Bacon (1561-1626)
|
05-25-2002, 02:37 PM
|
 |
Senior Club Cobra Member
|
|
|
Join Date: Jul 2000
Location: Chilliwack,BC,
BC
Cobra Make, Engine: F5 Roadster
Posts: 1,422
|
|
Not Ranked
Windwings,
Mine striped out first time I hit 130. There are only 2 or 3 small threads holding it on with too much wind force. I got 2 longer stainless screws and locknuts and drilled separate holes 1/4" away through the upright only. Haven't had ant trouble since no matter how fast...I mean slow, that I go.
Perry.  |
05-26-2002, 09:01 AM
|
 |
CC Member
|
|
|
Join Date: Mar 2000
Location: Fairfield, NJ, USA,
NJ
Cobra Make, Engine: A & C, 351W, Tremec 3550. Exiled Member: Club Cranky
Posts: 5,897
|
|
Not Ranked
I anticipated that problem and just drilled and tapped a new hole. After repairing your stripped screw hole you may want to do the same.
Roscoe
__________________
Roscoe
"Crisis occurs when women and cattle get excited!"....James Thurber
|
05-26-2002, 11:51 AM
|
|
CC Member
|
|
|
Join Date: Dec 1999
Location: Dillon,
IL
Cobra Make, Engine: CMC Cobra ,351-Cleveland, 375 hp
Posts: 78
|
|
Not Ranked
Perry
I like your way so far. If I retap am afraid of it doing the same thing again. Did you reverse the mounting direction?? On mine I could reverse the mounting ,drill the hole and cover up the old hole by doing that. I would have to reverse the windwing brackets to the inside instead of the outside of the windwing to make the angle look good.
Thanks
Rich
|
05-26-2002, 01:43 PM
|
|
Senior Club Cobra Member
|
|
|
Join Date: Jul 2000
Location: Chilliwack,BC,
BC
Cobra Make, Engine: F5 Roadster
Posts: 1,422
|
|
Not Ranked
 windwings
Hey Rich,
I didn't reverse them. Basically just lowered them 1/4" and moved them back towards the cockpit so the hole is only though the upright,not going into the windshield. When you look at the car nobody even notices they have their own holes unless you tell them.Now the windwings will never come off and you'll never strip the windshield screws again.
Perry.  |
05-26-2002, 10:48 PM
|
|
CC Member
|
|
|
Join Date: Nov 1999
Location: Bowling Green, OH USA,
OH
Cobra Make, Engine: SPF, 427 SO
Posts: 231
|
|
Not Ranked
I had a problem with my windwings vibrating loose as well - solved the problem with a little Permatex LocTite (blue I think). Haven't had any problems since... I suspect this will work as long as you have at least a little 'bite' of thread left - worth a try before you drill, tap and if it's a bad day - replace the glass in the windshield!
I've also used this trick on those pesky wiper arms that tend to work their way off the splined shaft. I can still take the off if needed **rarely if ever need to remove them... - but they don't come loose as you are cruising down the road.
If someone wants to hear a good story - - ask Ed Combs (DV) about his unique solution to the loose wiper arms  |
05-27-2002, 12:37 AM
|
 |
Super Moderator
|

|
|
Join Date: May 2001
Location: Fresno,
CA
Cobra Make, Engine: KMP 184/482ci Shelby
Posts: 14,448
|
|
Not Ranked
My arms have a clip that keeps them from sliding. I take them off unless it's raining and keep them in the trunk. Have some nice rubber caps covering the shafts.
Agree re the LocTite...these cars vibrate like a Harley, use it everywhere.
__________________
Jamo
|
05-27-2002, 08:11 AM
|
|
CC Member
|
|
|
Join Date: Dec 1999
Location: Dillon,
IL
Cobra Make, Engine: CMC Cobra ,351-Cleveland, 375 hp
Posts: 78
|
|
Not Ranked
Perry
Thanks everybody, I used Perrys method and drilled and bolted them to the windshield. I think they look real good and most people wouldn't know unless you told them. Now we can take her for a Memorial Day cruise and look good again.
You guys always come thru .
Thanks Again
Rich
|
03-19-2003, 05:23 PM
|
|
CC Member
|
|
|
Join Date: Aug 1999
Location: Canada's beautiful West Coast,
Posts: 723
|
|
Not Ranked
windwings question
Quote:
Originally posted by HighPlainsDrifter
Windwings,
Mine striped out first time I hit 130. There are only 2 or 3 small threads holding it on with too much wind force. I got 2 longer stainless screws and locknuts and drilled separate holes 1/4" away through the upright only. Haven't had ant trouble since no matter how fast...I mean slow, that I go.
Perry.
|
Perry Iknow how you mounted them with drill and tap but what was your repair for the stripped bottom screws?
I was/am just about to mount mine today and I took the two corresponnnding screws out to screw in the wing with the supplied longer screws. But it seems they are too long even with the wings thick hinge block.
As it turns out I go to put the original screws back in and the damn screw at the bottom seems too short and hardly biting the thread. The windshield frame is sprung ever so slightly at the bottom. Looked like all of 2 threads were in anyway. The longer screws with the wings scare me as they may screw into the windshield itself. I could shorten them a bit or do what you guys have done. drill and tap new ones.
Tim

|
03-19-2003, 06:09 PM
|
|
Senior Club Cobra Member
|
|
|
Join Date: Mar 2002
Location: Kennesaw,
Ga
Cobra Make, Engine: Old car with 6 banger
Posts: 261
|
|
Not Ranked
Whaler.
My screws were too long when I got them. I just ground them down to the length I wanted. It took several tries to get just the right amount off. Just have to be careful not to mess up the threads.
DC
|
03-19-2003, 07:05 PM
|
|
CC Member
|
|
|
Join Date: Aug 1999
Location: Canada's beautiful West Coast,
Posts: 723
|
|
Not Ranked
Dave since reading the thread and your reply I jumped out into the garage again and had another look. Sure as hell the wing's screws are 10-32" and the original holes are 10-24", so me trying to put a 32 into a 24 hole wasn't swift. Never assume! LOL
I have since drilled the new holes exactly 1/4" from the back edge and parallel to the others. Then I tapped for 10-32" and used the same screws and additionally added acorn nuts on the inside( this will never let go!)
Now for that bottom screw, I found the 10-24 original is only about 1/4 inch long, I have the same screw in 1/2" length and it goes in nicely but is too long I will either buy another in between or shorten as you did.
God I thought I had buggered the frame up 
Thanks
PS I think loctite on the original windowframe screws can't hurt.
Hell 2 or 3 threads( on each of those 8 screws) at highway speed is scary.
Tim
Last edited by Whaler; 03-19-2003 at 07:08 PM..
|
03-19-2003, 10:16 PM
|
|
CC Member
|
|
|
Join Date: Mar 2002
Location: Morro Bay,
CA
Cobra Make, Engine: FFR 3243. 5.0 (for now), 5-spd.
Posts: 188
|
|
Not Ranked
The topic of windwing mounts and stripped screws has been covered quite a bit, I am surprised that is still comes up.
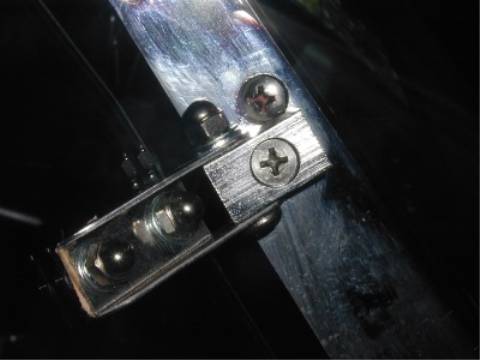
The four (per side) screws that mount the windshield frame to the support posts should not be used for mounting the windwings.
First, they are at an angle to the support post, to be square to the edge of the windshield.
Second, they screw into a 1/8" brass strip that only affords a couple threads (in #10-24 size) and will easily strip under the excess stress and loads imposed by the windwings. (Note that 10-24" is not correct, it is #10-24. The [ #10 ] is the size of the screw and the [ 24 ] is the number of threads per inch.)
If the support post is pulling away from the windshield frame there is the possibly a side load is being imposed on the post by the body.
Check to see if there is clearance between the post and the body on the inside of the slot the post passes through. If the body is pushing agains the post it will put excess stress on the #10-24 screws in the 1/8" brass strip and the holes will strip out. This could lead to loosing the windshield while driving, in the most extreme of circumstances.
If the screws are too long and hit bottom behind the brass strip the windshied frame will not be held tightly to the support posts.
The screws will not contact the glass, unless some extra drilling has been done during a "fix", but the screws can easily strip in the brass if they are trying to tighten the support post but actually bottom out while trying to draw the joint tight.
The slot, where the brass strip is located, is the same as the slot at the top of the windshield frame, and has a bottom which separates the glass from the outside, and the screws.
Last edited by CRZN427; 03-19-2003 at 10:21 PM..
|
03-20-2003, 08:40 AM
|
|
CC Member
|
|
|
Join Date: Aug 1999
Location: Canada's beautiful West Coast,
Posts: 723
|
|
Not Ranked
Thanks for the explanation. Sorry about my description or the machine screws. Its a #10-24 not a 10-24"
I have read many threads here on the topic after I did my search. As you may notice the person to which my thread question was directed has yet to respond. At least I am not dealing with the infamous cracking windshield, that would be another story well covered in the archives as well.
Tim
|
03-20-2003, 09:08 AM
|
|
CC Member
|
|
|
Join Date: Aug 2001
Location: Westport,
CT
Cobra Make, Engine: ERA 575 with Shelby Aluminum 427 Stroked to 468
Posts: 380
|
|
Not Ranked
I had this same problem a few years ago and was able to do something a little different. Loc-tite is pretty good, but the problem is that you are basically working with a limited amount of thread i.e., the brass winshield material where the holes are is likely about 1/16 of an inch thick, so the threads are very few. I used epoxy putty, sometimes called plumbers putty, which is a tube of grey and white material that looks like a tootsie roll. You cut a slice of the roll, kneed it in your fingers, and then stuff it into the hole. I shortened the bolt a little and slid the bolt through and threaded it into the hole with some pushing to form new threads, and did this until the bolt was all the way in and the epoxy started to ooze out. Within 30 minutes, the epoxy hardens and you can remove the screw and wing, use a razor to scape away the excess and then screw it back. You'll have to apply minimal torque on the screw because the newly formed threads will be weaker than loctite, but the difference is that you have threads formed all the way trhough the bore of the hole, which provides a solid foundation. Curious if anyone else had any luck using this method. The epoxy putty dries to an almost porcelin like matter, not as fragile but very brittle. Maybe someone can try mixing loc-tite into the putty while kneeding it and combine the binding properties of both materials.
Good luck.
|
03-20-2003, 09:25 AM
|
|
CC Member
|
|
|
Join Date: Aug 1999
Location: Canada's beautiful West Coast,
Posts: 723
|
|
Not Ranked
Hi Frank
I see what you are trying to do. In this case why not try plastic steel then? It may be a better material for what is trying to be achieved here.
Its a 2 part mix of an expoxy and a hardener that u can literally drill and tap. I imagine that once mixed it could be used the same way you did. Push it into the cavity and set the screw before hardening.
Tim
|
03-20-2003, 10:01 AM
|
|
CC Member
|
|
|
Join Date: Aug 2001
Location: Westport,
CT
Cobra Make, Engine: ERA 575 with Shelby Aluminum 427 Stroked to 468
Posts: 380
|
|
Not Ranked
Whaler,
I am not familiar with the product you mentioned, but every time I have ever used one of those liquid steel type epoxies, it always lacks the brittleness needed to form threads. I think the ultimate test of any of these products is to, after fully curing, take a flat-head screwdriver and see if you can make an indentation into a glob of the epoxy. In most of my applications, I always find the liquid iron type products to be a little too malleable to provide a base for threads. But maybe I haven't had the right product or haven't applied sufficient amounts of the catalyst. The epoxy putty globule, if you drop it from a height, it almost has the properties of rock, a golfball size glob might crack if you drop it, and I've found those characteristics to be helpful for the wind-wing, which doen'st require significant toqure as much as it needs a deep foundation. maybe loc-tite applied to the putty formed threads would add the staying power to ward off vibration weakenings. Also the pasty, doughy consistency is helpful for filling the cavity, a liquidy consistancy will wind up filling cavitities you didn't know existed, the putty won't travel beyond the immediate cavity.
This is a problem that really will happen to every cobra out there, it's mostly a function of mileage, more miles, more vibrations, will weaken these threads eventually. More contact threads makes for a more stable anchor. curious if there are other products that really cure to a hard as steel matter.
|
03-20-2003, 12:42 PM
|
 |
Club Cobra Member
|
|
|
Join Date: Nov 2000
Location: Macedonia,
OH
Cobra Make, Engine: A&C 427S/C, 351W, T5
Posts: 513
|
|
Not Ranked
Wind Wings!!!
There is plenty of room in the windshield frame for new mounting hole locations. Reverse the brackets on the wings, locate with clearance from glass and other areas of interference. Drill holes, using stainless steel machine scres, washers and locking nut. Should be strong installation now.
Jim
|
03-20-2003, 06:17 PM
|
|
CC Member
|
|
|
Join Date: Aug 1999
Location: Canada's beautiful West Coast,
Posts: 723
|
|
Not Ranked
Jim thats exactly what I did and even after tapping the frame for the #10-32 I topped them off using a matching SS acorn nut on the inside of the frame.
|
 Posting Rules
|
You may not post new threads
You may not post replies
You may not post attachments
You may not edit your posts
HTML code is Off
|
|
|
All times are GMT -7. The time now is 06:24 PM.
Links monetized by VigLink
|


 Linear Mode


