 
 Main Menu
|
 Nevada Classics
|
 Advertise at CC
|
| S |
M |
T |
W |
T |
F |
S |
| |
|
|
|
|
|
1 |
| 2 |
3 |
4 |
5 |
6 |
7 |
8 |
| 9 |
10 |
11 |
12 |
13 |
14 |
15 |
| 16 |
17 |
18 |
19 |
20 |
21 |
22 |
| 23 |
24 |
25 |
26 |
27 |
28 |
|
|
 CC Advertisers
|
|
 18Likes 18Likes

06-07-2022, 03:31 PM
|
|
CC Member

|
|
|
Join Date: Dec 2003
Location: Gurnee,
IL
Cobra Make, Engine: Kirkham #259
Posts: 1,396
|
|

 Not Ranked
 What to do at the Race Track
I wrote this article on Talk Cobra and it helped folks to know what to prepare for if they go to a Race Track. And what they are looking for in their vehicle. Then how do you get their. We'll see how it goes.
Let's move on, well we've finished the build and have taken the car for a ride around the back roads and everything seemed to work out just fine..... now it's time to take KMP259 to the track and start the real test of the things we have done ......... We treat every time we go to a track like an experiment to find out what works and what doesn't, also will the changes we make respond with feed back that is correct or not correct.
So now I'm going to take you thru an outline of everything we do to go to the Track.
Not sure how to up load photos....
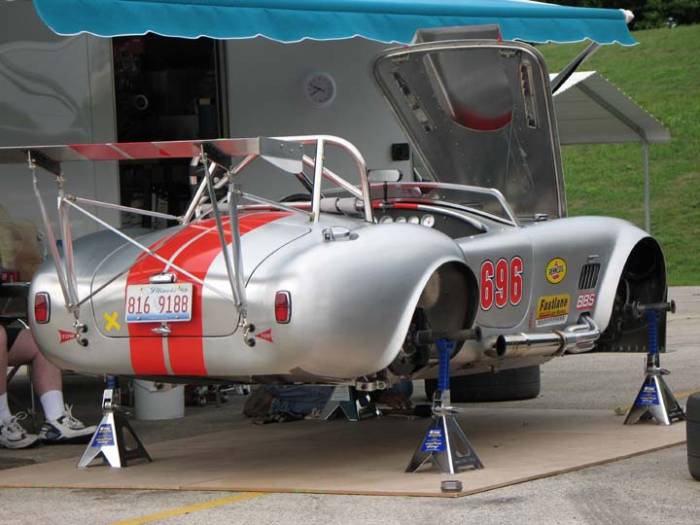
KMP 259 2nd Phase
1. Before the Track
a.Mount and Balance New Tires.
b.Check the circumference of the tires and set to the same number for Front axle and the Rear Axle.
c.Set the ride height on each corner
d.Weigh the car and set the corner weights based on the track you are going to attend.Also note what one turn on a corner spring will do to the weight of that corner and others, so you can make a calculated change at the track.
e.Align the chassis, all 4 corners, set to the Spec's of the Chassis builder
__________________
Morris
Last edited by Morris; 06-07-2022 at 03:49 PM..
Reason: insert photo
|

06-07-2022, 03:35 PM
|
|
CC Member

|
|
|
Join Date: Dec 2003
Location: Gurnee,
IL
Cobra Make, Engine: Kirkham #259
Posts: 1,396
|
|

 Not Ranked
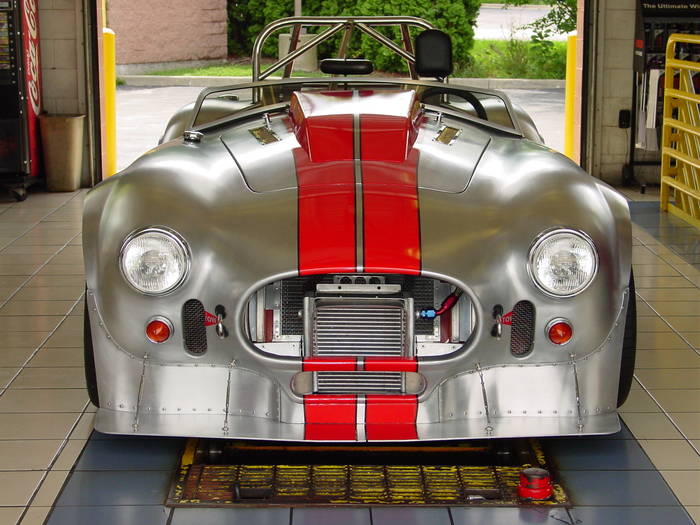
2. Getting ready to go to a track
A. Have a Plan
1. How many sessions do you have?
2. What Data needs on each session.
3. Review after each session, Race log to record all data from each session
B. Get extra parts that can be changed at the track.
1. Springs, Roll bars, brake pads.
2. Fill the Nitrogen Bottles 2 each, Extra tires and wheels mounted
3. Extra set of Rotors for Brakes
C. Test Equipment needed
1. Tire Pyrometer, Tire Pressure gauge.
2. Engine Pressure and Temperature gauges
3. Transmission secondary temperature gauge
4. Rear End secondary temperature gauge
5. Brake balance/ Brake Temperature Kit/Tempilac Stickers
6. Shock Pressure Tester Schrader Valve
7. Radiator Tester
__________________
Morris
Last edited by Morris; 06-07-2022 at 03:51 PM..
|

06-07-2022, 03:37 PM
|
|
CC Member

|
|
|
Join Date: Dec 2003
Location: Gurnee,
IL
Cobra Make, Engine: Kirkham #259
Posts: 1,396
|
|

 Not Ranked
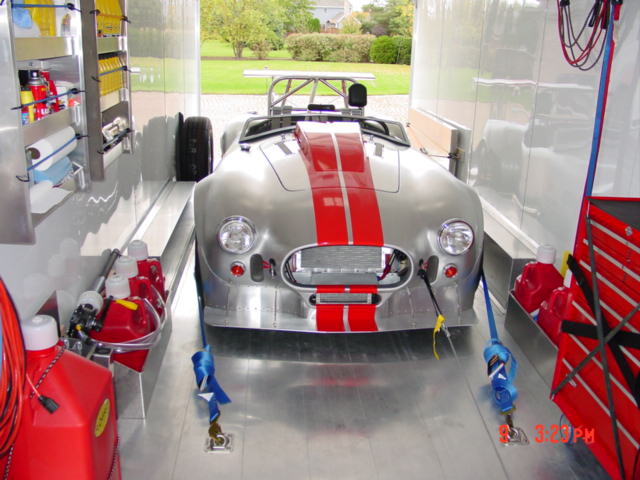
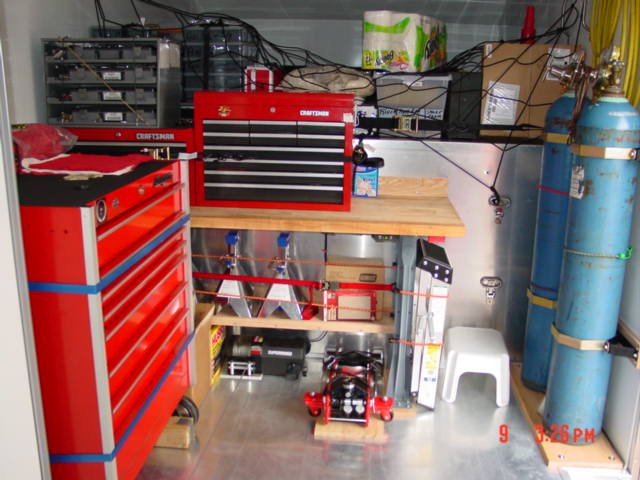
D. Trailer Set Up
1. Tools needed, both air and manual, Jacks, Jack stands.
2. Special Tools, Engine Hoist, Bump Steer Stand, Alignment and Toe Plates.
3. Winch and dollies
4. Spare Gas, Oil, Gear Oils, Trans Fluid, Water Wetter, Brake Fluid
5. Funnels, Extension Cords, Flash Lights.
6. 2 each Full Nitrogen Bottles, Regulators & Quick Disconnects Air Hose
7. Fire Extinguishers, Tow straps, Tie Down Straps.
8. Spare Nuts,Bolts and Hose Clamps & Tee Clamps
9. Spare engine parts, Ignition & Distributor parts & wires
10.Carb or Fuel small parts
11.Spare Filters both Oil and Fuel
12.Awning, Folding table, Chair, Trash Bags, Clock mounted on trailer Door
13.Cleaners Windex, Brake Kleen, Rags, Mineral Spirts, Paper Towels
__________________
Morris
Last edited by Morris; 06-07-2022 at 03:58 PM..
|

06-07-2022, 03:39 PM
|
|
CC Member

|
|
|
Join Date: Dec 2003
Location: Gurnee,
IL
Cobra Make, Engine: Kirkham #259
Posts: 1,396
|
|

 Not Ranked
I think my photo's are to large to post....???
__________________
Morris
|

06-07-2022, 03:41 PM
|
|
CC Member

|
|
|
Join Date: Dec 2003
Location: Gurnee,
IL
Cobra Make, Engine: Kirkham #259
Posts: 1,396
|
|

 Not Ranked

At the Track
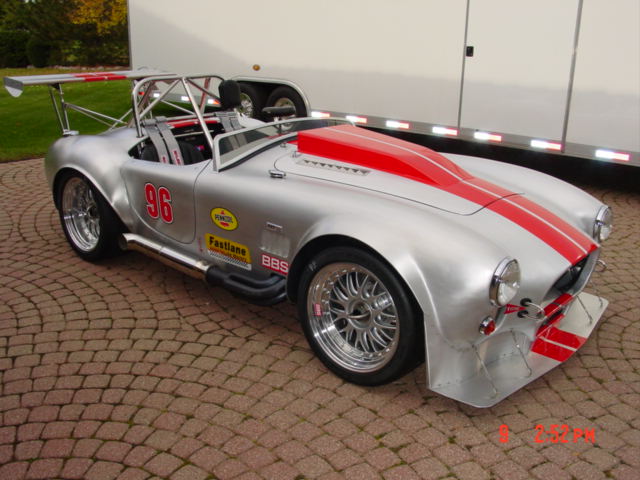
1. Review the Plan of Sequence of events, Get Set-up, Unload trailer, set up where the car is going to be on flat land.... that way it makes it easier to Jack and put on Jack stands.
2. Tech Inspection for the organization
1. It's always good for another pair of eyes to look at the things you have done for Safety.
2. Always work with the Tech inspectors and once they know the car it becomes easier at the next event.
3. Jack the car and put it on Jack Stands
1. Remove the wheels
2. Start by bleeding the brakes and top off the master cylinders
3. Paint all 4 Brake Rotors with the Brake Temperature Paint.
4. Set Shocks Bump and Rebound at the mid way setting the pressure about 150# lbs
5. Take a handful of wrenches and start checking nuts and bolts for tightness especially on the suspension and brakes.
6. Warm up Motor to 180*degrees, check pressure, temps, voltage.
7. Make sure the pumps on the transmission and rear end are operational
8. Check the fuel level and put enough fuel in the tank to cover the first session plus 2 extra gallons
9. Check oil level
10. Check water level and cap.
11. Make sure the catch cans are empty and clean, both in front and rear.
12. Establish Brake bias adjustment and set, same with the proportion valve
13. Reinstall wheels and get ready to go on track, add more Nitrogen for cold setting on tires.
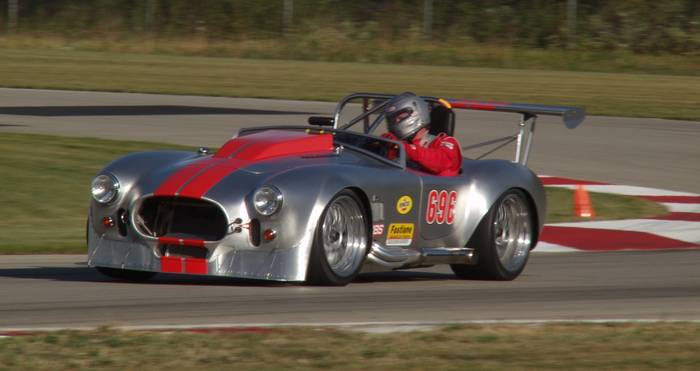
__________________
Morris
Last edited by Morris; 06-07-2022 at 04:03 PM..
|

06-07-2022, 03:43 PM
|
|
CC Member

|
|
|
Join Date: Dec 2003
Location: Gurnee,
IL
Cobra Make, Engine: Kirkham #259
Posts: 1,396
|
|

 Not Ranked
D. Pit Lane
1. Dress in long pants and Long sleeve shirt unless the organization allows different attire.
2. Tools - Pyrometer for tires, Air pressure gauge, various hand tools, Jack and stands if necessary.
3. Tablet and pad for temps and pressure, Engine Temps and Pressures
4. Set Cold pressure and record, most of the time we start out at about 25# lbs and see what happens to the tires when they come in ....if they are over or under inflation. That will be part of the tuning we do.
5. Send car out on the track and get ready for anything....
I remember once I put a fire out with a couple of Cokes... so do be ready for the unknown.
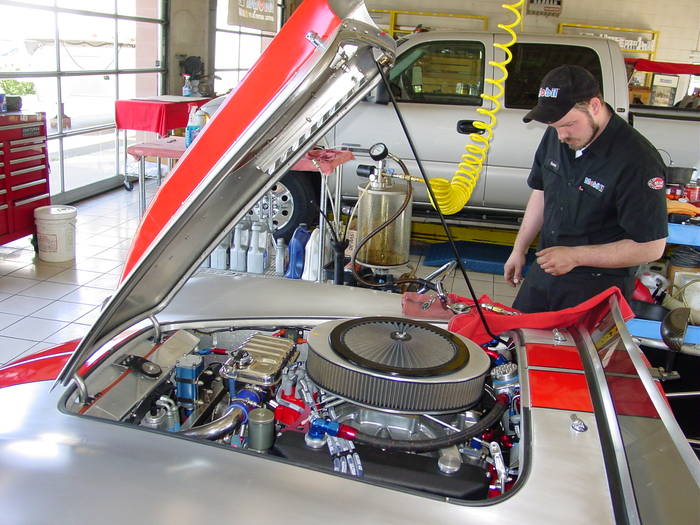
__________________
Morris
Last edited by Morris; 06-07-2022 at 04:05 PM..
|

06-07-2022, 03:47 PM
|
|
CC Member

|
|
|
Join Date: Dec 2003
Location: Gurnee,
IL
Cobra Make, Engine: Kirkham #259
Posts: 1,396
|
|

 Not Ranked

Run the car on the track 1st Sesson
1. Test the car on the track at half speed or a comfortable speed on the first Lap or two, this give the tires a chance to start warming up and the driver to feel safe and comfortable
2. Then go harder on the next few laps once you have the comfort factor resolved in your brain, and that the car is going to perform like it is should.
3. On the last few laps of the session go as hard as you feel comfortable and use the brakes so we can get a reading on the tires and brakes. Also try and get a clean cut on the motor so you can get a reading on the spark plugs.
4. The minute the car comes into the pits, as it is stopping turn the front wheels away from the guard rail so you or someone can get to the tires to check the temps.
a. Check and record the tire temps (inside/middle/outside) starting with the front tire that is used the most
b. Then the rear tire that is used the most
c. Then the other rear tire
d. Then the other front tire
5. Now check the pressure on all of the tires, usually you have someone come behind the person checking the temps and then you check the pressure
6. This is one of the most important part of being on the track, and that is, what are the tires doing ..... temps and pressure
7. Now record all of the temps of the Motor, Trans, and Rear End.
8. Also record the pressure reading of the oil, fuel, and did the driver notice any fluctuation during the session at any speed or specific
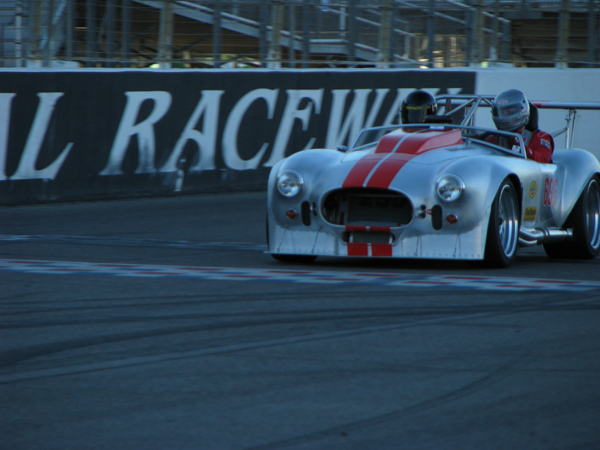
__________________
Morris
Last edited by Morris; 06-07-2022 at 04:13 PM..
|

06-07-2022, 04:09 PM
|
 |
CC Member

|
|
|
Join Date: Feb 2006
Location: Gilroy,
CA
Cobra Make, Engine: SPF 2291, Whipple Blown & Injected 4V ModMotor
Posts: 2,737
|
|

 Not Ranked
Morris,
Very complete and well organized race and car prep prior to going on the track for the first time, each event. I was however modestly disappointed, I was looking for the prepatory steps prior to sweeping the Race Queen off her feet and taking her out that evening. This is a very imortant workup that is obviously missing ...
Great prep coaching for anyone who wants to take a turn at running their car on a real race track — thanks for taking the time and effort to document it.
__________________
 Help them do what they would have done if they had known what they could do.
|

06-07-2022, 07:22 PM
|
 |
CC Member

|
|
|
Join Date: Aug 2013
Location: Canandaigua,
NY
Cobra Make, Engine: SPF MKII Riverside Racer FIA
Posts: 2,505
|
|

 Not Ranked
Morris,
As always, nothing short of a highly accurate and descriptive account what happens and is required at the track. It is most complete, because you are actively involved in all aspects of racing. A perspective that someone who just shows up to drive doesn't fully appreciate.
Thanks.
Jim
__________________

|

06-08-2022, 06:29 AM
|
 |
CC Member/Contributor

|

|
|
Join Date: Feb 2000
Location: Greenville,
SC
Cobra Make, Engine: 70 Shelby convertible, ERA-289 FIA, 65 Sunbeam Tiger, mystery Ford powered 2dr convertible
Posts: 12,740
|
|

 Not Ranked
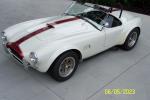
Love the car and the write up......Don't take this as a slight, but how comfortable do you feel on the track knowing you head/helmet is above the rollbar?

Personally, any Cobra I've had on track, I've always adjusted the rollbar/rollcage to make sure my helmet was below the peak of them.
Bill S.
__________________
Instead of being part of the problem, be part of a successful solution.
First time Cobra buyers-READ THIS
|

06-08-2022, 02:39 PM
|
|
CC Member

|
|
|
Join Date: Dec 2003
Location: Gurnee,
IL
Cobra Make, Engine: Kirkham #259
Posts: 1,396
|
|

 Not Ranked
Quote:
Originally Posted by mrmustang

Love the car and the write up......Don't take this as a slight, but how comfortable do you feel on the track knowing you head/helmet is above the rollbar?

Personally, any Cobra I've had on track, I've always adjusted the rollbar/rollcage to make sure my helmet was below the peak of them.
Bill S. |
Bill
Some of us remember racing without Roll Bars and little to nothing above our helmet.....
Just so you know my Gt-2 and GT-1 cars the roll bar was below the roof and my helmet was on the roof....
So no it does not bother me at all....when you build a car like we do... it's built to have other safety features.... like being able to slid down in the seat....also the helmet is even with the roll bar...the photo angle is not representative of the height of the roll bar.
__________________
Morris
|

06-08-2022, 02:43 PM
|
|
CC Member

|
|
|
Join Date: Dec 2003
Location: Gurnee,
IL
Cobra Make, Engine: Kirkham #259
Posts: 1,396
|
|

 Not Ranked

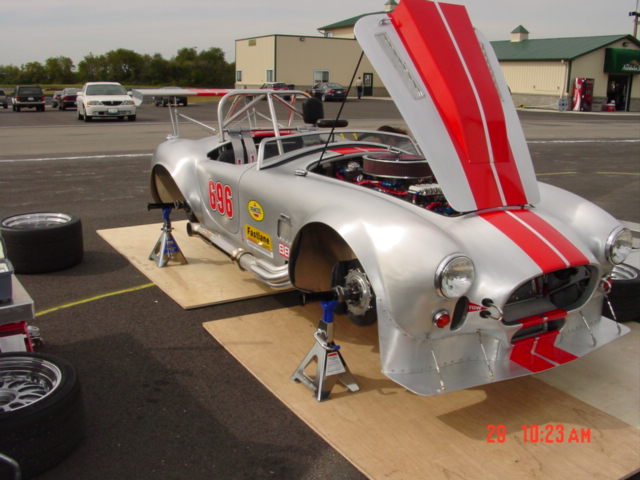
Now take the car back to the trailer and let it sit and cool down
1. You can now start jacking the car up and remove the wheels
Now we can Analyze the Chassis and Suspension
1. Let's look at the overall temperatures of the tires, if the driver is working the car then the temps will be around 200*degrees on new tires. less on older tires.
2. What we are really interested in is the average temp of the LF, RF, LR, RR, add the three temperature readings and divide by 3 and that will give you an overall average reading of that tire. Do the same for the other tires. This will start to tell you if the car is Under Steering or Over steering in the corners.
a. So the idea is to get a overall feel of the car for that track at that time.
b. This will tell you that you need to change the Anti-roll bar, springs or shocks at the end of the car that is being worked the hardest, The front or rear of the car that is sticking the best should be left alone and concentrate on getting the over worked end of the car to stick, as time goes by it is a constant issue of getting the vehicle to get the best grip on the track.
c. On KMP259 we found out the rear was sticking like a champ and did not show any signs of power oversteer or oversteer on any kind. So we started working on the front suspension because the front Temps were high and indicated a push in the car, by having higher temps and pressures it was easy to see we were over working the front end. We changed the front anti-roll bar from a 1.250"inch bar to a 1.187"inch Anti- roll bar, we also softened up the bump on the front shocks to #2 on bump and left the rebound at the half way point, then the last change we made was to reduce the pressure in the shocks to 125#lbs, all small changes so we could sneak up on the optimium setting.
3. Next we look at each tire temp to see how our camber looks, the idea is to have the tire flat on the track, so, look at the temperatures across the tire and see what you have to do to the camber, you may need more or less camber to get the tire flat on the track. It is acceptable to have the temps vary by about 10*degrees from the outside temp to the inside temp, with the inside temp being the hottest, 200*/205*/210* on the left front or right front at 210*/205*/200*/ Hottest temps are always on the inside edge of the tire.
__________________
Morris
|

06-08-2022, 02:48 PM
|
|
CC Member

|
|
|
Join Date: Dec 2003
Location: Gurnee,
IL
Cobra Make, Engine: Kirkham #259
Posts: 1,396
|
|

 Not Ranked

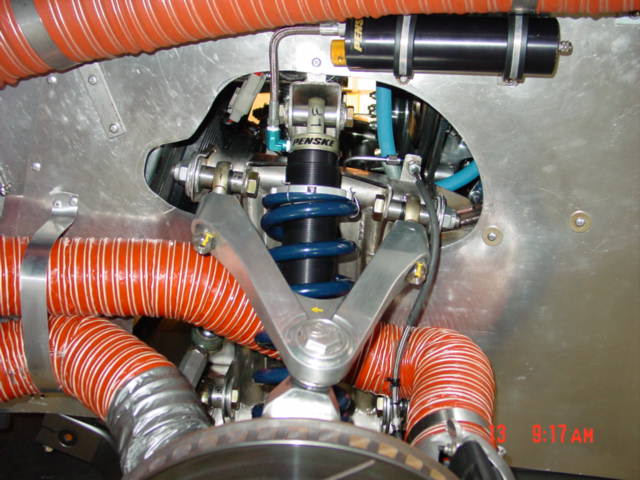
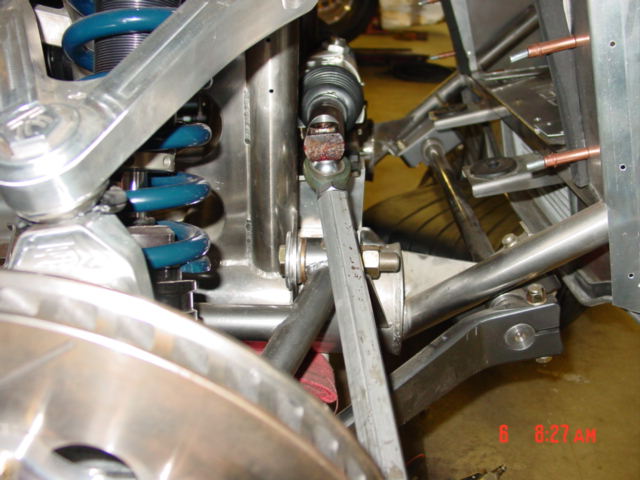
Look at this photo close and you'll see how the control arm ball joint of the upper control arm is leaning or on the back side of the shock body. This is the 5*degrees of caster we are using and in order to get it..... if you look at the chassis side of the control arm, you'll see that the front of the upper control arm has material added to it and the rear part of the upper control arm has material taken out to achieve the castor we wanted.
4. When we started using Radial Race Tires back in 1988, we found out the Radials liked a lot of negative camber, and so we start out setting them at around 3*degrees negative on the front and about the same on the Rear with Independent Rear Suspension. And we'll go by our tire temps to know if we want more Camber or less. We don't go by a Camber gauge, the tire Temps tell us what to do to the individual tire to get it flatter on the ground.
a. So we will make adjustments to the camber on each wheel based on the tire temps, There is many things that will affect this reading, how hard is the car being driven, what kind of track are we on, are there more right hand turns then left hand turns, are we in the turn for a long period of time. When we adjust the camber we will only go maybe one or two turns on the heim rod end, just so we can go back to our starting point if we have to.
b. As you start seeing the temperature across the tire even out then you know you are getting close to the optimum setting for that tire on that track with that driver.
__________________
Morris
|

06-08-2022, 02:59 PM
|
|
CC Member

|
|
|
Join Date: Dec 2003
Location: Gurnee,
IL
Cobra Make, Engine: Kirkham #259
Posts: 1,396
|
|

 Not Ranked

Also notice we made our adjuster nuts that fit inside the control arms so it is easy to adjust the control arm without taking the control arm off the vehicle. Just break loose the jam nut and turn the sleeve nut and tighted, Done. If you are making a straight camber adjustment you should adjust both the front and rear of the control arm the same amount to maintain the castor.
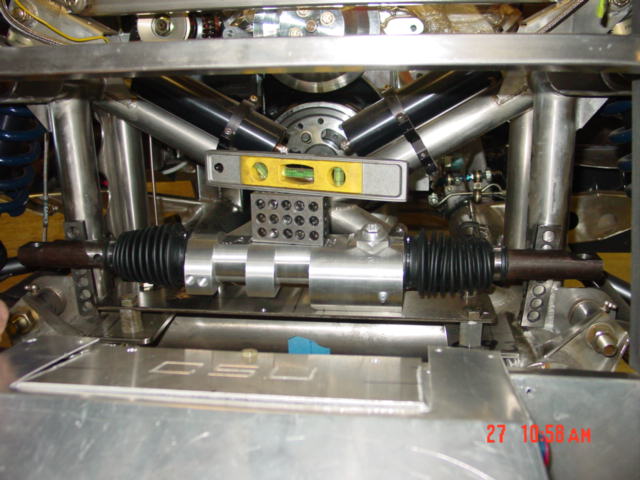
5. The caster we set at 5*degrees at the shop and don't want to change it, but it did cause us to have to install Power Steering because as we started getting bite on the track, the Front end was getting very hard to turn the steering wheel.
6. That was why we installed a Appleton power steering unit, because they are one of a few manufactures that can make a 23.25"inch long rack that we needed to make our bump steer work out right.
a. The other thing that most racers debate is Ackermann Theory. That means that the inside wheel of the turn is turning in more to help the outside wheel turn in to the corner. We like Ackermann and on GT-1 type of cars because they are so heavy and big as compared to Formula Cars, we have found out over the years that these type of cars like Ackermann. You really notice when pushing the car around the pits, it's very easy to push in a corner, as opposed to some cars that are very difficult to move if you turn the steering wheel. Sometimes it's the locked up rear end that makes it hard to push around the pits, but anything we can do to help the chassis get around a corner is a advantage.
Here you see that we machined material off the back of the upper control arm to get more castor
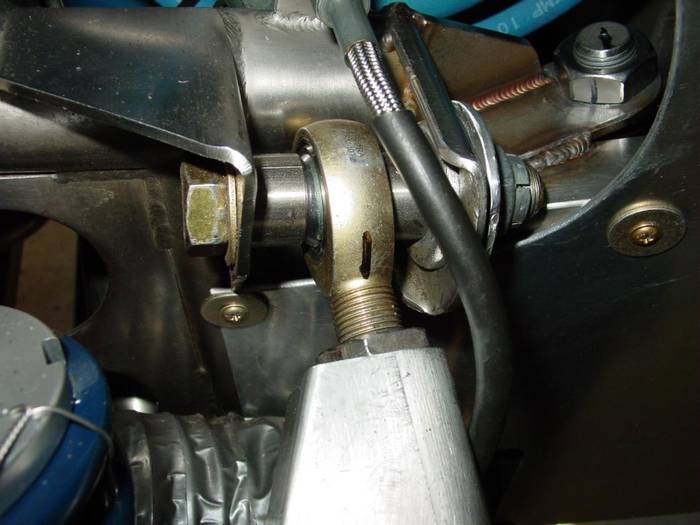
Here you'll see we added material to the Front of the upper control arm to get the caster where we wanted it...
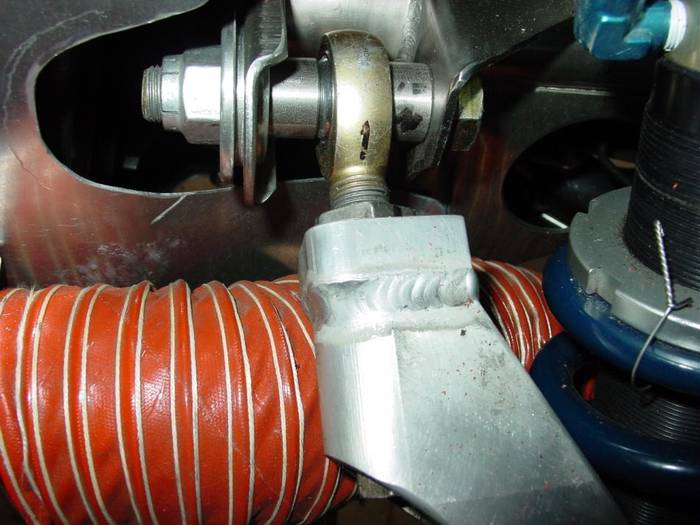
Here you see the nut adjuster on the lower control arm...also that the lower control arm is steel.
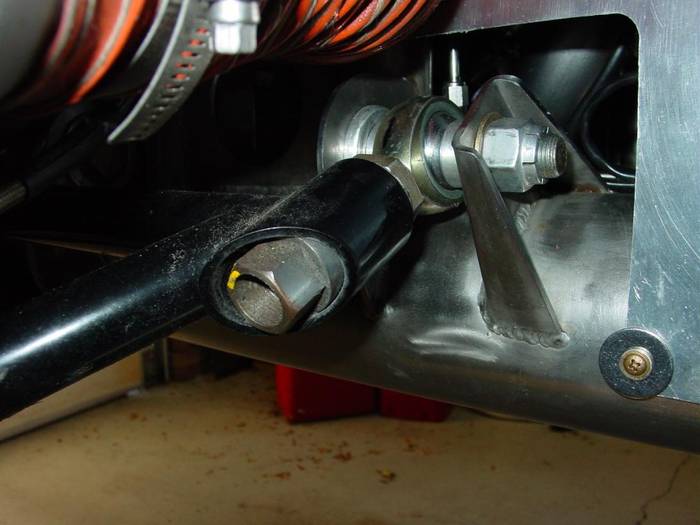
Here we show how we are achieving our Ackerman in the steering because the rack is further back then the steering arm giving the inside wheel a tighter radius then the outside wheel
__________________
Morris
Last edited by Morris; 06-08-2022 at 03:15 PM..
|

06-08-2022, 03:27 PM
|
|
CC Member

|
|
|
Join Date: Dec 2003
Location: Gurnee,
IL
Cobra Make, Engine: Kirkham #259
Posts: 1,396
|
|

 Not Ranked

7. As far as Toe-in, unless the driver says the car is wandering down the straight away, we don't touch it unless we make a very dramatic change. Then we will get out our Toe Plates and check the overall Toe-in to make sure the car is tracking straight.
I had many folks tell me they are running Toe-out .... what they are doing is compensating for the Ackermann Theory, and trying to help themselves get around a corner .... but we have never run Toe-out.... We built in Ackermann and run Toe-in and that way the car tracks straight down the track and turns-in at the proper point.
a. The toe-in setting we are using on KMP259 is 1/8" Total Toe-in= 1/16" inch on each side in the front.
b. The toe-in setting we are using in the Rear of KMP259 were the same as the front with ; 1/8" inch Total = 1/16"inch per side in the Rear.
c. Remember we spent a lot of time Bump Steering KMP259 on the front as well as the rear, and now it's paying off, the car tracks great at any Speed.
8. So now to review, we looked at the overall Temperature readings and averaged them to get a overall reading to help us decide what to change, The Shocks, Anti-Roll bar, or Springs for a major change.
9. Then we looked at the temps across the tire to adjust our Camber, Left Toe alone and the same for the Caster.
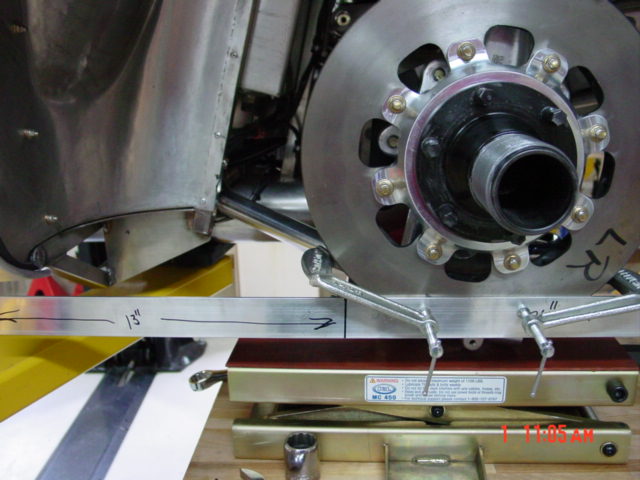
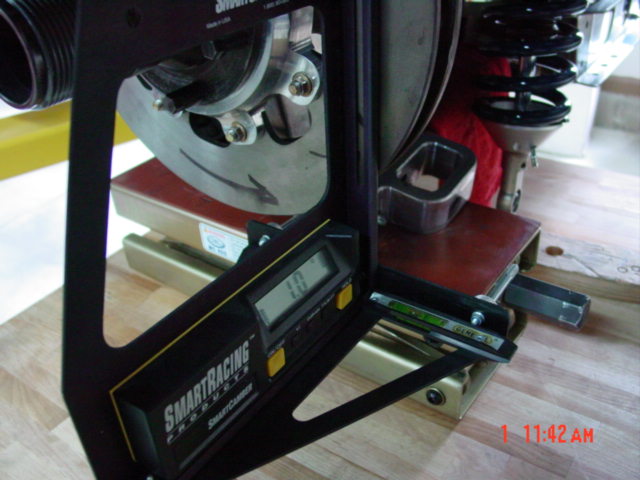
__________________
Morris
|

06-08-2022, 03:31 PM
|
|
CC Member

|
|
|
Join Date: Dec 2003
Location: Gurnee,
IL
Cobra Make, Engine: Kirkham #259
Posts: 1,396
|
|

 Not Ranked
Here's a good photo of a cracked Rotor, it was a front and we were still using the old hat which didn't force enough air thru the vanes of the rotor.... and yes it will happen again if we don't change the rotor Hat to prevent air from coming out of the center of the rotor and not making it go thru the vanes in the rotor.
attachment.php Here's the new hat on the rotors to prevent the air from getting out of the center of the rotor.
Now look at the Brakes and see how the temperatures came in from the race track, remember, the temps painted on brakes are, 1200*/1100*/1000*/900* Front brakes should be about 200*degrees hotter that the rear, If the rears are a lot lower then the front brakes, then add more balance bar or use the proportion valve and allow more pressure to the rear brakes,
a. Sand and paint them again for the next session.
b. Bleed them again if necessary.


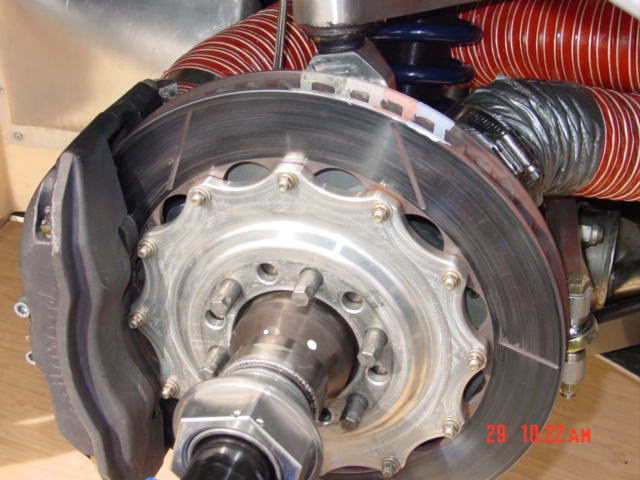
__________________
Morris
Last edited by Morris; 06-08-2022 at 03:35 PM..
|

06-08-2022, 03:45 PM
|
|
CC Member

|
|
|
Join Date: Dec 2003
Location: Gurnee,
IL
Cobra Make, Engine: Kirkham #259
Posts: 1,396
|
|

 Not Ranked
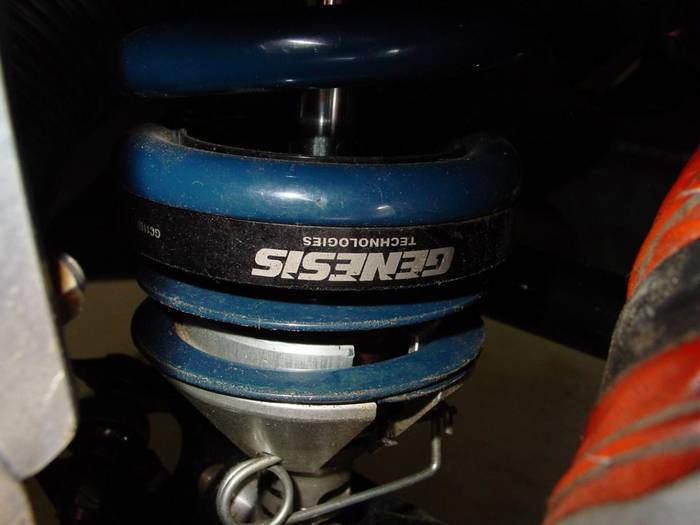
8. While the wheels are off, now is a good time to make any adjustments to the shocks, like Compression/Rebound/Pressure
a. Rebound/Droop is adjusted in the shock shaft and it is turned 1/4 turn for each sweep, a tip here is that more rebound will help with Turn-in going into a corner on the rear only. Transfer less weight to the front and allows turn-in much better.
b. Bump/ Compression is adjusted with the reservoir canister and it has 5 settings, we always start in the middle number #3 and make adjustments as necessary, like going to the number #2 setting and makes the front end softer for better stick in the corner.
c. Pressure is the resistance to the fluid in the canister and it is Nitrogen. You need a Schrader valve gauge to test this under pressure, most of the time it is in the 300# Range, but we have gone as low as 50# on KMP259 to get better turn in and better stick in the corner.
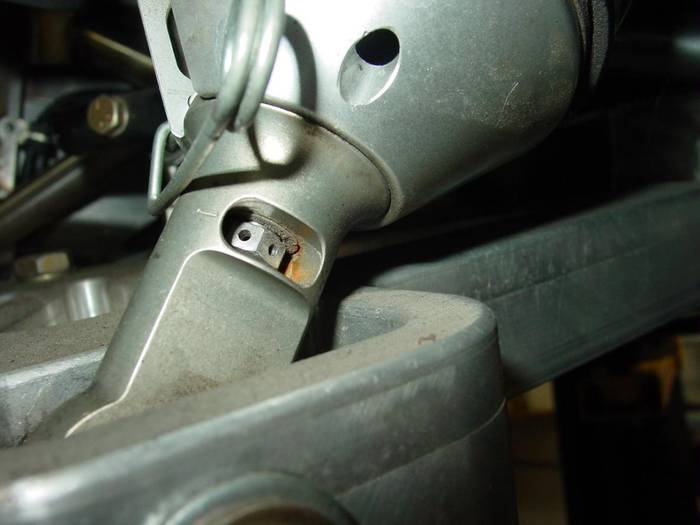
__________________
Morris
|

06-08-2022, 03:50 PM
|
|
CC Member

|
|
|
Join Date: Dec 2003
Location: Gurnee,
IL
Cobra Make, Engine: Kirkham #259
Posts: 1,396
|
|

 Not Ranked
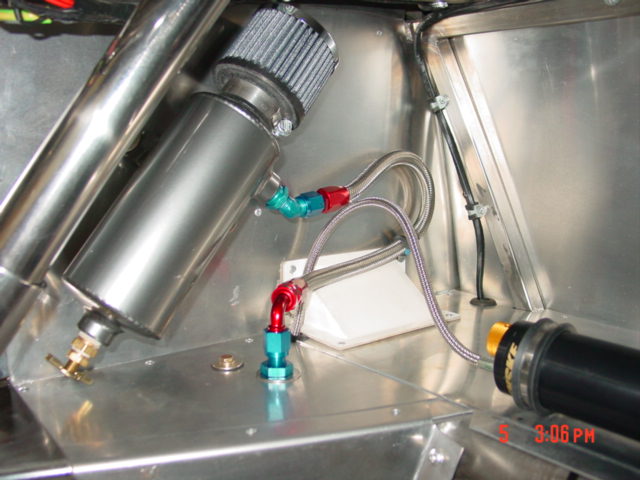
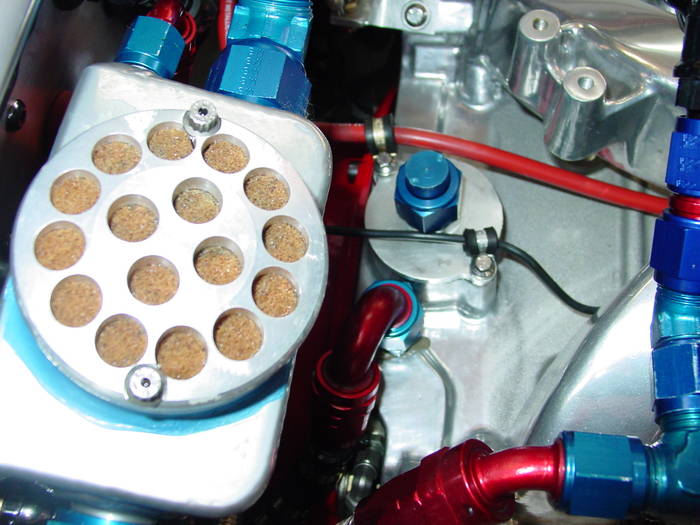
9. Now check all of the catch cans to see if any part of the drive train is getting over worked. It took us a while to get the Venting on KMP 259 worked out, but in the end we were able to run without any fluids puking out into the catch cans and that includes the rear end as well
10. Get Ready to go back out again
a. Brakes are checked adjusted and painted
b. Adjustments are made to the chassis
c. Problems are fixed and fluids are checked
d. Gas is added based on the amount used in the 1st session
e. Oil & Water are checked along with Catch Cans
f. Tires are filled with Nitrogen again and set at cold temp settings.

__________________
Morris
|

06-08-2022, 04:03 PM
|
|
CC Member

|
|
|
Join Date: Dec 2003
Location: Gurnee,
IL
Cobra Make, Engine: Kirkham #259
Posts: 1,396
|
|

 Not Ranked
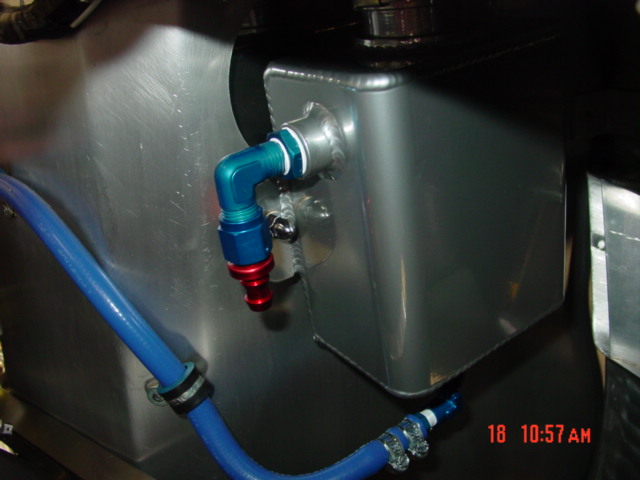
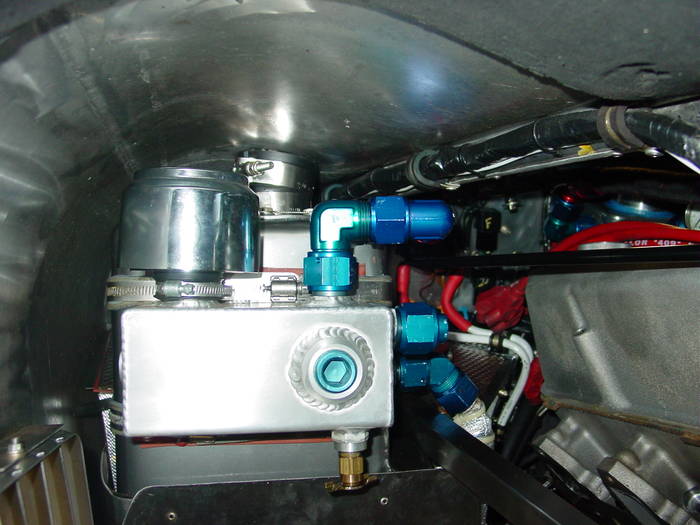
Catch can for the water and Dry Sump Tank.
__________________
Morris
Last edited by Morris; 06-08-2022 at 04:08 PM..
|

06-08-2022, 04:05 PM
|
|
CC Member

|
|
|
Join Date: Dec 2003
Location: Gurnee,
IL
Cobra Make, Engine: Kirkham #259
Posts: 1,396
|
|

 Not Ranked
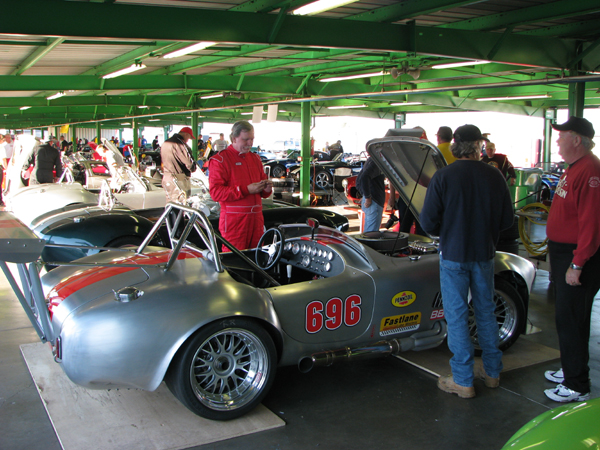
11. Pit Settings
a. Tires set at cold pressure, the end results is to have the tires come off the track at 30#lbs. So we would set the tires all at 25#lbs. cold and see what they are when they come in, again, 30#lbs is optimal, when they come in we will read the pressure and then lower the cold pressure going out for the next session.
b. Be sure to have the Tire Pyrometer, and the Tire Pressure gauge.
c. Pad to record the tire data and get the temps and pressures of the car when it comes in.
__________________
Morris
|
 Posting Rules
|
You may not post new threads
You may not post replies
You may not post attachments
You may not edit your posts
HTML code is Off
|
|
|
All times are GMT -7. The time now is 09:00 PM.
Links monetized by VigLink
|


