 
 Main Menu
|
|
Nevada Classics
|
|
Advertise at CC
|
| S |
M |
T |
W |
T |
F |
S |
| |
|
1 |
2 |
3 |
4 |
5 |
| 6 |
7 |
8 |
9 |
10 |
11 |
12 |
| 13 |
14 |
15 |
16 |
17 |
18 |
19 |
| 20 |
21 |
22 |
23 |
24 |
25 |
26 |
| 27 |
28 |
29 |
30 |
|
|
|
|
|
CC Advertisers
|
|
 3Likes 3Likes
-
 3
Post By kevins2
3
Post By kevins2

12-23-2024, 03:42 PM
|
|
CC Member

|
|
|
Join Date: Nov 2024
Cobra Make, Engine:
Posts: 7
|
|

 Not Ranked
 Side Pipe Cutouts
Hi there!
I recently bought an A&C kit, and I'm waiting for the rolling chassis to be built and delivered. As I wait, I have been working on some research and planning to help get ahead of things. One thing that I recently noticed is that the body does not come with the fiberglass side cut outs for the side pipes, unlike some other kits. Also, the manual that I have does not address making those cut. I was wondering how people have been successfully making those cuts. Has anyone made a template that can be drawn over the spots as a cutting reference....once its determined where the pipes will exit? Also, how does it effect the gelcoat along the edges? I imagine i'll have to sand the edges, but wondering if it will leave a dull looking coat. Also, did you put the body on, then look where the bottom of the headers lined up, then marked those spots for exiting? My last question is how does the fiberglass hold up with the headers right there? Any heat issues?
Anyway, simply put, I am looking for guidance on how to make a successful cut without damaging things nor making incorrect cuts that i can't take back.
Thanks, I'm pretty excited about getting this. I was looking at some other models, but i like the gelcoat option and the split delivery that they offer.
Thanks!

|
12-24-2024, 05:53 AM
|
|
CC Member
|
|
|
Join Date: Nov 2003
Location: New Britain,
CT
Cobra Make, Engine: Size 10 Feet
Posts: 3,027
|
|
Not Ranked
No magic here. Start with a small hole and enlarge. Get a straight piece of tubing that fits into the primaries. Once you enlarge the hole so that you can put the straight tubing into one of the primary pipes, you can use that location to approximate the other pipe holes. Leave a little extra clearance for when the engine torques over.
|
12-26-2024, 04:35 PM
|
|
CC Member
|
|
|
Join Date: Nov 2024
Cobra Make, Engine:
Posts: 7
|
|
Not Ranked
Quote:
Originally Posted by strictlypersonl

No magic here. Start with a small hole and enlarge. Get a straight piece of tubing that fits into the primaries. Once you enlarge the hole so that you can put the straight tubing into one of the primary pipes, you can use that location to approximate the other pipe holes. Leave a little extra clearance for when the engine torques over.
|
This is great. Thank You! |
12-27-2024, 09:15 AM
|
|
CC Member
|
|
|
Join Date: Feb 2003
Location: Plymouth,
MA
Cobra Make, Engine: MidStates, 351C, 4spd, 9"
Posts: 402
|
|
Not Ranked
Depends if you are going through the body, or just under the body edge like most replicas do. Dry fit your build first.. body to chassis, engine/sidepipes.. then determine where you want the pipes to pass through and build your headers to there. I'm sure we can provide a template for both styles of pass trough, but most manufacturers bodies, chassis', side pipes and locations tend to differ enough to create a one-size does not fit all. I may recommend getting a few templates.. marking them, and go with the one that best fits your parts or taste.
__________________
"It's not about getting from point A to point B. It is the point"
-J. James
M. Krause
1.508.944.3368
|
12-27-2024, 02:39 PM
|
|
CC Member
|
|
|
Join Date: Dec 2011
Location: West Chester,
PA
Cobra Make, Engine: ERA #795 427 S/C completed Jan. '14 - '68 FE 427 side oiler
Posts: 1,054
|
|
Not Ranked
__________________
"Anyone who drives faster than you is a maniac and anyone who drives slower than you is an idiot" - George Carlin
|
12-29-2024, 05:10 PM
|
 |
Senior Club Cobra Member
|
|
|
Join Date: Mar 2005
Location: Manchester,
NH
Cobra Make, Engine: AK1085 (302 Street), HTM111 (427 Comp), CSX2375R (289 Comp) and COB5999 (427 S/C)
Posts: 19,100
|
|
Not Ranked
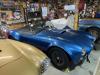
Here are mine
HTM111 is tight but works
|
01-07-2025, 11:16 AM
|
|
CC Member
|
|
|
Join Date: Nov 2007
Location: Richardson,
Tx
Cobra Make, Engine: Antique & Collectibles, Forte 427 SB, TKO 600
Posts: 201
|
|
Not Ranked
Quote:
Originally Posted by strictlypersonl
No magic here. Start with a small hole and enlarge. Get a straight piece of tubing that fits into the primaries. Once you enlarge the hole so that you can put the straight tubing into one of the primary pipes, you can use that location to approximate the other pipe holes. Leave a little extra clearance for when the engine torques over.
|
This is what I did.
I started with a small kind of like half circle cut and slowly went larger.
I used a small pneumatic airsaw. (Pick `em up at Harbor Freight)
The gelcoat on the A&C bodies is pretty thick and durable.
Cut a little, bolt on the sidepipes.
Remove sidepipes. Cut a little.
Lather rinse repeat.
Once you`re satisfied with your cut and pipe to body gap, Harbor Freight also sells sanding drums that you put on your cordless drill. (doesn`t spin as fast as a dremel and allows you to fine sand any awkward cuts.
I think I left a half-inch gap between the pipes and the top of the cutout in the body. (allowing room for the motor to torque on revs)
Also, anytime your cutting fiberglass, wear a dust mask.
Oh, one last thing, if your cuts aren`t as exactly super precise to the tenth of an angle, don`t sweat it.
That cutout is the lowest point on your car. Plus with the pipes exiting the body, nobody will notice.
Last edited by H-Rod; 01-07-2025 at 11:19 AM..
|
01-14-2025, 09:01 PM
|
|
CC Member
|
|
|
Join Date: Nov 2024
Cobra Make, Engine:
Posts: 7
|
|
Not Ranked
Thank you for the replies and pics. Really appreciate it. Very helpful.
|
 Posting Rules
|
You may not post new threads
You may not post replies
You may not post attachments
You may not edit your posts
HTML code is Off
|
|
|
All times are GMT -7. The time now is 12:08 PM.
Links monetized by VigLink
|


 Linear Mode


