Welcome to Club Cobra! The World's largest
non biased Shelby Cobra related site!
- » Representation from nearly all
Cobra/Daytona/GT40 manufacturers
- » Help from all over the world for your
questions
- » Build logs for you and all members
- » Blogs
- » Image Gallery
- » Many thousands of members and nearly 1
million posts!
YES! I want to register an account for free right now!
p.s.: For registered members this ad will NOT show
 
 Main Menu
|
 Nevada Classics
|
 Advertise at CC
|
 January 2026
|
| S |
M |
T |
W |
T |
F |
S |
| |
|
|
|
1 |
2 |
3 |
| 4 |
5 |
6 |
7 |
8 |
9 |
10 |
| 11 |
12 |
13 |
14 |
15 |
16 |
17 |
| 18 |
19 |
20 |
21 |
22 |
23 |
24 |
| 25 |
26 |
27 |
28 |
29 |
30 |
31 |
|
 CC Advertisers
|
|
 5Likes 5Likes

05-09-2012, 06:46 PM
|
 |
CC Member

|
|
|
Join Date: Jan 2001
Location: Sunbury,
VIC
Cobra Make, Engine: Rat Rod Racer, LS1 & T56
Posts: 5,391
|
|

 Not Ranked

Well after a fair bit of work and messing arround I've got my tube bender producing some respectable results in 2" tube.
Here's my first couple of attempts with the new setup. The hoop on the right is the first test bend I did. The one on the left is the final product.
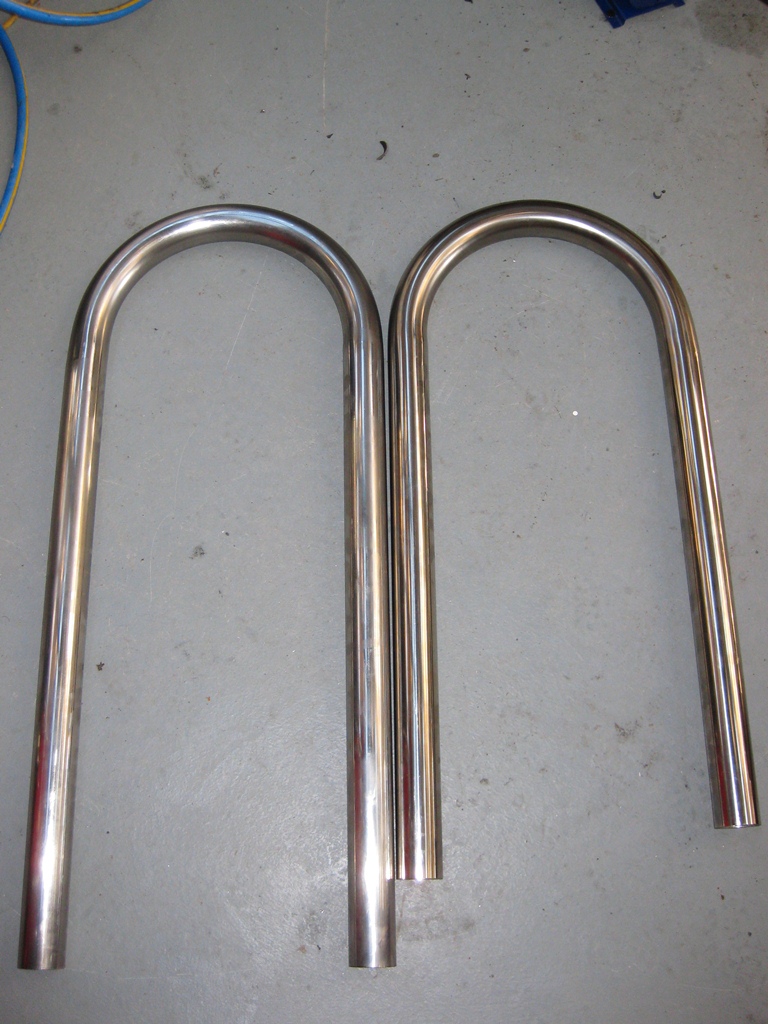
The bends are turning out nice with very little distortion and only a slight crimp at the start of the bend. These are 2" polished 304 stainless with a 3mm wall. These are fresh pout of the bender and covered in greasy finger prints but it does come up nice with a good polish.
The only issue I have is getting the bend radius tight enough. The die is a 165mm Center Line Radius. I theory It should make a hoop that's 330mm between centers but the spring back in the material means the hoop ends up at 345mm between centers. I made some mods to the die which produces a nicer bend but I can't seem to get it any tighter than that.
I put this tube bender setup together for my own enjoyment as I like making stuff myself. However to try and recover some of the cost of the dies and equipment I can offer roll hoops at a competitive price.
How does a bare 2" x 3mm wall 304 stainless hoop at 345mm centers for $180 sound? or 2 for $350.
Drop me a PM if you are interested.
Cheers
Michael
__________________
Mike Murphy
Melbourne Australia
|
-
Advertising


05-10-2012, 03:09 AM
|
 |
CC Member

|
|
|
Join Date: Jul 2008
Cobra Make, Engine: BBF 545 Stroker Alloy Heads Roller Cam Aluminium Flywheel Twin plate Clutch TKO600 9inch Independent Rear 335x17 Rear 315x17 Front 1140kg
Posts: 292
|
|

 Not Ranked
Nigel just pay the $300 bucks supply your pipe get it chromed easy....
|

05-10-2012, 03:48 AM
|
 |
CC Member

|
|
|
Join Date: Nov 2009
Location: Cheltenham,
Vic
Cobra Make, Engine: Classic Revival CR3516, LS3, Aussie Mike'd T-56, 3.70 LSD, AP brakes, Penske shocks
Posts: 1,616
|
|

 Not Ranked
Mike, considering what SOME charge for hoops, your prices sound more than fair. Nice work.
__________________
BUILD-BLOG: http://cobrablog.holnet.net
Ben in AU
|

05-17-2012, 09:21 PM
|
 |
CC Member

|
|
|
Join Date: Jan 2001
Location: Sunbury,
VIC
Cobra Make, Engine: Rat Rod Racer, LS1 & T56
Posts: 5,391
|
|

 Not Ranked
Got the new roll bars in! I've decided to delete the seat belt mount frame and run the roll bars right down to the chassis cross member. I reckon this will be a much stronger setup than having the inside leg mount to the seat belt frame.
I'm still working on the heights of the bars to get them looking right. I've also got to make the back stays.
I do prefer the single hoop behind the driver style but some times you've got to think about passenger safety over style concerns. Especially since it'll be my wife or daughter in there.
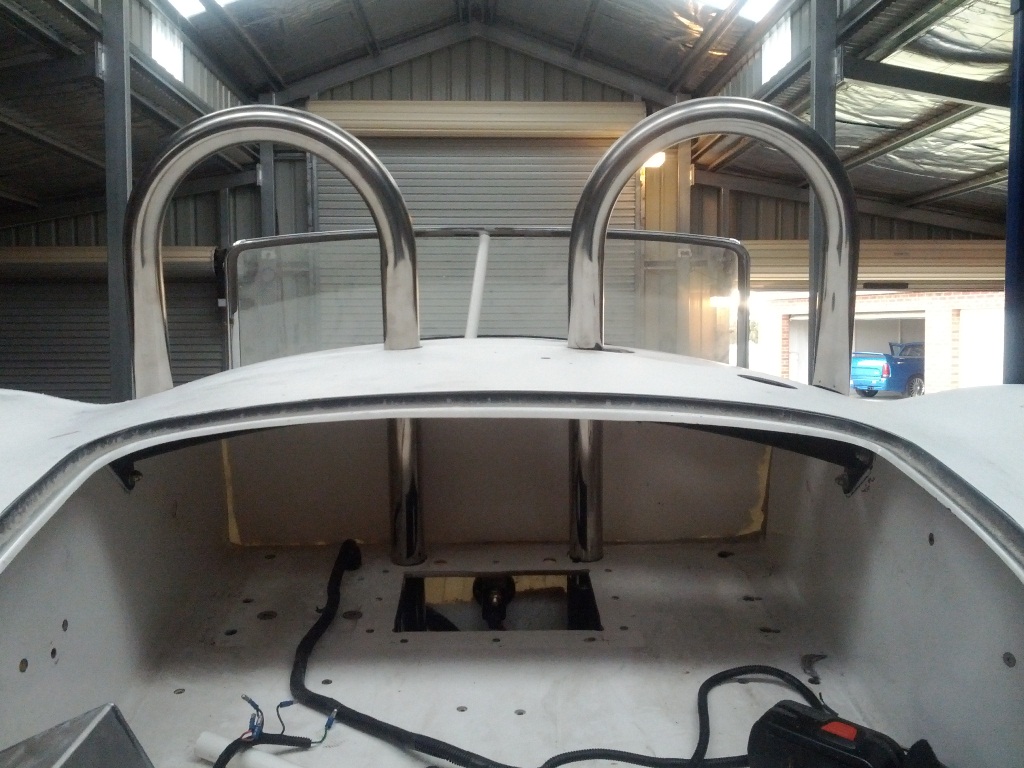
Here's one of the new chassis mounts. I've still got to tack it in place. I'll do the final welding on it once I pull the body again to paint under the floor.
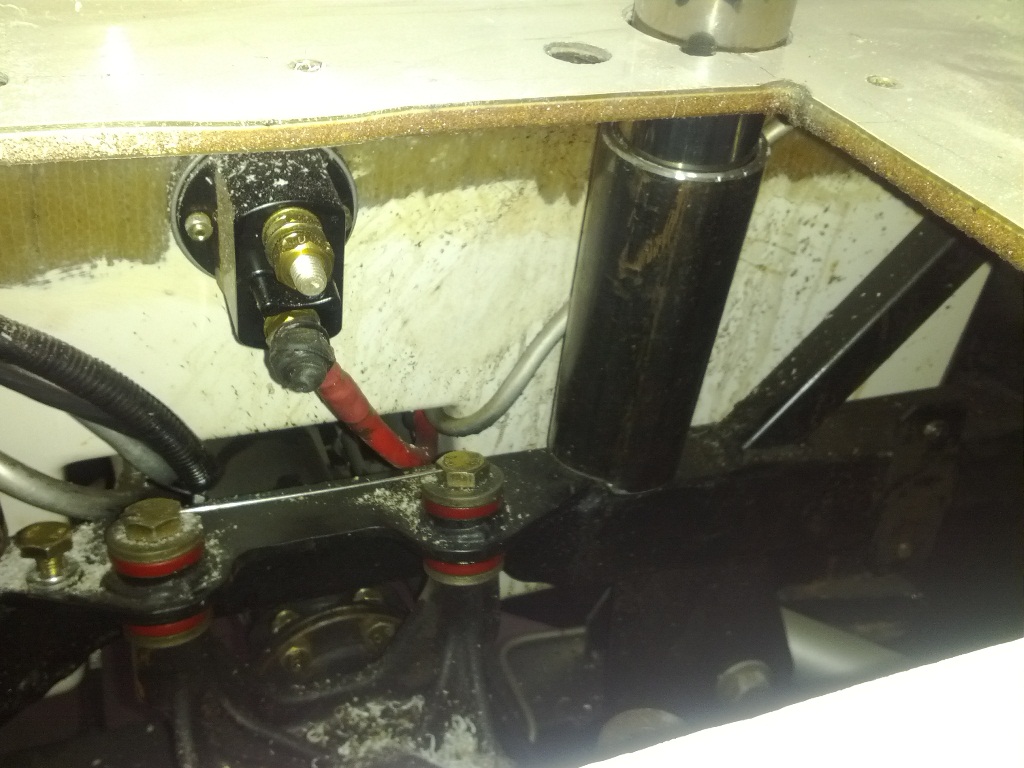
The seat belts will be on a frame bolted to the roll bars inside the boot. I figure it'll be stronger than the sheet metal frame that they were originally attached to to.
Cheers
__________________
Mike Murphy
Melbourne Australia
|

12-16-2012, 05:45 PM
|
 |
CC Member

|
|
|
Join Date: Jan 2001
Location: Sunbury,
VIC
Cobra Make, Engine: Rat Rod Racer, LS1 & T56
Posts: 5,391
|
|

 Not Ranked
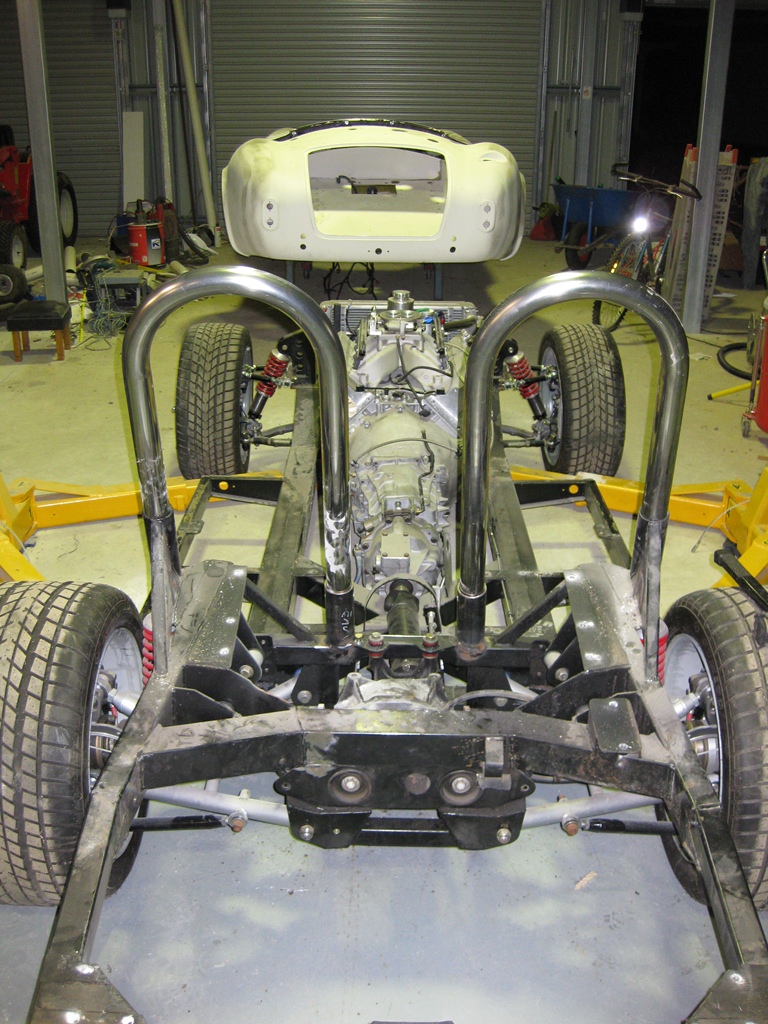
I pulled the body on the weekend. I've got a bunch of fiberglass work to do on the underside and I want to paint the engine bay.
While I've got the body off it's a good oportunity to finish off the frame mods for the new roll bar setup. I've run the roll bars down to the chassis rather than the seat belt frame in the boot. I reckon this is a lot more secure way to mount them.
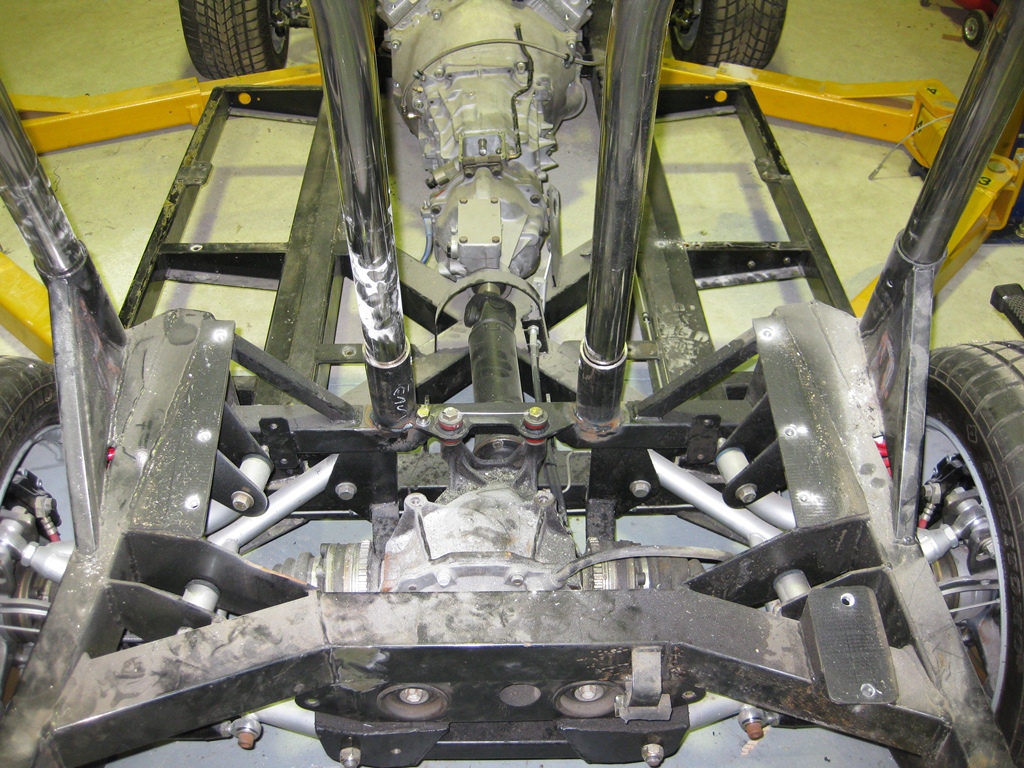
Cheers
__________________
Mike Murphy
Melbourne Australia
Last edited by Aussie Mike; 12-16-2012 at 07:14 PM..
|

12-16-2012, 07:05 PM
|
 |
CC Member

|
|
|
Join Date: Apr 2008
Location: Melbourne,
VIC
Cobra Make, Engine: Classic Revival CR 3505, LS1, T56 6 Speed, VE 3.45 LSD Rear, 6 Spot AP Fronts, 4 Spot Wilwood Rears
Posts: 1,121
|
|

 Not Ranked
Hi Mike, Looks great. Do you think you'll do a third leg on the bars? On the later chassis the third leg mounts in the boot and bolts through to a chassis mount.
Cheers Gregg
|

12-16-2012, 07:11 PM
|
 |
CC Member

|
|
|
Join Date: Jan 2001
Location: Sunbury,
VIC
Cobra Make, Engine: Rat Rod Racer, LS1 & T56
Posts: 5,391
|
|

 Not Ranked
Yep, I'll be adding a 3rd leg for both roll bars. I welded in a chassis mount for the drivers side with the old roll bar setup. My generation chassis had no provision for a 3rd leg mount.
I'll keep you posted on the progress.
Cheers
__________________
Mike Murphy
Melbourne Australia
|

03-17-2013, 06:36 AM
|
 |
CC Member

|
|
|
Join Date: Jan 2001
Location: Sunbury,
VIC
Cobra Make, Engine: Rat Rod Racer, LS1 & T56
Posts: 5,391
|
|

 Not Ranked

Hi All,
Started work in on the roll bars again. I worked out a design for the 3rd leg and have nearly got the passengers side finished.

There's no provision for a 3rd leg mount on the old square tube chassis so you have to make your own up. I had made one for the drivers side wit the old roll bar but was never completely happy with it. I'm much happier with the new setup.
I machined up a threaded boss and welded it into a short section of tube cut at the right angle to fit snug up against the underside of the boot floor. This is then welded onto the rear cross member behind the diff. There's a hole drilled into the cross member for the bolt to run down into.

One of the things I didn't like about my old mount was that it crushed the fiberglas between the mount and the flange on the roll bar. With this setup I machined an aluminium bush that goes between the roll bar flange and the mount. This is stepped to go through the fiberglass and sandwich in place but not crush it. The boot floor has a foam core mat between 2 laminated layers and is about 8-9mm thick.
My TIG has been giving me grief lately I think the torch is stuffed because it just won't throw a consistent arc. It wanders and is hard to control so the welds are a bit crappy. It doesn't matter though since they will be linished back and polished out.
Here's the slip joint at the top. There's a stainless steel slug welded into the down tube and this slides into a socket on the roll bar. It's hald in place with 2x 10mm stainless countersunk cap screws. Again crappy welds will be polished out.

Cheers
__________________
Mike Murphy
Melbourne Australia
|

03-17-2013, 07:42 PM
|
|
CC Member

|
|
|
Join Date: Dec 2002
Location: Melbourne ,Victoria- Australia,
VIC
Cobra Make, Engine: Python
Posts: 271
|
|

 Not Ranked
Special work there Michael, as per usual.
Will we see you at Winton this weekend for Shelbyfest?.If so, I will look forward to a catch up. New motor is not ready for mine yet,but is close.
Cheers
Chris L
|

03-17-2013, 08:50 PM
|
 |
CC Member

|
|
|
Join Date: Jan 2001
Location: Sunbury,
VIC
Cobra Make, Engine: Rat Rod Racer, LS1 & T56
Posts: 5,391
|
|

 Not Ranked
Hi Chris, I'll be there on the Saturday. It'll be good to catch up.
Cheers
__________________
Mike Murphy
Melbourne Australia
|

03-19-2013, 05:52 AM
|
 |
CC Member

|
|
|
Join Date: Jan 2001
Location: Sunbury,
VIC
Cobra Make, Engine: Rat Rod Racer, LS1 & T56
Posts: 5,391
|
|

 Not Ranked
A bit of work with the linisher and a flap disc and its looking much better

I trimmed a lot of the excess material from the mount and smoothed it out a bit.

Should all look nice when it's polished up.
I think I found the issue with my TIG. The argon bottle was almost empty and I just wasn't getting enough flow. I think the electrode wasn't good either. A new bottle of argon and a freshly ground electrode and its working nice again.
Cheers
__________________
Mike Murphy
Melbourne Australia
|

03-19-2013, 01:40 PM
|
 |
CC Member

|
|
|
Join Date: Mar 2010
Location: Gold Coast,
QLD
Cobra Make, Engine: Arntz, TKO600, 460
Posts: 818
|
|

 Not Ranked
Geeze Mike, your work is always among the best topics that I read and see with the pics that you include.
Your ideas and approach are well thought out and as you said 'over engineered'......... I wouldn't have it any other way.
Thanks for sharing.
|

03-19-2013, 06:27 PM
|
 |
CC Member

|
|
|
Join Date: Jan 2001
Location: Sunbury,
VIC
Cobra Make, Engine: Rat Rod Racer, LS1 & T56
Posts: 5,391
|
|

 Not Ranked
Thanks Leroy. As usual, I get a lot of enjoyment out of making stuff.
Cheers
__________________
Mike Murphy
Melbourne Australia
|

03-20-2013, 06:15 PM
|
 |
CC Member

|
|
|
Join Date: Jan 2001
Location: Sunbury,
VIC
Cobra Make, Engine: Rat Rod Racer, LS1 & T56
Posts: 5,391
|
|

 Not Ranked
I did a bit more tweeking on the tube bender last night and it's producing some nice bends now.
I've had a request for roll hoops in mild steel. I just got onto my steel supplier and worked out the cost for materials.
I reckon I can do 2" x 3.2mm wall hoops in mild steel for $150 each. This is a 2" ERW tube.
I should have the an example to show in the next few days.
Cheers
__________________
Mike Murphy
Melbourne Australia
|

03-27-2013, 06:25 AM
|
 |
CC Member

|
|
|
Join Date: Jan 2001
Location: Sunbury,
VIC
Cobra Make, Engine: Rat Rod Racer, LS1 & T56
Posts: 5,391
|
|

 Not Ranked
Bent up a couple of hoops in 2"x3.2mm wall mild steel. They turned out very nice with even less distortion than the stainless ones. I reckon there is less spring in the steel so the bender doesn't have to push it so hard around the die.
Very happy with the results.

Cheers
__________________
Mike Murphy
Melbourne Australia
|

04-15-2013, 10:23 PM
|
 |
CC Member

|
|
|
Join Date: Jan 2001
Location: Sunbury,
VIC
Cobra Make, Engine: Rat Rod Racer, LS1 & T56
Posts: 5,391
|
|

 Not Ranked

Just a small update showing how the connection for the back stay is made.
I machine a slug from bar stock that is pressed into the end of the tube. The socket piece is also machined inside to make it concentric and smooth. The slug is a neat slip fit. I also drilled out the center of the slug to reduce a bit of weight.


With the whole thing clamped down in a section of angle iron I can make sure it's all in line ready for welding. The slug and the end of the pipe are machined/ground to give a nice V groove for the weld.
This back stay is in mild steel so not as shiney but much easier to work with than stainless.

Tig weld the slug in place. TIG gives good penitration without adding a lot of extra filler material. The weld needs to be good since It'll be linished smooth on the outside.

After linishing the weld back slip the socket section on and clamp it in the mill vice. Drill, tap and countersink for a 10mm retaining screw on both sides.

To make the retaining screws a bit nicer looking I put a countersunk head cap screw in the lathe and machine the shoulders of it off to more of a dome shape.

Set screws in place. The countersunk heads keep the joint snugged closed.

Cheers
__________________
Mike Murphy
Melbourne Australia
|

04-15-2013, 11:42 PM
|
 |
CC Member

|
|
|
Join Date: Mar 2010
Location: Gold Coast,
QLD
Cobra Make, Engine: Arntz, TKO600, 460
Posts: 818
|
|

 Not Ranked
This....never.....gets.....old.
Great work.
|

04-16-2013, 02:02 AM
|
 |
CC Member

|
|
|
Join Date: Jan 2001
Location: Sunbury,
VIC
Cobra Make, Engine: Rat Rod Racer, LS1 & T56
Posts: 5,391
|
|

 Not Ranked
I think I mainly do these kind of updates to keep myself motivated. I also reckon it's important to share ideas. I've got a lot out of seeing others ideas on the net on various forums. If someone else gets something useful from one of these posts then that makes me happy.
I met a nice bloke at the lancfield swap meet on the weekend wearing a Cobra shirt. We got chatting and the forum came up and he recognized me from the posts. Small world. He's running an LS powered RCM Cobra. Hopefully he'll register and say hello.
Cheers
__________________
Mike Murphy
Melbourne Australia
|

05-13-2013, 09:45 PM
|
 |
CC Member

|
|
|
Join Date: Jan 2001
Location: Sunbury,
VIC
Cobra Make, Engine: Rat Rod Racer, LS1 & T56
Posts: 5,391
|
|

 Not Ranked

Just a small update. One of those jobs that is a pain in the arse and doesn't look like you've done much.
One of the things that had been iritating me about the roll bars was the original mounts on the chassis. They were way out of square! With the roll bars installed they both leaned inwards. The difference from top to bottom was about an inch.
Every time I looked at them it was very obvious to me. I thought I could live with it that way but the other week I said bugger it and grabbed the angle grinder and the plasma torch.
I cut the original mounts off and straightened them up and rewelded them. Now they are square within a couple of mm.
Unfortunately in doing this I also had to redo my new inner mounts as they were square to the original chassis mounts.

It was good parctice for doing verticle welds which can be a pain to do as your weld puddle wants to fall down.

So roll bars are all straight now and just about finished. I've started stripping the chassis down to get it sand blasted so I can repaint it. With all the welds and mods the original paint is a mess.
Cheers
__________________
Mike Murphy
Melbourne Australia
|

05-13-2013, 11:46 PM
|
|
CC Member

|
|
|
Join Date: Dec 2002
Location: Melbourne ,Victoria- Australia,
VIC
Cobra Make, Engine: Python
Posts: 271
|
|

 Not Ranked
Are we to assume Michael that this (stripping & sandblasting) would signal the end of the chassis mods ?. For those of us who know you and followed your build over the years this would seem unlikely. Perhaps you are finally at peace with the car Chassis ?. However I'm tipping you will be 'bolt upright' from your slumber one night and tearing her down again the next day !!.
As always, its good reading what your up too.
Take it easy, the new fitness campaign may speed up shed activity and the whiteboard list will grow.....not shrink.
Cheers
Chris L
|
 Posting Rules
|
You may not post new threads
You may not post replies
You may not post attachments
You may not edit your posts
HTML code is Off
|
|
|
All times are GMT -7. The time now is 10:55 PM.
|
|




 5Likes


 Linear Mode


