Welcome to Club Cobra! The World's largest
non biased Shelby Cobra related site!
- » Representation from nearly all
Cobra/Daytona/GT40 manufacturers
- » Help from all over the world for your
questions
- » Build logs for you and all members
- » Blogs
- » Image Gallery
- » Many thousands of members and nearly 1
million posts!
YES! I want to register an account for free right now!
p.s.: For registered members this ad will NOT show
 
 Main Menu
|
 Nevada Classics
|
 Advertise at CC
|
 January 2025
|
| S |
M |
T |
W |
T |
F |
S |
| |
|
|
1 |
2 |
3 |
4 |
| 5 |
6 |
7 |
8 |
9 |
10 |
11 |
| 12 |
13 |
14 |
15 |
16 |
17 |
18 |
| 19 |
20 |
21 |
22 |
23 |
24 |
25 |
| 26 |
27 |
28 |
29 |
30 |
31 |
|
|
 CC Advertisers
|
|
 100Likes 100Likes

01-13-2015, 12:32 AM
|
 |
CC Member

|
|
|
Join Date: Jul 2011
Location: Sydney,
NSW
Cobra Make, Engine: Puckett 250 GTO - LS1
Posts: 567
|
|

 Not Ranked
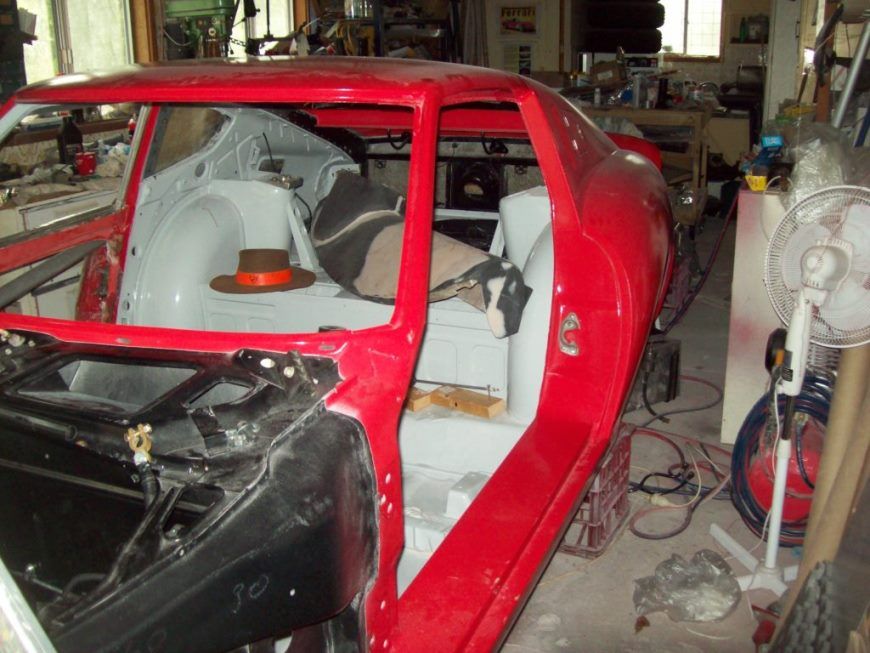
Reg Mombassa charge $000s for images like that.
And what's so special about that coupe, every second shed in Sydney has something similar.
 |
-
Advertising


01-28-2015, 06:01 PM
|
|
CC Member

|
|
|
Join Date: Dec 2014
Posts: 365
|
|

 Not Ranked
No much visible progress over the past few weeks... AC evap mounted, installing the power steering, refrig and heater hoses tomorrow. Fuel lines finished, brakes are holding fluid.. !
The need for electricity is causing me some grief as I am useless with a soldering iorn... but I guess its another skill (or lack there of) that I will need to acquire.
Fiddling with dash sheetmetal at the mo and gauge layout along with the AC outlets, pic of the Mk1 dash attached.. am onto Mk3..
Cheers
Chris
|

02-05-2015, 03:29 AM
|
|
CC Member

|
|
|
Join Date: Dec 2014
Posts: 365
|
|

 Not Ranked
Still fitting off components..
Heater done, power steering plumbed in, ordered more radiator hose after being advised that an LS3 runs from the inlet of the water pump to the top of the radiator (highest point). Trying to borrow a hose clamp tool for the air con fittings.. most of the hoses are cut and fitted and the firewall fittings have been installed (AN type all round).
Made a much more decent clamp for the receiver drier (2.5mm plate steel), wrapped it in a rubber PVC pipe joiner sleeve and fixed the lot with SS worm drive clamps.
Didn't make my goal of getting the engine started in Jan.. Feb may be a possibility.. electrics are nowhere at the moment.
One day at a time.. 
Cheers
Chris |

02-06-2015, 04:41 AM
|
|
CC Member

|
|
|
Join Date: Dec 2014
Posts: 365
|
|

 Not Ranked
After discovering (in lieu of any indication in the build manual) that there was a tie plate for the radiator side panels, I reinforced and braced it with 3mm Al sheet.
Have joined it at the rear to the back to back angle I had installed earlier and added a centre support with a 6mm SS pin. Is not going anywhere.. !
|

02-23-2015, 03:47 AM
|
|
CC Member

|
|
|
Join Date: Dec 2014
Posts: 365
|
|

 Not Ranked
Getting more serious with the dash now the AC is mostly sorted.
Have ordered a few 5mm LED's to replace the ridiculously flimsy wires that hang out of the conventional bulbs on the AC slide control. Will use them for the dash warning lights as well after I make some bezels out of ABS plastic. Have a single DIN radio / GPS to fit under the cross brace and AC vents / controls over the top.
Settled on the treatment I am going to use for the LED tail lights I have as well.. is a Corvette / Ferrari style semi recessed bucket fitting.
Cheers
Chris
|

02-27-2015, 05:21 PM
|
|
CC Member

|
|
|
Join Date: Dec 2014
Posts: 365
|
|

 Not Ranked
First attempts and some glassed bits..  a hood for the instruments (with padding for the leading edge to be added) and a glovebox insert..  Had used foamboard for these, with the view of removing it, but ended up encasing them. Have some 3mm ply for any future bits..  |

05-25-2015, 04:10 AM
|
|
CC Member

|
|
|
Join Date: Dec 2014
Posts: 365
|
|

 Not Ranked
Well its been a number of months of effort, wrong parts, defective parts and replacement parts before I THINK I have finally got the modern chinese finger torture test, otherwise know as the clutch slave cylinder installed and working.
Have ended up with a GM LS3 dual mass flywheel, clutch and pressure plate and a low profile CSS as pictured. Am looking forward to confirmation its working from my other post on setting up a Hydraulic Clutch.
Best to all.. 
Cheers
Chris |

05-25-2015, 05:21 PM
|
 |
CC Member

|
|
|
Join Date: Feb 2002
Location: Alice Springs, central Australia,
NT
Cobra Make, Engine: Classic revival kit (CR3181), gen III engine, T56 6 speed box, AU XR8 lsd diff
Posts: 5,699
|
|

 Not Ranked
Keep at it Chris.
If it was easy, everyone would be doing it.
__________________

Cruising in 5th

---------------------------------------------
Never be afraid to do something new, Remember, Amateurs built the Ark: Professionals built the Titanic.
|

05-26-2015, 04:16 AM
|
|
CC Member

|
|
|
Join Date: Dec 2014
Posts: 365
|
|

 Not Ranked
thanks Boxhead... after three months of going backwards with the build its good to be reminded what we are actually trying to do is no lego project..  |

06-09-2015, 05:38 AM
|
|
CC Member

|
|
|
Join Date: Dec 2014
Posts: 365
|
|

 Not Ranked
After several months of clutch, bell housing, master cylinder and CSS preload issues I am picking up where I left off in Jan... (2015..!!).
Engine and gearbox back in, new gearbox mount fabricated, moving the holes 15mm forward to stop the lower half of the bracket hitting the back of the gearbox casing (cudos to the 'professional' I commissioned to set these things up correctly, this was the last thing he touched and the last one requiring rework to make it actually correct..!).
Fitted an e-stopp park brake controller this evening, welded a small bracket to the transmission tunnel with the cables due in the next day or so..  .
Need to figure out why I was modifying the AC duct a few months back..! then run the electrical looms and refit the dash panels.
Cheers
Chris |

09-17-2015, 05:53 AM
|
|
CC Member

|
|
|
Join Date: Dec 2014
Posts: 365
|
|

 Not Ranked
Had a decent day with sorting the electrical issues created by the overwhelming ignorance, incompetence and complete apathy of a northern Sydney Kobra builder.. not only was there a number of wiring faults, that he specifically introduced into a clean harness, the ancillaries were incorrect for the motor type, the tune provided was from a mafless 6L motor (L98), rather than an LS3 with a MAF as the factory runs, the majority of the fault codes were being generated because one of the plugs for the ECU was wired and then installed backwards.. !
Yes .. it is staggering.. well its staggering if you knew how everything he touched he did a half baked, inaccurate, incomplete and totally flawed job on everything he touched.
Fingers crossed this is the last in a fairly comprehensive list of stuff up he created.
Looking forward to getting the fuel pumps rewired to a higher ampere breaker tomorrow and see if it will hold fuel pressure and run.
Cheers
Chris
__________________
FFR Coupe 65
LS3 motor, TR6060 box with Falcon ABS, 17" Halibrand wheels, 3.55:1 Ford Racing IRS and Willwood brake upgrade
Last edited by SydneyChris; 09-18-2015 at 07:36 PM..
|

09-17-2015, 06:56 PM
|
 |
CC Member

|
|
|
Join Date: Jul 2011
Location: Sydney,
NSW
Cobra Make, Engine: Puckett 250 GTO - LS1
Posts: 567
|
|

 Not Ranked
Chris. That guy sure gets around, he's building a GTO in Southern Sydney.
|

09-18-2015, 07:35 PM
|
|
CC Member

|
|
|
Join Date: Dec 2014
Posts: 365
|
|

 Not Ranked
Im sure the guy in Southern Sydney takes accountability for his work Peter.. 
Hope you are having fun with yours now its driveable.. 
__________________
FFR Coupe 65
LS3 motor, TR6060 box with Falcon ABS, 17" Halibrand wheels, 3.55:1 Ford Racing IRS and Willwood brake upgrade
|

09-21-2015, 12:23 AM
|
|
CC Member

|
|
|
Join Date: Feb 2006
Cobra Make, Engine:
Posts: 2,752
|
|

 Not Ranked
Chris, I was talking to a fellow FFR Coupe owner up here who mentioned a guy in NSW building one where he is putting 2 AC units in his car? Could that be you? If so can you give some details please.
Matt
|

09-21-2015, 05:22 AM
|
|
CC Member

|
|
|
Join Date: Dec 2014
Posts: 365
|
|

 Not Ranked

hi Matt,
Im looking at it.. hadnt gone that way yet.
The second unit would be installed over the NS rear wheel.
After a few months of research, the measures I'm taking before that step are to fit:
- Double layer heat insulation, plus butyl from the footwells to the rear bumper, including the rear quarters.
- Glass reinforced roof, rear quarters and bonnet, with butyl then sound deadener layered on.
- An 80mm exhaust fan in the rear taking air from the top of the cargo area, triggered based on ambient cabin temp.
- Tinted side windows.. for light and heat..  Using 6mm glass if I can fit it.
- A speed triggered header / CAT cooling fan (SPAL 5.2") running below 35kph), mounted in the void behind the radiator ducting.
- Addition of a front air damn.. these last two measures intended to divert heat from the engine under so its flows under the (insulated body) of car.
My strategy is basically to treat all of the areas of heat adsorption from the sun and heat soak from the engine in the first instance for both NHV and temperature control.
If these measures dont prove feasible a second evaporator, running from a single engine mounted AC compressor, with lines running down the transmission tunnel, triggered when the fan is at medium cooling or above would be the next step.
Hope that helps.. 
Chris
__________________
FFR Coupe 65
LS3 motor, TR6060 box with Falcon ABS, 17" Halibrand wheels, 3.55:1 Ford Racing IRS and Willwood brake upgrade
|

09-21-2015, 05:32 AM
|
 |
CC Member

|
|
|
Join Date: Mar 2005
Location: Perth,
wa
Cobra Make, Engine: Pace Alumina 427 #69
Posts: 1,615
|
|

 Not Ranked
When I built my FFR coupe I fitted the supplied AC kit and that's all. I never noticed that the interior was overly hot. I miss my Coupe. a guy in QLD bought it, Greg I think his name was ,nice Guy.
|

09-22-2015, 05:13 AM
|
|
CC Member

|
|
|
Join Date: Dec 2014
Posts: 365
|
|

 Not Ranked
Good to know..  thanks.. 
The guys in the US complain about the heat... havent seen many fit insulation on the firewall or the floor.
Cheers
Chris
__________________
FFR Coupe 65
LS3 motor, TR6060 box with Falcon ABS, 17" Halibrand wheels, 3.55:1 Ford Racing IRS and Willwood brake upgrade
|

10-12-2015, 03:01 PM
|
|
CC Member

|
|
|
Join Date: Dec 2014
Posts: 365
|
|

 Not Ranked

After a couple of weeks the car is now running. One minor oil lead and a split radiator hose later and we seem to be holding most of the various fluids..  .
Was pleased to test the cooling system and see that the 16" fan is drawing over the entire radiator surface after fitting a cowling earlier in the build. Its only idling in the shop at the moment, but is holding temp easily..  . Have also installed a 5" SPAL fan to blow air over the headers up to 35kph or so.. Is a better than expected result there also.
I have a tuning / set up issue that Im not sure how to resolve.
Had a double row timing chain fitted (Rollmaster CS1195) when I did the cam and valves, but now have the issue that the cam sensor is not picking up the correct number of pulses (is throwing error codes and refusing to rev cleanly or return to idle). In monitoring the sensor output it appears to be generating one pulse per revolution, not the four pulses that would be present with the standard cam sprocket. Further research indicates that the Rollmaster sprocket is apparently compatible with the Gen III not Gen IV series, hence the incorrect number of pulses..???
Look forward to any thoughts or advice on resolving this one beyond what appears to be the need to change the sprocket at this stage (and if this required to WHAT..???).
With thanks
Chris
Foot note.. For the record, a number of people asked how I could have made this apparently fundamental error... all I can say is I engaged a so called professional Classic Kobra builder in northern sydney, unfortunately... there was not ONE thing he did on the engine or chassis that was correct, didn't need to be removed and replaced or completely redone.
__________________
FFR Coupe 65
LS3 motor, TR6060 box with Falcon ABS, 17" Halibrand wheels, 3.55:1 Ford Racing IRS and Willwood brake upgrade
Last edited by SydneyChris; 10-14-2015 at 02:48 AM..
|

10-14-2015, 11:50 PM
|
|
CC Member

|
|
|
Join Date: Dec 2014
Posts: 365
|
|

 Not Ranked
Spoke with Ian Denner of Classic Revival.. he's now retired and takes NO responsibility for any of his previous work, including the endless stream of stuff ups he's responsible for on my build alone.
To say his attitude has changed in any measurable way would be an overstatement in any case.
For those who may be interested in the technical solution to the problem. A Rollmaster CS1185 - 2 pulse per revolution cam sprocket was apparently fitted, which suits the Gen III motors in 6L and 5.7L capacity.
The E85 ECU and LS3 requires the CS1195 - 4 pulse per revolution cam sprocket. I've had one sighted at the supplier and it's apparently compatible. Will find out soon enough when it arrives.
__________________
FFR Coupe 65
LS3 motor, TR6060 box with Falcon ABS, 17" Halibrand wheels, 3.55:1 Ford Racing IRS and Willwood brake upgrade
|

10-15-2015, 12:38 AM
|
 |
CC Member

|
|
|
Join Date: Jan 2001
Location: Sunbury,
VIC
Cobra Make, Engine: Rat Rod Racer, LS1 & T56
Posts: 5,391
|
|

 Not Ranked

There have been a few changes in cam reluctor and crank wheel setups over the years between Gen 3 and Gen 4 motors. The locations of cam angle and crank angle sensors have changed in the blocks. The old LS1 has the cam and crank angle sensor located in the back of the block. The LS1 uses a specific cam with the reluctor trigger machined into a section next to the last journal. It means you need to order a specific cam but you can run any old timing chain setup you like. there was even a gear drive setup available for them.
LS2 relocated all the sensors to different spots. The cam angle sensor was moved to the cam cover and triggers off a reluctor on the cam gear. There were several different configurations of this too over the years with different numbers of poles.
Anyone working on one needs to do their research to be sure they have mixed and matched the right parts.
There's also different versions of crank reluctor wheels with different tooth counts. Important to keep in mind if you ever build a stroker conversion or get a replacement crank.
There's plenty of info available on all the different iterations and what you need to run over on the the LS1 forums like LS1tech. LS1Tech.com
Cheers
__________________
Mike Murphy
Melbourne Australia
Last edited by Aussie Mike; 10-15-2015 at 12:40 AM..
|
 Posting Rules
|
You may not post new threads
You may not post replies
You may not post attachments
You may not edit your posts
HTML code is Off
|
|
|
All times are GMT -7. The time now is 12:59 PM.
|
|


 100Likes


 Linear Mode


