Welcome to Club Cobra! The World's largest
non biased Shelby Cobra related site!
- » Representation from nearly all
Cobra/Daytona/GT40 manufacturers
- » Help from all over the world for your
questions
- » Build logs for you and all members
- » Blogs
- » Image Gallery
- » Many thousands of members and nearly 1
million posts!
YES! I want to register an account for free right now!
p.s.: For registered members this ad will NOT show
 
 Main Menu
|
 Nevada Classics
|
 Advertise at CC
|
 January 2025
|
| S |
M |
T |
W |
T |
F |
S |
| |
|
|
1 |
2 |
3 |
4 |
| 5 |
6 |
7 |
8 |
9 |
10 |
11 |
| 12 |
13 |
14 |
15 |
16 |
17 |
18 |
| 19 |
20 |
21 |
22 |
23 |
24 |
25 |
| 26 |
27 |
28 |
29 |
30 |
31 |
|
|
 CC Advertisers
|
|
 2Likes 2Likes

08-05-2007, 07:05 AM
|
|
CC Member

|
|
|
Join Date: May 2002
Location: Brisbane Australia,
QLD
Cobra Make, Engine: RMC under re-construction, GenIV with tremec 600, Jag 3.31 L/S diff
Posts: 3,318
|
|

 Not Ranked
Stephen, Good you sorted it out.
Frankly, I don't know how any-one could get the tie rods upside down as the steering arm is tapered to accept the ball joint.
As you now know the standard Jag ball joint mounts below the steering arm with the nut on the top.
There has been the odd one machined to mount the tie rod on the top ( or a heim joint) but that is usually done by some-one who know what they're doing, has checked all the geometry, and made that mod to correct severe bump steer.
EDIT: Now all ya gotta do is fine tune it.
Cheers
__________________
It's impossible to soar like an eagle when you're surrounded by turkeys.
Last edited by Rebel1; 08-05-2007 at 07:09 AM..
|
-
Advertising


08-05-2007, 07:14 AM
|
 |
CC Member

|
|
|
Join Date: Aug 2001
Location: Melbourne, Australia,
Vic
Cobra Make, Engine: G-Force Mk I, 5L Windsor, TKO 600, enhanced Jag / Koni suspension & LSD Diff.
Posts: 2,302
|
|

 Not Ranked
Les
Like I said before, the previous owners clearly didn't know what they were doing, and I've been silly to assume what I've seen assembled on this kit as the correct thing.
The top ball joints I pulled out had horrendous movement and clearly throw aways, yet the previous owners had just slapped it all together.
I'll be looking even more closely at the rear now, when the time comes!!
Ciao
__________________
slowy
|

08-05-2007, 07:37 AM
|
|
CC Member

|
|
|
Join Date: May 2002
Location: Brisbane Australia,
QLD
Cobra Make, Engine: RMC under re-construction, GenIV with tremec 600, Jag 3.31 L/S diff
Posts: 3,318
|
|

 Not Ranked
Steve, that's the great thing about these cars, huge learning curve.
When you're finished you'll be on intimate terms with every component in the car. 
__________________
It's impossible to soar like an eagle when you're surrounded by turkeys.
|

08-05-2007, 08:40 PM
|
 |
CC Member

|
|
|
Join Date: Nov 2003
Location: Melbourne Australia,
VIC
Cobra Make, Engine: 1991 RMC 1966 427SC replica, 302 Cleveland, Edelbrock manifold with 600 Holley double pumper.
Posts: 154
|
|

 Not Ranked
 Series 1 versus 2
Steve,
I may have led you astray on the series one / two upper arms. (Sorry about that!!!) What I found was the Series 2 upper arms did not give me enough caster without doing some major surgery on the lower arms. The series 1 upper arms due to the different lengths gave me the caster I was after with enough adjustment with shims etc.
If I want more castor I would have problems with the setback on the front wheels.
If you have very heavy steering under parking you may want to consider getting Series 2 upper arms to reduce your caster a little as Rebel 1 has explained with the G Force setup.
Cheers
Tony
|

08-05-2007, 09:28 PM
|
 |
CC Member

|
|
|
Join Date: Aug 2001
Location: Melbourne, Australia,
Vic
Cobra Make, Engine: G-Force Mk I, 5L Windsor, TKO 600, enhanced Jag / Koni suspension & LSD Diff.
Posts: 2,302
|
|

 Not Ranked
Thanks Tony
Yes part of this exercise for me was to confirm the suspension bits I had, as I was aware GF specified S2 gear for the build.
I reckon I might have a bit too much castor as some effort is needed at park speed. I may also need to watch how my camber sets up as I did say after my quick drive that I had quite a bit of camber on both wheels but after later revising the tie rods to the correct location, the movement of the car had negated the additional camber I had first measured.
The S2 uppers are 1.5mm shorter in overall length than the S1 which would help by a poofteenth if I am struggling to find camber settings.
The S1 could be turned around like Mike did and the S2 start more in the middle of the S1 range so I will guage what I need some time further down the track.
Cheers
__________________
slowy
|

01-03-2013, 09:32 PM
|
|
CC Member

|
|
|
Join Date: Jun 2012
Location: KILMORE,
Vic
Cobra Make, Engine: Replica Motor Company
Posts: 195
|
|

 Not Ranked
Quote:
Originally Posted by Tenrocca

Stephen,
Heres a pic of series 1 arms, you can see the difference when the front arm is at the back and back at the front as Ive layed the left hand side on top of the right hand side:

Heres the series 2\3 arms I have:

See how they kink in a bit just after the pivot bolt thingy (technical term). The difference between using series 2\3 arms (which are the same dimensions front and back) and the series 1 arms, is that the series 1 arms will place the upper ball joint 8.5mm further back.
The jury is out on whether series 2\3 arms come in a "straight" design, the place I got mine from said that they had not seen series 2\3 arms straight like series 1.
Cheers.
 |
Gentleman! I need more photos of Series 3 RMC front end showing amongst other things how the Jaguar upper and lower wishbones are adapted th the chassis as I am constructing a hybrid chassis.
I got three Jaguars -two with a V12 which have LSD and the third is S2 six cyclinder. |

01-08-2013, 02:22 PM
|
 |
CC Member

|
|
|
Join Date: Jul 2008
Cobra Make, Engine: BBF 545 Stroker Alloy Heads Roller Cam Aluminium Flywheel Twin plate Clutch TKO600 9inch Independent Rear 335x17 Rear 315x17 Front 1140kg
Posts: 292
|
|

 Not Ranked

Quote:
Originally Posted by Rebel1

Ok Steve, least you know.
Caster can be roughly checked with a plumb bob and protractor. hang the plumb bob so it intersects the center of the lower ball joint. Use a projector ( I have a marine version) to measure the caster angle. ( ie a line thru the bottom and top ball joints from the perpendicular). You can buy a tool but it will get little use.
Shims either side of the top ball joint total three. The width of the top ball joint body, plus 3 shims plus the offset of the arms equal the length of the inner pivot shaft. more shims and you'll be inducing stress to the top arms.
Rear toe.....a debatable subject and a bit involved for this short space. My rear will be set with 1/8" of toe.
It's a topical discussion because the jag is so difficult to change rear toe as it's done with shims under the control arm inner brackets. If it was an easy adjustment folks would try it and test the results.
Cheers
|
Can you give me a bit of an idea with measurements...ie if you were to place a spirit level centre to the bottom ball joint what is an ideal measurement to have the centre of the top ball joint back from the centreline.

|

01-08-2013, 03:21 PM
|
|
CC Member

|
|
|
Join Date: May 2002
Location: Brisbane Australia,
QLD
Cobra Make, Engine: RMC under re-construction, GenIV with tremec 600, Jag 3.31 L/S diff
Posts: 3,318
|
|

 Not Ranked
Quote:
Originally Posted by AC-460

Can you give me a bit of an idea with measurements...ie if you were to place a spirit level centre to the bottom ball joint what is an ideal measurement to have the centre of the top ball joint back from the centreline.
|
Go here for a simple tool.
Home : Crendon Replicas
Scroll down to the caster/camber section.
__________________
It's impossible to soar like an eagle when you're surrounded by turkeys.
|

01-11-2013, 05:48 PM
|
 |
CC Member

|
|
|
Join Date: Jul 2008
Cobra Make, Engine: BBF 545 Stroker Alloy Heads Roller Cam Aluminium Flywheel Twin plate Clutch TKO600 9inch Independent Rear 335x17 Rear 315x17 Front 1140kg
Posts: 292
|
|

 Not Ranked
Just checked my front end ....pretty sure my caster is running at 0....if I change to seriies one arms will this help and roughly what degrees will it give me
|

01-12-2013, 01:45 PM
|
|
CC Member

|
|
|
Join Date: May 2002
Location: Brisbane Australia,
QLD
Cobra Make, Engine: RMC under re-construction, GenIV with tremec 600, Jag 3.31 L/S diff
Posts: 3,318
|
|

 Not Ranked
Quote:
Originally Posted by AC-460

Just checked my front end ....pretty sure my caster is running at 0....if I change to seriies one arms will this help and roughly what degrees will it give me
|
Short answer is yes but will it give you all the caster you want?.
That is assuming you want something between say 4 and 6 degrees.
Were you able to identify which upper and lower arms you currently have?.
The series 1 uppers will allow about 1/4" extra caster over the series 11 arms. Then say putting the three caster shims to the front of the ball joint will give you an extra 1/8" making a total of 3/8".
If you currently have a series 1 lower arm then changing to a series 2 lower will allow you an extra 1/4" of caster.
__________________
It's impossible to soar like an eagle when you're surrounded by turkeys.
|

01-12-2013, 03:06 PM
|
 |
CC Member

|
|
|
Join Date: Jul 2008
Cobra Make, Engine: BBF 545 Stroker Alloy Heads Roller Cam Aluminium Flywheel Twin plate Clutch TKO600 9inch Independent Rear 335x17 Rear 315x17 Front 1140kg
Posts: 292
|
|

 Not Ranked
I have series 2 top and bottom
|

01-12-2013, 05:28 PM
|
|
CC Member

|
|
|
Join Date: May 2002
Location: Brisbane Australia,
QLD
Cobra Make, Engine: RMC under re-construction, GenIV with tremec 600, Jag 3.31 L/S diff
Posts: 3,318
|
|

 Not Ranked
Quote:
Originally Posted by AC-460

I have series 2 top and bottom
|
Ensure the series 11 lowers are on the correct side of the car.
Using the series 1 uppers, and all the shims to the front will give you a small amount of caster.
__________________
It's impossible to soar like an eagle when you're surrounded by turkeys.
|

01-12-2013, 07:42 PM
|
 |
CC Member

|
|
|
Join Date: Jul 2008
Cobra Make, Engine: BBF 545 Stroker Alloy Heads Roller Cam Aluminium Flywheel Twin plate Clutch TKO600 9inch Independent Rear 335x17 Rear 315x17 Front 1140kg
Posts: 292
|
|

 Not Ranked
Does anyone manufacture adjustable Jag wishbones off the shelf.....I may need to change my lower wishbones as well...to get the required castor it will push the wheel back to far and hit the rear
|

01-12-2013, 08:43 PM
|
 |
CC Member

|
|
|
Join Date: Jan 2004
Location: Queanbeyan,
NSW
Cobra Make, Engine: AP 289 USRRC #98 The Ken Miles Tribute Car
Posts: 1,134
|
|

 Not Ranked
Hi Mark
Am going through the same process at the moment. Bought Factory Five Racing adjustable upper arms and am getting new bottom wishbones cut with the spindle mount moved 20mm forward so the wheel won't rub at the back of the guard. Supplied some Jag series 2 bottom arms to the machinist for a template. Will see how successful they turn out soon. A man of your skills should be able to do the same.
Cheers
Brett
__________________
289 FIA Cobras RULE! 
|

01-14-2013, 03:25 AM
|
 |
CC Member

|
|
|
Join Date: Jul 2008
Cobra Make, Engine: BBF 545 Stroker Alloy Heads Roller Cam Aluminium Flywheel Twin plate Clutch TKO600 9inch Independent Rear 335x17 Rear 315x17 Front 1140kg
Posts: 292
|
|

 Not Ranked
Long time no see Brett Ive only just got the cobra back on the road its been parked up for three years change from manual to auto and had a house fire in the middle and lost everything but getting back on track now....I have thought about making them.... been checking out heim joints on the net...dont think it would be much trouble...but just curious if you could buy them off the shelf
|

01-14-2013, 04:27 AM
|
 |
CC Member

|
|
|
Join Date: Jan 2004
Location: Queanbeyan,
NSW
Cobra Make, Engine: AP 289 USRRC #98 The Ken Miles Tribute Car
Posts: 1,134
|
|

 Not Ranked
Understandable mate. I was looking for the same solution as well. Sorry to hear about your misfortune with fires and all and hope there is no immediate danger out your way at the moment. Try and make it in for Wheels expo in March so we can catch up.
Cheers
Brett
__________________
289 FIA Cobras RULE! 
|

01-17-2013, 01:36 PM
|
|
CC Member

|
|
|
Join Date: Jun 2012
Location: KILMORE,
Vic
Cobra Make, Engine: Replica Motor Company
Posts: 195
|
|

 Not Ranked
 Attachments
Quote:
Originally Posted by stephen low

I'm back with a few more suspension queries guys but with some pics. now
Started to pull front suspension apart to reset properly and have a few queries, like:
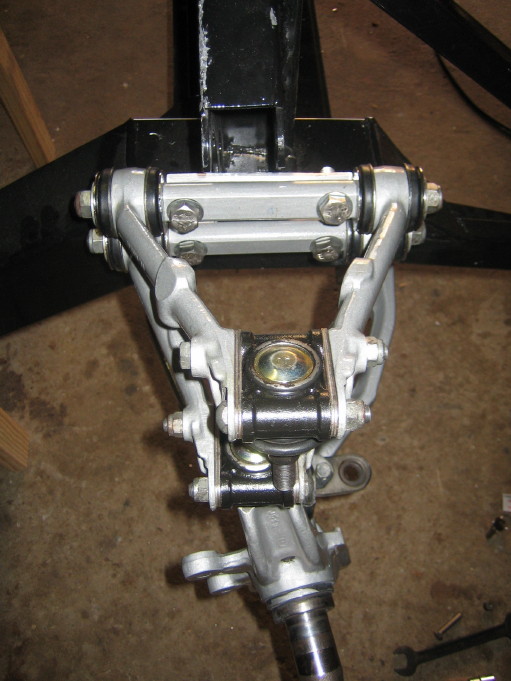
Upper wishbone arms seem to have slightly different offsets from the pivot arm. This is evident off the photo as the square is central on the pivot arm between the arms but is offset slightly once at the ball joint end. Or is this just the movement possible through the rubber bushes?
Attachment 13128
As shown in the pic. the arms are from the drivers side with the circular castings for bolt attachment near the upper ball joint location facing downwards. Is this the correct orientation for these arms? What did the bolts originally hold in the jag set up?
Also took a pic at the upper pivot shaft attachment to the chassis.
Attachment 13126
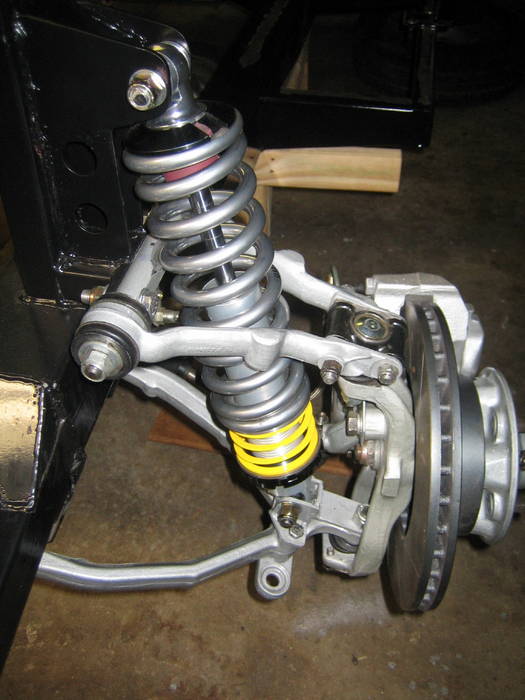
You can see the 6 - 8mm gap between the chassis frame and the rear face of the pivot shaft, achieved by large spacers on each bolt. I've been told to mount the pivot shaft directly against the chassis frame. This would clearly affect the camber of the wheels and I'm not sure whether the use of the spacers or not in this GForce kit is correct. Can anyone help here? I'm assuming the shims were actually from the jag set up but are perhaps not needed in the GForce construction - HELP!!
Also thought about the steering linkage and the next photo shows the connecting track rod end without any form of locking nut on the threaded section. Isn't there normally some form of locking made here?
Attachment 13127
A question on the upper ball joint, unlike the lower that can be adjusted by shims, do I presume if there is any play in the joint in a vertical direction when mounted that this is normal or a sign of wear?
Both the steering and upper ball joint dust rubbers, both sides, have failed so I need to replace either the dust rubbers or the whole joint assemblies. The steering joints seem fine, it's just whether the upper joints normally move as they do or not.
Here's hoping someone can help.
Cheers |
All your attachments cannot be seen and would you kindly forward photos,

|

01-17-2013, 03:11 PM
|
 |
CC Member

|
|
|
Join Date: Aug 2001
Location: Melbourne, Australia,
Vic
Cobra Make, Engine: G-Force Mk I, 5L Windsor, TKO 600, enhanced Jag / Koni suspension & LSD Diff.
Posts: 2,302
|
|

 Not Ranked
John
You are looking at a thread written in 2008 so I've no idea where the links were made to for the photos. Don't think I had a photobucket account back then.
However I'll go try and upload the related pictures to my account and then revisit that first thread and re-link the pictures.
It is clearly a useful information tool for others so worth revisiting. I'll also send you the photos as attachments to your gmail account.
Cheers
Steve
__________________
slowy
|

06-30-2013, 11:36 PM
|
|
CC Member

|
|
|
Join Date: Jun 2012
Location: KILMORE,
Vic
Cobra Make, Engine: Replica Motor Company
Posts: 195
|
|

 Not Ranked
Gentleman How do you make the lower control arm to suit the RMC Series 3 assuming you are going to utilise the Series 2 or 3 upper control arm?
Any photos would be appreciated!
|

07-01-2013, 12:29 AM
|
|
CC Member

|
|
|
Join Date: May 2002
Location: Brisbane Australia,
QLD
Cobra Make, Engine: RMC under re-construction, GenIV with tremec 600, Jag 3.31 L/S diff
Posts: 3,318
|
|

 Not Ranked
Quote:
Originally Posted by justcobra

Gentleman How do you make the lower control arm to suit the RMC Series 3 assuming you are going to utilise the Series 2 or 3 upper control arm?
Any photos would be appreciated!
|
I assume you refer to the front suspension.
We just use the lower arms from the Jag.
__________________
It's impossible to soar like an eagle when you're surrounded by turkeys.
|
 Posting Rules
|
You may not post new threads
You may not post replies
You may not post attachments
You may not edit your posts
HTML code is Off
|
|
|
All times are GMT -7. The time now is 08:59 AM.
|
|


 2Likes


 Linear Mode


