 Main Menu
|
 Nevada Classics
|
 Advertise at CC
|
| S |
M |
T |
W |
T |
F |
S |
| |
|
|
1 |
2 |
3 |
4 |
| 5 |
6 |
7 |
8 |
9 |
10 |
11 |
| 12 |
13 |
14 |
15 |
16 |
17 |
18 |
| 19 |
20 |
21 |
22 |
23 |
24 |
25 |
| 26 |
27 |
28 |
29 |
30 |
31 |
|
|
 CC Advertisers
|
|
 1Likes 1Likes

06-17-2008, 11:15 AM
|
 |
CC Member

|
|
|
Join Date: Nov 1999
Location: Pentwater,
Mi
Cobra Make, Engine: Professional Cobra & Streetrod Builder
Posts: 5,352
|
|

 Not Ranked
 Door assembly

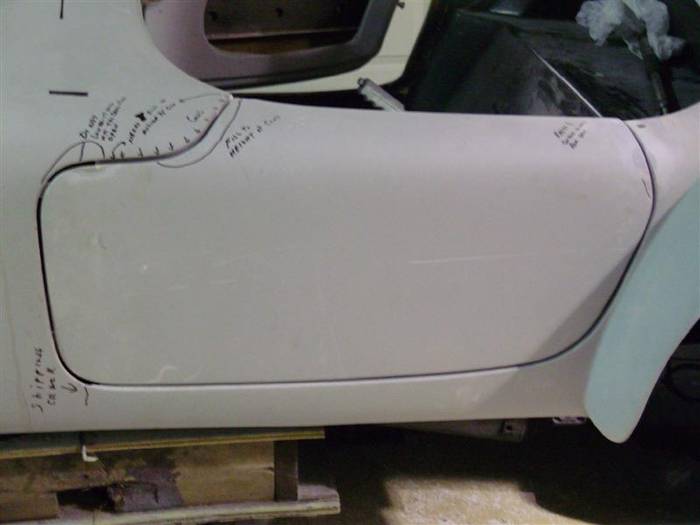
This is supposed to be what the cutout looks like-

And this is what it looks like done-no shims whatsoever-One finger to close please, one finger on the latch to open.
CR's doors are amazingly strong. Done right there is no two handed opening or closeing!

You can disregard my black chicken scratchings, there for my own use. Mark, does this help?
DV
Last edited by Double Venom; 06-17-2008 at 11:18 AM..
|

06-17-2008, 12:22 PM
|
|
CC Member

|
|
|
Join Date: Mar 2007
Location: Daly city,
ca
Cobra Make, Engine: classic roadster,408cu
Posts: 212
|
|

 Not Ranked
 wow, i would have cut out too much ..
That helps alot i may need the measurement of the strip width that will help in lining everything else up ...did anyones bodys not get scribed as well??
|

06-17-2008, 01:34 PM
|
 |
CC Member

|
|
|
Join Date: Nov 1999
Location: Pentwater,
Mi
Cobra Make, Engine: Professional Cobra & Streetrod Builder
Posts: 5,352
|
|

 Not Ranked
See,
You weren't writing fast enough! The strip width is 1-1/2"s to the radius where it cuts to the inside.
Don't worry about cutting either side a little large, when you go to close the door)s) it either wont close or it will scrape on the inside or out, then you can really tell what you need to cut.
DV
|

06-17-2008, 08:36 PM
|
|
CC Member

|
|
|
Join Date: Mar 2008
Location: kalona,
IA
Cobra Make, Engine: CRII
Posts: 76
|
|

 Not Ranked
DV is the body permanently attached at this point? or do you paint it off the body off the car?
|

06-18-2008, 04:26 AM
|
 |
CC Member

|
|
|
Join Date: Nov 1999
Location: Pentwater,
Mi
Cobra Make, Engine: Professional Cobra & Streetrod Builder
Posts: 5,352
|
|

 Not Ranked
Kawika,
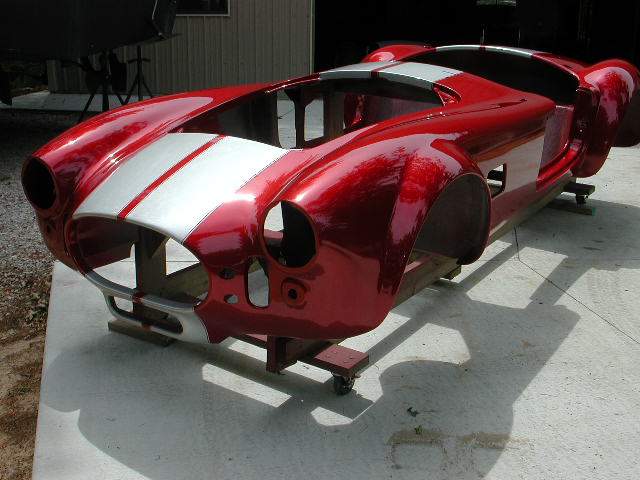
I paint all my body's off the frame and on the jig. It is almost imnpossible to mask off the entire frame, suspension motors, etc. If the body has been mnounted and aligned as I have shown it will have noproblem going back on the frame exactly as everything was lined up.


Both these body's were painted last sumer/fall.
DV |

06-18-2008, 01:38 PM
|
 |
CC Member

|
|
|
Join Date: Nov 1999
Location: Pentwater,
Mi
Cobra Make, Engine: Professional Cobra & Streetrod Builder
Posts: 5,352
|
|

 Not Ranked

Mark,Kawika, et.,al.,
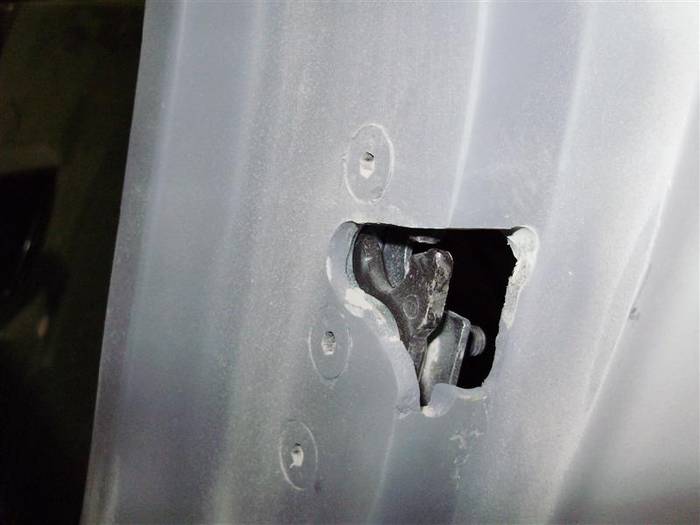
Door latch cut outs: First take a small grinder 2" and grind the inside of the body a little bit where the "Bear Claw latch" fits. This area usually has a lot of extra glass in it making it almost impossible for the latch to sit flush. Once you have it ground out to be fairly smooth close the latch and hold it in place, pulling it tight against the body itself. After you have put the door striker in the door (and the body is mounted tight of course, close the door easy and mark where the actual latch is hitting-(the barrell of the striker). Now cut this from the outside matching your lines. Cut just deep enough so the latch will fully close. Now put the latch on from the inside, making sure the safety latch actually closes completely, two clicks. Now move the latch as tight as you can against the body, pulling outward. Make sure the latch is straight as posssible up and down. Drill one hole useing the bolt holes in the latch. Insert a bolt and a nut holding the latch fairly tight. Drill the next two holes for the latch.
Remove the latch and drill the holes on the inside with a tapered bit 5/16's. Now you can test fit, have the latch open and you can see where the little divit has to be cut for the latch to fully open. Once that is done just use the latch for a guide and cut out the rest of the fiberglass. Piece of cake!


DV

|

06-19-2008, 02:23 PM
|
|
CC Member

|
|
|
Join Date: Mar 2005
Location: Chardon, Ohio,
OH
Cobra Make, Engine: Classic Roadster II, 351 windsor, Tremmec T-5
Posts: 98
|
|

 Not Ranked
A comment about the door latch cutout scribe lines.
Based upon my single experience: No not trust the scribe lines without doing some confirming before cutting. I cut as marked and found out the passenger's door scribe lines were TOO LOW. Threw off lots of things. Especially the steel bracket/brace that supports the latch from the frame. The two holes were no where close to lining up properly. Had to lower the door latch striker pin ¾". If I had a "do over", I'd mount the steel bracket, transfer the location holes on the bracket for the latch to the fiberglass and work from those points of reference.
I got lucky on the driver's door side. Holes lined up just fine. What a bunch of grief!
|

06-20-2008, 12:29 PM
|
 |
CC Member

|
|
|
Join Date: Jul 2007
Location: Algonquin,
IL
Cobra Make, Engine: CRII 351W/408 Stroker
Posts: 991
|
|

 Not Ranked
 DV, everything OK?
Hey DV!
You've been kinda quite on the forum the last day or so. Everything OK?
I should be at your place tomorrow around noon, your time. I talked with my rat rod guy and the lower rear arms will not be ready till around Wednesday  I'll get them to the coaters ASAP and have him overnight them to you. I know this is really holding things up.
One thing I wanted to run by you before tomorrow, is...
We should be OK sticking a C6 tranny in this thing, right? I remember when I talked to Don we had discussed a C4. Is there going to be any size problems with the tranny tunnel or the firewall with a C6?
Cheers,
Ed |

06-20-2008, 12:54 PM
|
 |
CC Member

|
|
|
Join Date: May 2000
Location: Northern VA,
VA
Cobra Make, Engine: Classic Roadsters
Posts: 2,765
|
|

 Not Ranked
I look at all these pictures, and read all these details and all I can say is Thank God I bought my car already finished!!!!!!!
All I had to do was beef up the power output and the drive train to where I wanted it to be. If I had to build the whole thing, I woulda went nutz. I have the attention span of a three year old!!! 
.
__________________
LIFE IS TOO SHORT TO WORRY ABOUT GOOD GAS MILEAGE
________
Utinam logica falsa tuam philosophiam totam suffodiant!
________
|

06-20-2008, 01:52 PM
|
 |
CC Member

|
|
|
Join Date: Nov 1999
Location: Pentwater,
Mi
Cobra Make, Engine: Professional Cobra & Streetrod Builder
Posts: 5,352
|
|

 Not Ranked
CptEddie,
Not top panic, just waiting for parts............Just trying to help when asked. Geez, look at all the threads and it looks like I am dominating the whole forum! Hope not, don't mean too.
C-6 or C-4 will work just fine, I know of no problems with either. See ya tomorrow! May have to put your car outside under a blanket for awhile but It wont go far! 
DV |

06-22-2008, 11:55 AM
|
 |
CC Member

|
|
|
Join Date: Jul 2007
Location: Algonquin,
IL
Cobra Make, Engine: CRII 351W/408 Stroker
Posts: 991
|
|

 Not Ranked
DV,
As always it was great stopping by your place on Saturday. I checked the build sheets on my motor and it does have roller rockers. So the height of the valve covers is right. I'm just going to sit tight and wait till you get the motor mounted and see what clearance issues we might have 
I'll call Evens tomorrow and find out what the deal is with that brass plug we talked about yesterday. I'll also check with Nisonger about the speedo question.
As for the color of the stripe. I'll stop by a body shop and check out the samples of gray/titanium and get a code for you.
Let me know if there is anything else you need.
oops! 1 more thing. If you roll bar guy shows up. I'm thinking of we should have the bar done in 2" stock, ok?
Cheers,
Ed
Last edited by capteddie; 06-22-2008 at 11:58 AM..
|

06-23-2008, 11:18 AM
|
 |
CC Member

|
|
|
Join Date: Nov 1999
Location: Pentwater,
Mi
Cobra Make, Engine: Professional Cobra & Streetrod Builder
Posts: 5,352
|
|

 Not Ranked
Ed,
I've made my own"corporaqte" decisiioon about the roll bars- they "ALL" will be "D.O.M." rated 2" bars! Good choice!
Here's another choice for you- great fuel filter, AEROMOTIVE- billett fuel filter. Jegs has them in SS, #027-12308, Blk/Red, 027-317, Platiinum 027-12358. Extra filter element is # 027-12608.
Any of these will mount to the center bar I made for you. I will need two more black anodized 90's, 3/8's pipe thread to #6 (?) I think I have enough line to comeplete the circle.
|

06-23-2008, 12:34 PM
|
 |
CC Member

|
|
|
Join Date: Jul 2007
Location: Algonquin,
IL
Cobra Make, Engine: CRII 351W/408 Stroker
Posts: 991
|
|

 Not Ranked
DV,
Really nice remote fuel filter you found
 ITS ORDERED!!! 
I also ordered the AN fittings needed for this also.
Cheers,
Ed |

06-25-2008, 11:29 AM
|
 |
CC Member

|
|
|
Join Date: Jul 2007
Location: Algonquin,
IL
Cobra Make, Engine: CRII 351W/408 Stroker
Posts: 991
|
|

 Not Ranked
OK DV...
I swear the word "bushings" is going to cause me to triple my blood pressure medication dosage 
Just got off the phone with Kevin at Hot Rod Chassis & Cycle. He needs an measurement taken of the ID of lower rear control arm tabs on the rear end. I know the frame and body are sitting the rolling platform in the shop. How hard is this going to be for you to get me a "inside to inside" measurement of the brackets? 
Ed |

06-25-2008, 11:55 AM
|
 |
CC Member

|
|
|
Join Date: Nov 1999
Location: Pentwater,
Mi
Cobra Make, Engine: Professional Cobra & Streetrod Builder
Posts: 5,352
|
|

 Not Ranked
1.862 is the inside measurement for the rear end. The front bushings for the uppers are in both your upper control arms so they probably wont help any since they are "Hotchkiss". It is supposed to be a Ford 9" with 8.8 ears welded on. Looks factory to me!
|

06-25-2008, 12:20 PM
|
 |
CC Member

|
|
|
Join Date: Jul 2007
Location: Algonquin,
IL
Cobra Make, Engine: CRII 351W/408 Stroker
Posts: 991
|
|

 Not Ranked
Quote:
Originally Posted by Double Venom

1.862 is the inside measurement for the rear end. The front bushings for the uppers are in both your upper control arms so they probably wont help any since they are "Hotchkiss". It is supposed to be a Ford 9" with 8.8 ears welded on. Looks factory to me!
|
OK, so we're not confusing each other. This is for the new rear lower arms and 1.862 is the measurement on the axle for the lower control arm ears. right?
I measured the CRII made lower arm I have and here's what I got...
 |

06-25-2008, 01:44 PM
|
 |
CC Member

|
|
|
Join Date: Nov 1999
Location: Pentwater,
Mi
Cobra Make, Engine: Professional Cobra & Streetrod Builder
Posts: 5,352
|
|

 Not Ranked
Ed,
What I measured is the inside of the "ear"on the rear end. The width of the rear upper bushing should be within hundreds of what you have, measuring the outside of the actual bushing/rubber.
DV
|

06-25-2008, 01:53 PM
|
 |
CC Member

|
|
|
Join Date: Jul 2007
Location: Algonquin,
IL
Cobra Make, Engine: CRII 351W/408 Stroker
Posts: 991
|
|

 Not Ranked
Quote:
Originally Posted by Double Venom

Ed,
The width of the rear upper bushing
DV
|
I'm talking about where the rear lower control arm mounts to the rear end. Not the upper. But by what you said, if I was trying to find bushings for the new lower arms. They should be a couple of thousands over the 2.544 I measured off the old CRII lower arm.
Thanks,
Ed |

06-25-2008, 03:34 PM
|
 |
CC Member

|
|
|
Join Date: Nov 1999
Location: Pentwater,
Mi
Cobra Make, Engine: Professional Cobra & Streetrod Builder
Posts: 5,352
|
|

 Not Ranked
Ed,
The bushing "I" need is for the upper, the one that go on the housing.
To fit the lower the total distance from steel flange to steel flange , on the housing is;
3.03. So I am guessing I can draw up tight the lower brackets to fit the listed bushing you are showing. The frame brackets are duplicating the rear end brackets.
Sure seems like the 2.544 you've got is a little loose! IF you are measuring to the outside of the rubber on both ends that is?
DV
|

06-25-2008, 03:49 PM
|
 |
CC Member

|
|
|
Join Date: Nov 1999
Location: Pentwater,
Mi
Cobra Make, Engine: Professional Cobra & Streetrod Builder
Posts: 5,352
|
|

 Not Ranked
Darn,
I suprise myself. I copied your picture, opened it with my picture program, blew it up, lightend it and now I can you you do NOT have a bushing in the lower contropl are so I am guessing your measureement is going to be right. By the time we add the distance to both sides of the arm with the bushing in place, everything will be honkey dorey.
DV
|
 Posting Rules
|
You may not post new threads
You may not post replies
You may not post attachments
You may not edit your posts
HTML code is Off
|
|
|
All times are GMT -7. The time now is 04:51 PM.
Links monetized by VigLink
|


