 Main Menu
|
 Nevada Classics
|
 Advertise at CC
|
| S |
M |
T |
W |
T |
F |
S |
| |
|
|
|
|
|
1 |
| 2 |
3 |
4 |
5 |
6 |
7 |
8 |
| 9 |
10 |
11 |
12 |
13 |
14 |
15 |
| 16 |
17 |
18 |
19 |
20 |
21 |
22 |
| 23 |
24 |
25 |
26 |
27 |
28 |
|
|
 CC Advertisers
|
|
 2Likes 2Likes

09-08-2014, 07:06 PM
|
|
CC Member

|
|
|
Join Date: Oct 2003
Posts: 4,078
|
|

 Not Ranked
Quote:
Originally Posted by patrickt

But this how-to was soooooooo good that even that ol' rat Chas and RodKnock couldn't really rag on me about it.
|
Oh yes i can Mr. Wizard.
See my post in (poor) Dan's thread (fried wiring, recalcitrant shift boot, bouncing needles, itchy floor mats-I forgot what...  ) about another Nobel Prize for monumental contributions to the Cobra legend.
What next? A 70 page thread for power door locks or automatic headlight dimmers like '57 Cadillacs had... 
__________________
Chas.
|

09-08-2014, 07:54 PM
|
 |
CC Member

|
|
|
Join Date: Dec 2006
Location: Southbury,
ct
Cobra Make, Engine: ERA, 428, 4 speed Toploader, Jag rear, Red with White stripes
Posts: 922
|
|

 Not Ranked
Quote:
Originally Posted by patrickt

If you have a mechanical fuel pump, just jumper across the left (meaning passenger) sides of fuses one and five. Those are the two top fuses on the right and left hand side of the fuse block. Then disconnect and just tape off the feed to fuse five. If you have an electric fuel pump then you'll need to place it on a switch.
EDIT -- Easy Test: Just remove fuse five and use a fused jumper wire with alligator clips to go from the passenger side of fuse one to the driver side of the empty fuse holder five. Leave that fuse out. That's an easy test to see if changing the feed will do what you want.
|
Wow Patrick...IMPRESSIVE!
I do have a mechanical fuel pump, so it sounds pretty easy.
What does this mean so I don't make a stupid assumption:
"Then disconnect and just tape off the feed to fuse five."
Also, what do you think of those 3m wire splicers to do the permanent jumping once you have tested it to see if it will work?
Thanks...Dave
__________________
ERA#698 428, 4 speed Toploader, 3:31 Jag rear
|

09-08-2014, 08:07 PM
|
 |
Half-Ass Member

|
|
|
Join Date: Jun 2005
Cobra Make, Engine: ERA #732, 428FE (447 CID), TKO600, Solid Flat Tappet Cam, Tons of Aluminum
Posts: 22,017
|
|

 Not Ranked

Quote:
Originally Posted by davids2toys

Wow Patrick...IMPRESSIVE!
I do have a mechanical fuel pump, so it sounds pretty easy.
What does this mean so I don't make a stupid assumption:
"Then disconnect and just tape off the feed to fuse five."
Also, what do you think of those 3m wire splicers to do the permanent jumping once you have tested it to see if it will work?
Thanks...Dave
|
The left side of fuse number five is the feed. It becomes "hot" with 12 volts when you turn the key on. If you just jumper over to the left side of fuse five with a constant 12 volts, your brake lights will work with the key off, but that jumper will "back feed" through the original feed that runs to fuse five and your ignition light will be on, etc. You don't want that. So, you must simply disconnect the feed by removing the existing wire that goes to the screw that is immediately to the left of fuse five and just wrap electric tape around it. Then you can jumper an "always on" 12 volt source to that screw on the left side of fuse five. Your brake lights do not use a lot of current, so a simple 14 gauge wire running from the left side of fuse one would be fine -- just crimp and solder little ring connectors on the end. The left side of fuse one is always hot. |

09-09-2014, 06:14 AM
|
 |
CC Member

|
|
|
Join Date: Apr 2009
Location: Little Rock area,
AR
Cobra Make, Engine: ERA Street Roadster #782 with 459 cu in FE KC engine, toploader, 3.31
Posts: 4,527
|
|

 Not Ranked
Quote:
Originally Posted by ERA Chas

Oh yes i can Mr. Wizard.
See my post in (poor) Dan's thread (fried wiring, recalcitrant shift boot, bouncing needles, itchy floor mats-I forgot what...  ) about another Nobel Prize for monumental contributions to the Cobra legend.
What next? A 70 page thread for power door locks or automatic headlight dimmers like '57 Cadillacs had...  |
Geez - now I'm lumped in with Patrick. But I'm all about just maintaining the status quo (functioning). Patrick is all about improving the breed with bells and whistles.  |

09-09-2014, 06:52 AM
|
 |
Half-Ass Member

|
|
|
Join Date: Jun 2005
Cobra Make, Engine: ERA #732, 428FE (447 CID), TKO600, Solid Flat Tappet Cam, Tons of Aluminum
Posts: 22,017
|
|

 Not Ranked
Quote:
Originally Posted by DanEC

Geez - now I'm lumped in with Patrick...
|
Uhhhh, it's not a bad club to be in -- all the members are overpaid, underworked, have plenty of free time on their hands and have a wonderful sense of humor.  |

09-09-2014, 06:06 PM
|
 |
CC Member

|
|
|
Join Date: Dec 2006
Location: Southbury,
ct
Cobra Make, Engine: ERA, 428, 4 speed Toploader, Jag rear, Red with White stripes
Posts: 922
|
|

 Not Ranked
Quote:
Originally Posted by patrickt

The left side of fuse number five is the feed. It becomes "hot" with 12 volts when you turn the key on. If you just jumper over to the left side of fuse five with a constant 12 volts, your brake lights will work with the key off, but that jumper will "back feed" through the original feed that runs to fuse five and your ignition light will be on, etc. You don't want that. So, you must simply disconnect the feed by removing the existing wire that goes to the screw that is immediately to the left of fuse five and just wrap electric tape around it. Then you can jumper an "always on" 12 volt source to that screw on the left side of fuse five. Your brake lights do not use a lot of current, so a simple 14 gauge wire running from the left side of fuse one would be fine -- just crimp and solder little ring connectors on the end. The left side of fuse one is always hot.
|
Great, thanks!!!
__________________
ERA#698 428, 4 speed Toploader, 3:31 Jag rear
|

09-14-2014, 12:13 PM
|
|
CC Member

|
|
|
Join Date: Apr 2012
Location: Bay Area (Peninsula),
CA
Cobra Make, Engine: ERA 427, 427/487 side-oiler
Posts: 1,248
|
|

 Not Ranked
I went ahead and finished this last night. Thanks Patrick. But I did do a few things differently. I didn't wire the dash lights to flash. I don't want any of those hard to reach small bulbs to fail more quickly. I used AWG 10 wire and soldered most of the connections under the dash. I also mounted a rocker switch hidden under the dash on a small aluminum bracket I made.
I actually think this is a fairly important thing to have. My car hasn't broken down in my first 1500 miles driven, but I did put it together myself and realize it won't be as reliable as a modern car. I carry safety triangles, but many of the roads I use don't have shoulders and this just strikes me as a good idea.
|

09-14-2014, 12:28 PM
|
 |
Half-Ass Member

|
|
|
Join Date: Jun 2005
Cobra Make, Engine: ERA #732, 428FE (447 CID), TKO600, Solid Flat Tappet Cam, Tons of Aluminum
Posts: 22,017
|
|

 Not Ranked
Quote:
Originally Posted by lippy

I went ahead and finished this last night. Thanks Patrick. But I did do a few things differently. I didn't wire the dash lights to flash. I don't want any of those hard to reach small bulbs to fail more quickly. I used AWG 10 wire and soldered most of the connections under the dash. I also mounted a rocker switch hidden under the dash on a small aluminum bracket I made.
|
Nice. Are you running the super bright LED rear lights? (see: LED Upgrade to Rear Rectangular Lights ) The total amperage draw on my four way flasher circuit with normal 1157 bulbs up front, the LED lights in the rear, the dash light wired in to the circuit, and an electronic flasher, is just a hair under five amps (and that includes my third LED brake light as well). |

09-14-2014, 12:31 PM
|
|
CC Member

|
|
|
Join Date: Apr 2012
Location: Bay Area (Peninsula),
CA
Cobra Make, Engine: ERA 427, 427/487 side-oiler
Posts: 1,248
|
|

 Not Ranked
Quote:
Originally Posted by patrickt

Nice. Are you running the super bright LED rear lights? (see: LED Upgrade to Rear Rectangular Lights ) The total amperage draw on my four way flasher circuit with normal 1157 bulbs up front, the LED lights in the rear, the dash light wired in to the circuit, and an electronic flasher, is just a hair under five amps (and that includes my third LED brake light as well). |
Nope. Just the brighter standard bulbs from ERA. No LEDs. |

09-14-2014, 12:40 PM
|
 |
Half-Ass Member

|
|
|
Join Date: Jun 2005
Cobra Make, Engine: ERA #732, 428FE (447 CID), TKO600, Solid Flat Tappet Cam, Tons of Aluminum
Posts: 22,017
|
|

 Not Ranked
Quote:
Originally Posted by lippy

Nope. Just the brighter standard bulbs from ERA. No LEDs.
|
The LEDs are painful to buy (like fifty bucks for the two of them), but they are significantly brighter than the bright 1157 bulbs, and, they are cool to the touch. 1157 bulbs have caught more than one rag or paper towel on fire in the trunk of the car. Do you have the polished aluminum reflectors that go behind the bulbs? They make a good bit of difference as well. |

09-14-2014, 06:15 PM
|
|
CC Member

|
|
|
Join Date: Apr 2012
Location: Bay Area (Peninsula),
CA
Cobra Make, Engine: ERA 427, 427/487 side-oiler
Posts: 1,248
|
|

 Not Ranked
Quote:
Originally Posted by patrickt

The LEDs are painful to buy (like fifty bucks for the two of them), but they are significantly brighter than the bright 1157 bulbs, and, they are cool to the touch. 1157 bulbs have caught more than one rag or paper towel on fire in the trunk of the car. Do you have the polished aluminum reflectors that go behind the bulbs? They make a good bit of difference as well.
|
Yes, reflectors from ERA. |

03-17-2019, 12:58 PM
|
 |
CC Member

|
|
|
Join Date: Dec 2011
Location: West Chester,
PA
Cobra Make, Engine: ERA #795 427 S/C completed Jan. '14 - '68 FE 427 side oiler
Posts: 1,053
|
|

 Not Ranked

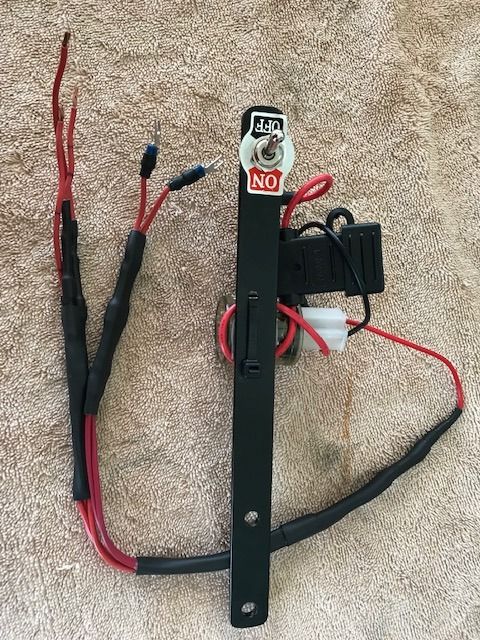
This is a very old thread, but thanks Patrick for the very clear wiring instructions for adding emergency flashers. Since this thread is still relevant to anyone wanting to add flashers to their car, I thought I'd add some detail about how I mounted mine.
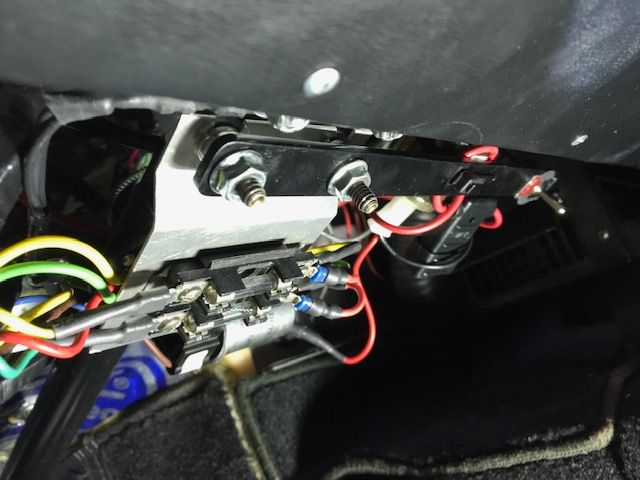
I went with a marine toggle switch and mounted everything on a 1" wide x 1/8" thick steel bracket that I fabricated from my collection of scraps. There is a steering column bracket directly behind the dash and the bolts sticking straight down are plenty long enough to add the bracket and a couple of new nuts without having to disassemble anything. That's what the two holes at the end of the bracket are for.

The photo below shows the bracket mounted to the steering column bracket and extending to the right. I assume ERA made those bolts extra long to make it easier for assembly. Regardless, it sure came in handy for this. I made the bracket long enough to mount the switch directly behind the horn button so it is easy to find even though you can't see it.

This was a fun little project, so thanks again Patrick. Now, here's hoping I never need to use them...
Kevin
__________________
"Anyone who drives faster than you is a maniac and anyone who drives slower than you is an idiot" - George Carlin
|

03-17-2019, 02:11 PM
|
 |
Half-Ass Member

|
|
|
Join Date: Jun 2005
Cobra Make, Engine: ERA #732, 428FE (447 CID), TKO600, Solid Flat Tappet Cam, Tons of Aluminum
Posts: 22,017
|
|

 Not Ranked
Quote:
Originally Posted by kevins2

This was a fun little project, so thanks again Patrick. Now, here's hoping I never need to use them...
|
Well this is an absolutely spectacular tutorial thread, of which I have no memory writing -- which is why I write them.  That, and it irritates members like the two rodneys, ACademic, and my all-time favorite, ERAChas, who I still miss on an almost daily basis.  |

03-17-2019, 09:15 PM
|
|
CC Member

|
|
|
Join Date: Oct 2010
Cobra Make, Engine: Superformance
Posts: 663
|
|

 Not Ranked
Quote:
Originally Posted by patrickt

Well this is an absolutely spectacular tutorial thread, of which I have no memory writing -- which is why I write them.  That, and it irritates members like the two rodneys, ACademic, and my all-time favorite, ERAChas, who I still miss on an almost daily basis.  |
Patrick, you’re like the blind dog that occasionally finds a bone. This thread was one of those moments. Congrats and well done. Now go put some more polish on that beige paint. |

03-18-2019, 12:51 PM
|
 |
Senior Club Cobra Member

|
|
|
Join Date: Feb 2007
Cobra Make, Engine: KMP 539, a Ton of Aluminum
Posts: 9,592
|
|

 Not Ranked
Just to be a "Patrick," I think the idiom is "Even a blind squirrel finds a nut once in a while."
And speaking of blind, Patrick had to color blind to pick out that beige color, how else do you explain the choice unless he got a deal on interior/exterior wall paint?
|

03-18-2019, 12:54 PM
|
 |
Half-Ass Member

|
|
|
Join Date: Jun 2005
Cobra Make, Engine: ERA #732, 428FE (447 CID), TKO600, Solid Flat Tappet Cam, Tons of Aluminum
Posts: 22,017
|
|

 Not Ranked
Quote:
Originally Posted by RodKnock

Just to be a "Patrick," I think the idiom is...
|
Hmmm, ok, we're revoking your membership in the "overpaid, underworked, plenty of free time and wonderful sense of humor" club.  |

03-18-2019, 01:56 PM
|
 |
CC Member

|
|
|
Join Date: Feb 2014
Location: White City,
SK
Cobra Make, Engine: West Coast, 460 CID
Posts: 2,915
|
|

 Not Ranked
Quote:
Originally Posted by RodKnock

Just to be a "Patrick," I think the idiom is "Even a blind squirrel finds a nut once in a while."
And speaking of blind, Patrick had to color blind to pick out that beige color, how else do you explain the choice unless he got a deal on interior/exterior wall paint?
|
"Beige, honey, let's paint the ceiling beige."
__________________
Brian
|
 Posting Rules
|
You may not post new threads
You may not post replies
You may not post attachments
You may not edit your posts
HTML code is Off
|
|
|
All times are GMT -7. The time now is 10:08 PM.
Links monetized by VigLink
|


