 
 Main Menu
|
 Nevada Classics
|
 Advertise at CC
|
 February 2025
|
| S |
M |
T |
W |
T |
F |
S |
| |
|
|
|
|
|
1 |
| 2 |
3 |
4 |
5 |
6 |
7 |
8 |
| 9 |
10 |
11 |
12 |
13 |
14 |
15 |
| 16 |
17 |
18 |
19 |
20 |
21 |
22 |
| 23 |
24 |
25 |
26 |
27 |
28 |
|
|
 CC Advertisers
|
|

04-04-2009, 04:18 PM
|
 |
Stolen Avitar

|
|
|
Join Date: Oct 2004
Location: Brunswick,
GA
Cobra Make, Engine: BDR 1311 428PI
Posts: 3,044
|
|

 Not Ranked
 Build thread for BDR687's FE462
Hi all, I'm just now starting to get my photos loaded so that I can put this thread all the way together so please be patient. However I just came across something that's odd even for my "2 steps up and 1 step back" build and thought you guys would like to laugh with/at me. At this point I just got to bolting the intake down after having it on then off about 15 times checking and clearancing things. Then of course the pushrods and rockers get bolted down and I go to put my cool looking H/M VCs on just to keep dust out and this is what I found:
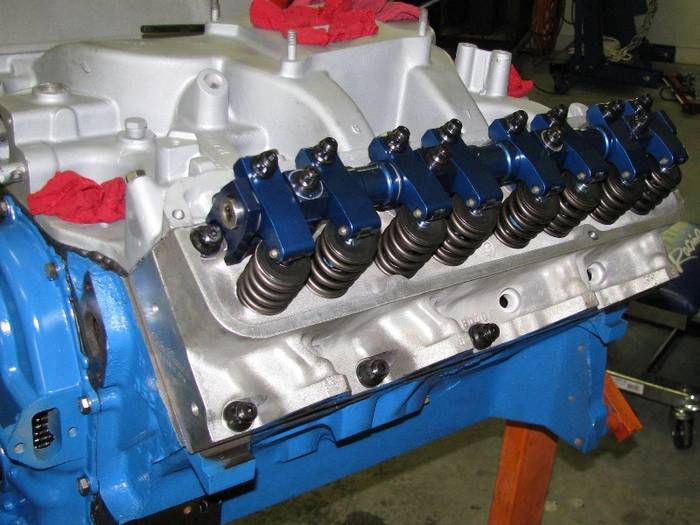
Notice anything missing? 
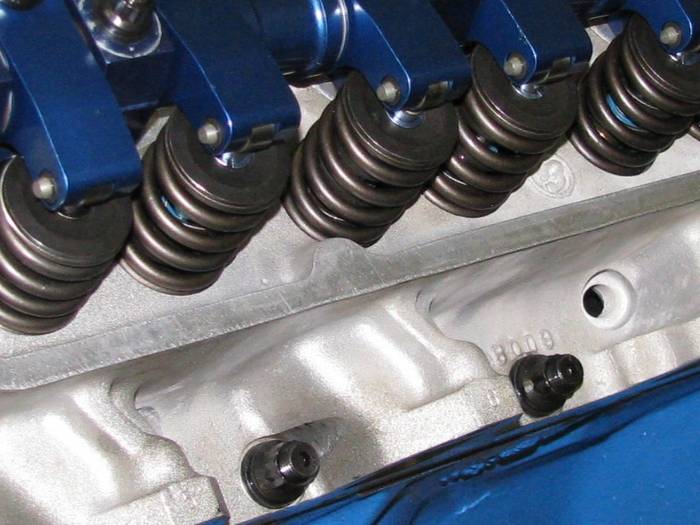
Seriously, WTF!? I can't believe that I now have to drill and tap for a VC bolt hole at this point. Why hadn't I noticed this before? Duh! WTF is with it not being there anyway?! 
More to follow................................ 
Steve
BTW, anyone have a dipstick and tube they want to get rid of for a reasonable price? How about a WP pully? 
Last edited by lovehamr; 04-04-2009 at 04:22 PM..
|
-
Advertising


04-04-2009, 06:58 PM
|
 |
Half-Ass Member

|
|
|
Join Date: Jun 2005
Cobra Make, Engine: ERA #732, 428FE (447 CID), TKO600, Solid Flat Tappet Cam, Tons of Aluminum
Posts: 22,017
|
|

 Not Ranked
Quote:
Originally Posted by lovehamr

Seriously, WTF!? I can't believe that I now have to drill and tap for a VC bolt hole at this point. Why hadn't I noticed this before? Duh! WTF is with it not being there anyway?!  |
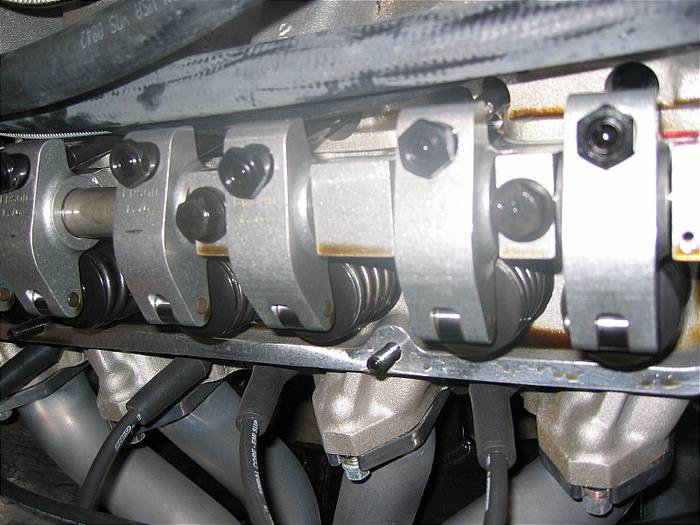
Well, since you have to do it anyway you might as well go with studs. It'll help you keep your covers from leaking... which they will. 
 |

04-04-2009, 09:05 PM
|
 |
Stolen Avitar

|
|
|
Join Date: Oct 2004
Location: Brunswick,
GA
Cobra Make, Engine: BDR 1311 428PI
Posts: 3,044
|
|

 Not Ranked

Patrick, good advice which I would follow but using these VCs sort of negates that possibility:
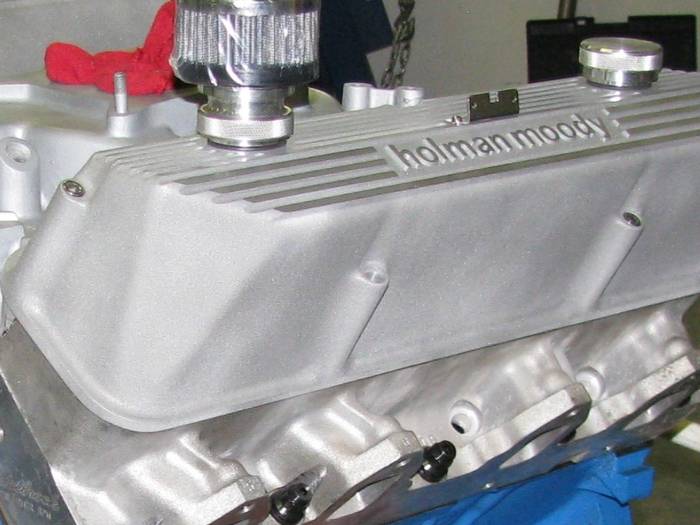
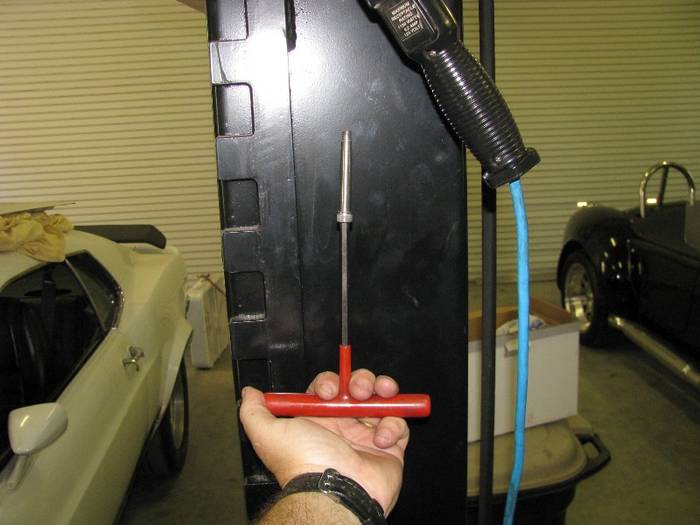
The VCs and their bolts have already cost me an afternoon of work on it as one gauled in the other head after being run in finger tight. Seriously, finger tight. When I went to remove it, it rotated about 2 turns and stopped refusing to turn in or out. At that point I had to twist it out and hope for the best. As I twisted on it with nothing but a T handle it sheared about 10 threads up from the head.  Notice that my T handle is fine. Now I'm not what you would call a small guy but it really didn't take much torque to twist that little POS in half. Uh, I mean thirds, when I tried to get what was left in the head out it sheared again, right at the level of the head, forcing me to drill it out and heli-coil that hole. 
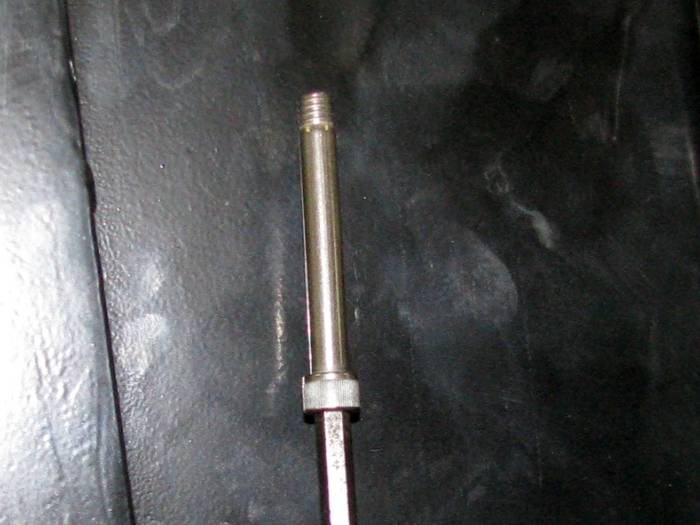
I figure these things are made of stainless peanut butter and I'm now looking for something to replace them. Just in case anyone wondered, these are what came with the VCs. 
Steve
Last edited by lovehamr; 04-04-2009 at 09:14 PM..
|

04-05-2009, 07:18 AM
|
|
CC Member

|
|
|
Join Date: Dec 2001
Location: Louisville,
KY
Cobra Make, Engine: I'm Cobra-less!
Posts: 9,417
|
|

 Not Ranked
Another good reason for studs. You can't get some longer studs/threaded rod? I always use studs when I can on the valve covers. It makes things so much easier.
|

04-05-2009, 07:59 AM
|
 |
Half-Ass Member

|
|
|
Join Date: Jun 2005
Cobra Make, Engine: ERA #732, 428FE (447 CID), TKO600, Solid Flat Tappet Cam, Tons of Aluminum
Posts: 22,017
|
|

 Not Ranked
Quote:
Originally Posted by blykins

Another good reason for studs. You can't get some longer studs/threaded rod? I always use studs when I can on the valve covers. It makes things so much easier.
|
Yes, I would think a high-quality rod, cut & threaded to the correct length would do the trick. Beautiful valve covers, but the bolts that came with them sound like they came from Toys R Us.  |

04-05-2009, 09:31 AM
|
|
CC Member

|
|
|
Join Date: Mar 2001
Location: E BRUNSWICK N.J. USA,
Posts: 3,841
|
|

 Not Ranked
 You broke the golden rules
lovehamer Steve you broke to basic rules of assembling any motor. First you didnot take a good look at the new parts you got.( no tapped hole in the head) Next you didn't run a tap into every hole in the heads, block, intake, water pump,crankshaft, and timing cover if needed. You would have caught the missing hole if you checked the hole for clean threads. Worst of all, You like screwing every hole DRY?     You know that steel and aluminum oxidizes and corriodes in the holes without a sealer or antiseize on the threads. Go to ARP and see if they have allen head long screws. Its a shame that you paided big bucks for those valve cover and they have cheap bolts. Rick L. Ps if you cover the area, you can drill and tap the head on the block. Get some one to use a shop-vac to collect the chips, drill slow, put a piece of tape on the drill drills to get the right depth. Drill in 3 sizes. Oil the tap and tap straight. Clean real good when done. Biggest thing is take your time. Your OK.  Pss try a little lube next time, it will not hurt this much.    Use the valve cover to center the hole for the bolt. Use a center punch or use the old bolt you have with just grinding the threaded end to a tip that will center in the hole of the valve cover. 

|

04-05-2009, 08:22 PM
|
 |
Stolen Avitar

|
|
|
Join Date: Oct 2004
Location: Brunswick,
GA
Cobra Make, Engine: BDR 1311 428PI
Posts: 3,044
|
|

 Not Ranked

First off yes I did not chase all the bolt holes in the head. I did do that with the block but it's a 40 year old piece and the heads are new. I will be drilling the head while it's on the block, I did the other side with a piece of bolt in it and sweated the entire time I was working on it. This one should be much easier; at least the bit won't be bouncing off of bits of peanut butter bolt while also cutting aluminum. My biggest worry is not getting the hole straight.
To answer about the studs, even using threaded rod would not work in this case as the head of the allen bolt sits down in a recess in the VC. And yes, for the price I paid for having something different I expected better quality components. I hope they don't use hardware like this on their GT40s. 
Now on to other offending studs. In this pic you'll notice the cool ARP studs and nuts holding the killer KC recip assy.
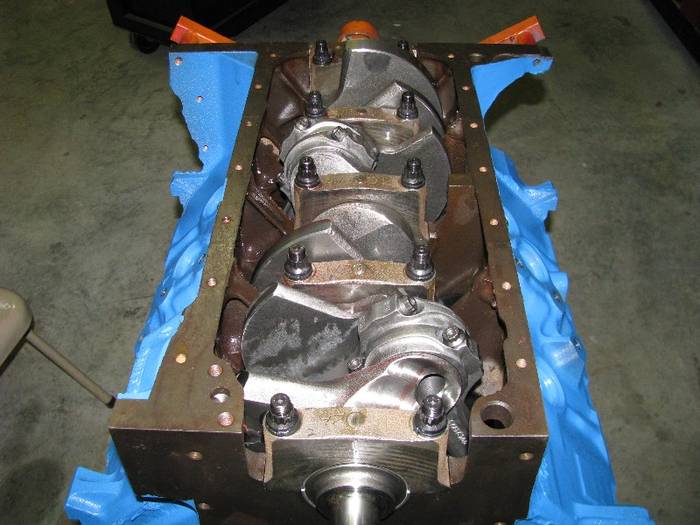
Guess what happened when I tried to mount the Moroso RR oil pan? Yup, no clearance for the studs on the rear main.
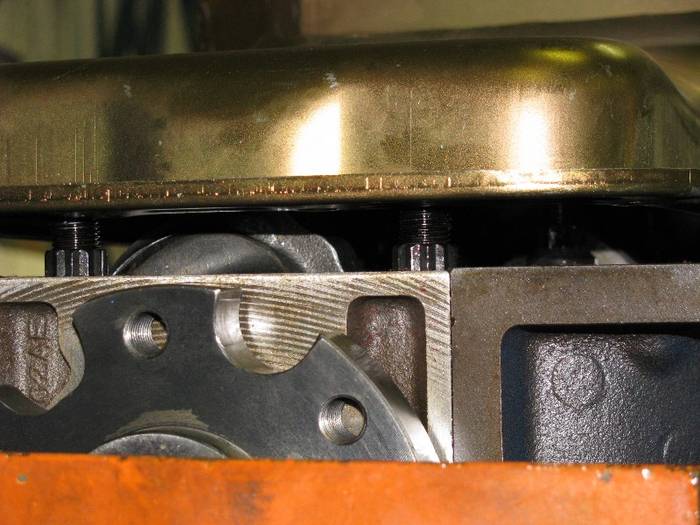
So, back to bolts for the rear main! And the saga continues. 
Steve

|

04-05-2009, 08:33 PM
|
 |
Backdraft Racing Dealer

|

|
|
Join Date: Dec 2004
Location: North Haven,
CT
Cobra Make, Engine: Backdraft Racing
Posts: 5,122
|
|

 Not Ranked
Good to see it coming together Steve... atleast you only have to build the engine  |

04-05-2009, 08:52 PM
|
 |
Stolen Avitar

|
|
|
Join Date: Oct 2004
Location: Brunswick,
GA
Cobra Make, Engine: BDR 1311 428PI
Posts: 3,044
|
|

 Not Ranked
Quote:
Originally Posted by Cashburn

Good to see it coming together Steve... atleast you only have to build the engine  |
Ya got that right homey!  |

04-05-2009, 11:07 PM
|
|
CC Member

|
|
|
Join Date: Jul 2008
Location: Driftwood,
TX
Cobra Make, Engine: Contemporary Cobra, 427 side oiler
Posts: 1,850
|
|

 Not Ranked
Quote:
Originally Posted by lovehamr

Guess what happened when I tried to mount the Moroso RR oil pan? Yup, no clearance for the studs on the rear main. So, back to bolts for the rear main! And the saga continues.  Steve |
I JUST ran into this same problem with my Armondo pan, and I was using main bolts, not studs. With some creativity on the pan and lots of Right Stuff I think I got a good enough seal to stop the seeping in the rear, we'll see. I am praying to the FE gods it won't leak again. Nice build, bada$$ valve covers. |

04-06-2009, 05:36 AM
|
|
CC Member

|
|
|
Join Date: Mar 2001
Location: E BRUNSWICK N.J. USA,
Posts: 3,841
|
|

 Not Ranked
 Here to help
lovehamer Steve Take a deep breath. We can walk you through this. Valve cover first, Mount the valve cover on the head and remove play on the cover. SHARP BITS. Next Grind the broken bolt threaded end to a point and use this as a center punch to start the hole. You really only need the mark to start in the aluminum. Next Get masking tape and see how depth the hole in the valve cover is until you hit the head. Put the tape on the drill bit leaving just enough room to slide this down the hole for the pilot hole. Put grease on the tape so it doesn't bind up when spinning inside the valve cover hole. Slow Speed on the Drill, aluminum is soft to drill. 3/4" deep should be all you need to do this. If you have the cover tight, your pilot hole is centered. Next get a bit for the correct size to the tap. Use some WD-40 when doing any drilling. Slow spray to cool the bit and keep the chips from sticking to the bit. Blow out the hole and tap it. You will have to eye this for the correct angle for the tap to go in. Put a bolt in one of the other holes and use this for the correct angle. Just take you time and use lube for this too.
Rear main studs. Do you have a wiz wheel grinder? Yes/No? If yesyou ccan cut the main studs in the motor. Just cover the area with paper and tape real good. If you don't want to cut them in the block, remove the studs and cut them in a vise down to the correct size to fit under the oil pan. Are you using a windage tray? You will need two gaskets. This will take up some room also. If you cut the stud on a vise use wet towels to control the heat from the cutting. You can either get a stud installer or double nut the studs to reinstall in the block Don't touch or wiggy the main cap if you can aviod it. Install the shorter studs, lube and torque to spec. Recheck the work and assembly. Get a friend to help you with this. 4 hands are better than 2.  Rick L

|

04-06-2009, 10:32 AM
|
 |
Stolen Avitar

|
|
|
Join Date: Oct 2004
Location: Brunswick,
GA
Cobra Make, Engine: BDR 1311 428PI
Posts: 3,044
|
|

 Not Ranked

Quote:
Originally Posted by RICK LAKE

lovehamer Steve Take a deep breath. We can walk you through this.
|
Rick, It's not like I can't do it, I'm just pissed and venting that A) I didn't notice it until now and B) why the hell wasn't it already done. 
Quote:
Originally Posted by RICK LAKE

Next Grind the broken bolt threaded end to a point and use this as a center punch to start the hole.
|
Not even close to long enough so I used a long punch.
Quote:
Originally Posted by RICK LAKE

You really only need the mark to start in the aluminum. Next Get masking tape and see how depth the hole in the valve cover is until you hit the head. Put the tape on the drill bit leaving just enough room to slide this down the hole for the pilot hole. Put grease on the tape so it doesn't bind up when spinning inside the valve cover hole. Slow Speed on the Drill, aluminum is soft to drill. 3/4" deep should be all you need to do this. If you have the cover tight, your pilot hole is centered.
|
I'll have to see if I can find a bit long enough. If I can this could work! 
Quote:
Originally Posted by RICK LAKE

Put a bolt in one of the other holes and use this for the correct angle. Just take you time and use lube for this too.
|
Did this on the other side on the broken bolt as well. 
Quote:
Originally Posted by RICK LAKE

Rear main studs. Do you have a wiz wheel grinder? Yes/No? If yesyou ccan cut the main studs in the motor. Just cover the area with paper and tape real good. If you don't want to cut them in the block, remove the studs and cut them in a vise down to the correct size to fit under the oil pan. Rick L |
Just the thought of that gives me the heebee jeebees!  Besides, unless I cut off all of the nut as well it still wouldn't fit under the pan. I just went back to bolts on the rear main. 
Steve
Last edited by lovehamr; 04-06-2009 at 12:04 PM..
|

04-07-2009, 05:51 AM
|
|
CC Member

|
|
|
Join Date: Mar 2001
Location: E BRUNSWICK N.J. USA,
Posts: 3,841
|
|

 Not Ranked
 Did you get the right oil pan for yourcar and motor
lovehamer Steve is this the right part for the car?? Companies have boxed stuff wrong before? Are you running a windage tray? Rick L. Ps what numbers stamped on the pan??  Did you call Moroso about this? |

04-07-2009, 12:19 PM
|
 |
Stolen Avitar

|
|
|
Join Date: Oct 2004
Location: Brunswick,
GA
Cobra Make, Engine: BDR 1311 428PI
Posts: 3,044
|
|

 Not Ranked
Quote:
Originally Posted by RICK LAKE

lovehamer Steve is this the right part for the car?? Companies have boxed stuff wrong before? Are you running a windage tray? Rick L. Ps what numbers stamped on the pan??  Did you call Moroso about this? |
The pan is definitely an FE pan, no windage tray, it's going in a Cobra with no cross pieces under it so I didn't even have to use a front or rear sump. If you would really like the #s I'll look when I get back home. In the rear the factory bolts sit almost flush with the main cap; the ARP studs with nuts protrude above (or below depending on how you're looking at it) that level enough to hit the back of the OP where it curves from the pan rail. As far as calling Moroso goes, no I haven't and probably won't as I bought this thing used from one of the guys over on the FE forum and at any rate it's for a factory FE and probably wasn't designed with ARP studs in mind.
Steve |

04-16-2009, 09:37 PM
|
 |
Stolen Avitar

|
|
|
Join Date: Oct 2004
Location: Brunswick,
GA
Cobra Make, Engine: BDR 1311 428PI
Posts: 3,044
|
|

 Not Ranked
 Up Date:
VC, bolt hole drilled and tapped; thanks Rick.  ****-canned the stainless bolts and went with steel. I may have to worry about rust on the bolt heads but I won't be twisting one off with a T-handle. Here are a couple of pics showing how it's coming together; 
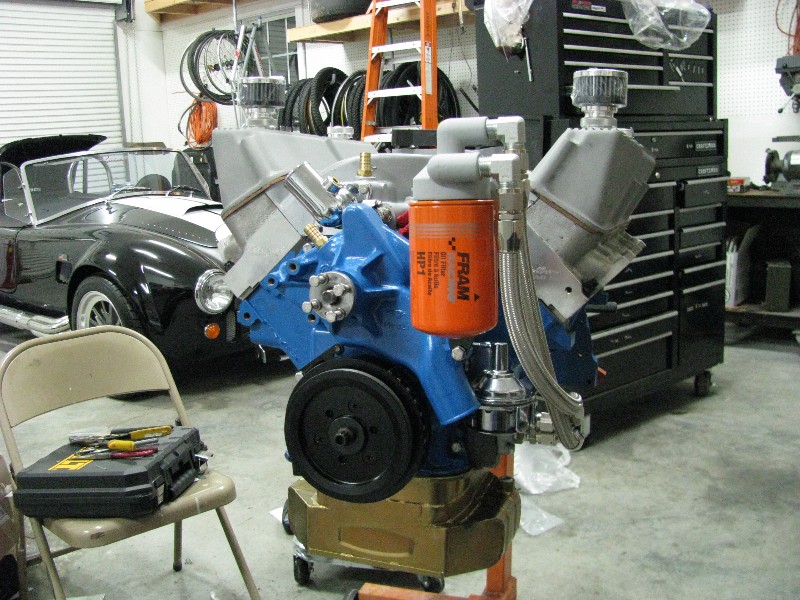
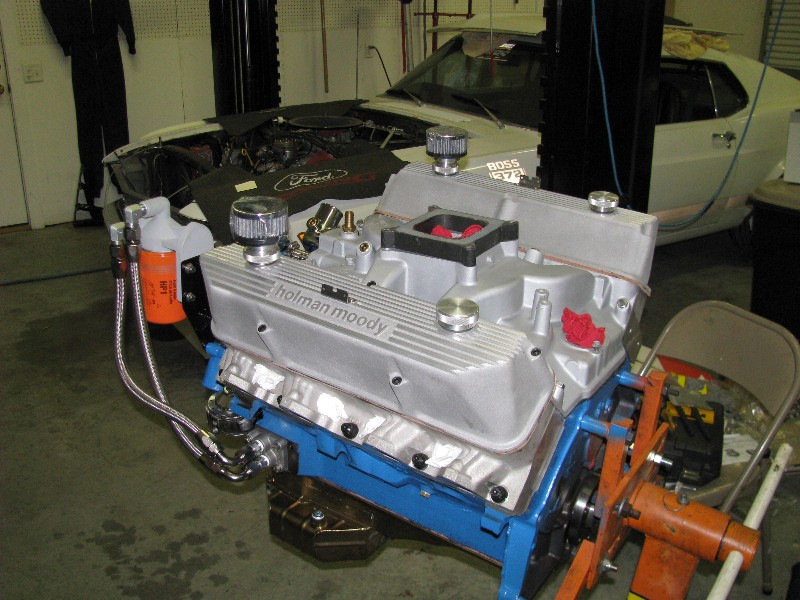
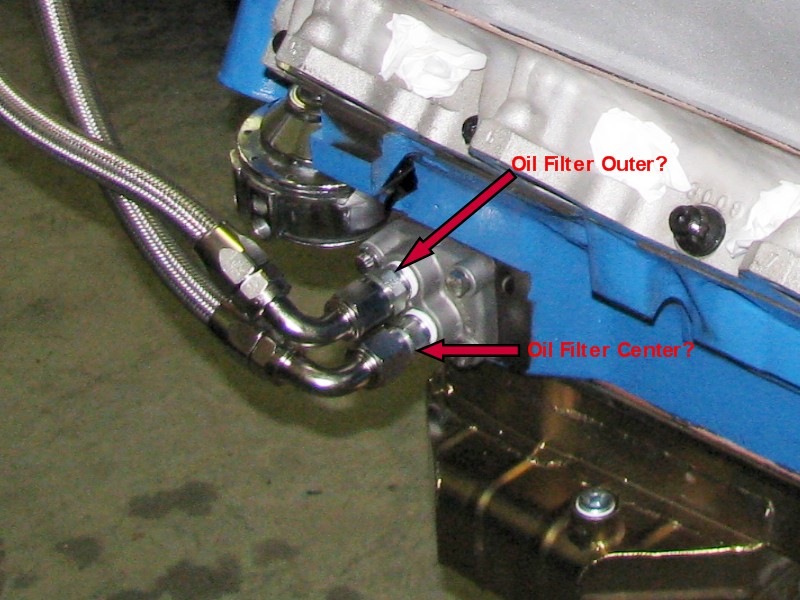
I couldn't find a definite answer for this, so will someone look at it a tell me whether I have the oil routed correctly or not?
Now on to the headers. Considering how heavy these puppys are and how thick the flange is, they are some wavy, out of shape, heaps. I don't know if I'm going to be able to get #4 to seal w/o some surgery. What do you guys think?
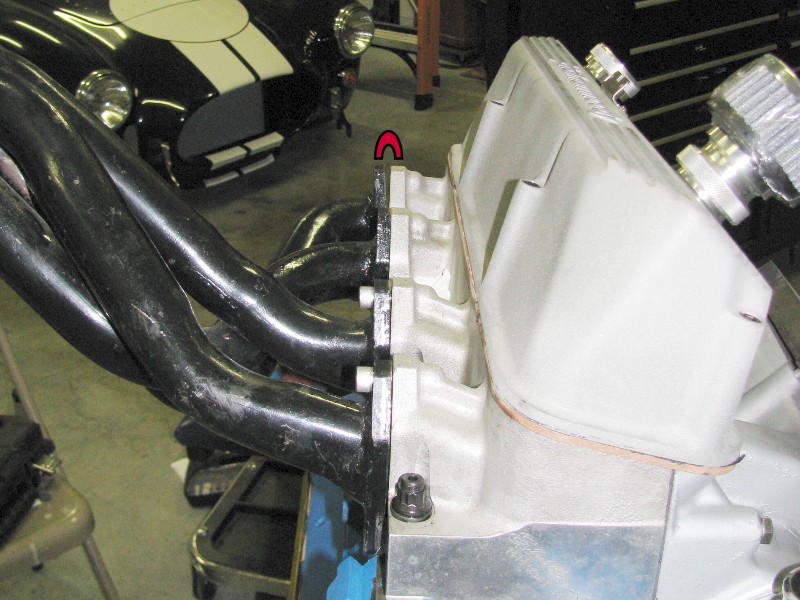
Better view;
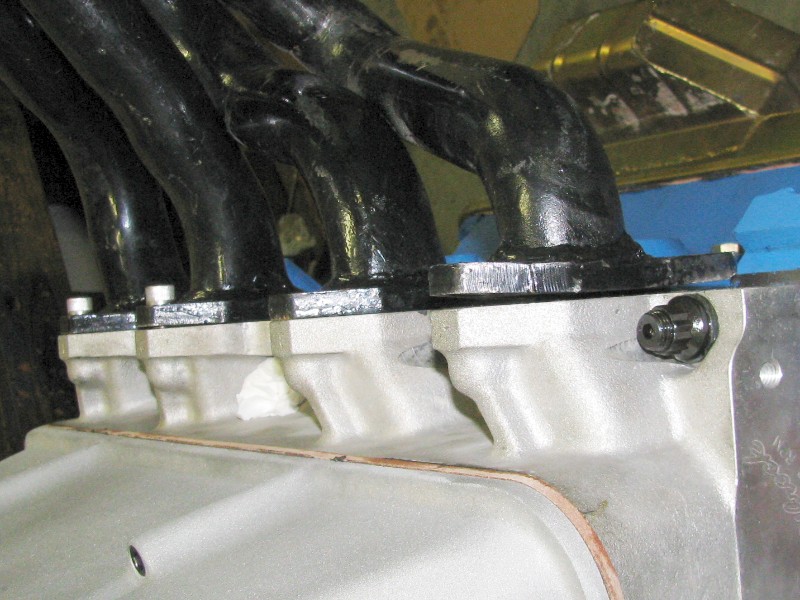
Someone really didn't want to be making FE headers that day I think. In this view with a straight edge, you can see that the flange is twisted on 3 axis. Not even close to straight;

That's it for now guys, Steve  |

04-16-2009, 10:34 PM
|
|
CC Member

|
|
|
Join Date: Jul 2008
Location: Driftwood,
TX
Cobra Make, Engine: Contemporary Cobra, 427 side oiler
Posts: 1,850
|
|

 Not Ranked
Quote:
Originally Posted by lovehamr

What do you guys think?
|
I think I wouldn't be trying to pull that flush into an aluminum head. Very nice looking engine. |

04-17-2009, 04:59 AM
|
 |
CC Member

|
|
|
Join Date: Jul 2005
Location: Virginia Beach, Va & Port Charlotte, Fl.,
Posts: 2,287
|
|

 Not Ranked
I'd get a sawzall and cut through 70% of the diameter of #4 pipe on the distorted side upward, as close to the flange as possible. I'd the get a "fat tipped" oxy/acet torch and "cherry red" that distorted flange. Put the header flange flat on the concrete floor or driveway (large anvil preferred) and flatten #4 flange, comparitive and equal to the others, working it with a hammer. Once you get it where you want it dress it up with a file. An auto machine shop head resurfacer (sander/abrasive type) would be better and get you a 100% flat flange. Once you have the flange where you want it tack weld it to the tube. Recheck flange with a straight edge and reweld/fill the gap between the flange and the tube. You're not going to see the repair once it's installed in the car so it doesn't have to be real pretty, just effective.
Dave
__________________
Too many toys?? never!
|

04-17-2009, 05:50 AM
|
|
CC Member

|
|
|
Join Date: Mar 2001
Location: E BRUNSWICK N.J. USA,
Posts: 3,841
|
|

 Not Ranked
 Nice job on the valve covers

|

04-17-2009, 05:51 AM
|
|
CC Member

|
|
|
Join Date: Jul 2003
Location: West Bloomfield,
MI
Cobra Make, Engine:
Posts: 717
|
|

 Not Ranked
Variation on the theme. If you have an old iron head lightly bolt that header into place. Warm the offensive parts 'til they glow red and tighten the bolts a few turns at a time reheating as needed. Once it's "home" cool the affected area with a wet rag to "lock the setting". Then do the parts store head surfacer belt sander deal.
__________________
Survival Motorsports
"I can do that....."

Engine Masters Challenge Entries
91 octane - single 4bbl - mufflers
2008 - 429 cid FE HR - 675HP
2007 - 429 cid FE MR - 659HP
2006 - 434 cid FE MR - 678HP
2005 - 505 cid FE MR - 752HP
|

04-17-2009, 05:52 AM
|
|
CC Member

|
|
|
Join Date: Jul 2003
Location: West Bloomfield,
MI
Cobra Make, Engine:
Posts: 717
|
|

 Not Ranked
Damn. Lake got me on a holeshot!
__________________
Survival Motorsports
"I can do that....."

Engine Masters Challenge Entries
91 octane - single 4bbl - mufflers
2008 - 429 cid FE HR - 675HP
2007 - 429 cid FE MR - 659HP
2006 - 434 cid FE MR - 678HP
2005 - 505 cid FE MR - 752HP
|
 Posting Rules
|
You may not post new threads
You may not post replies
You may not post attachments
You may not edit your posts
HTML code is Off
|
|
|
All times are GMT -7. The time now is 01:48 PM.
|




 Notice that my T handle is fine. Now I'm not what you would call a small guy but it really didn't take much torque to twist that little POS in half. Uh, I mean thirds, when I tried to get what was left in the head out it sheared again, right at the level of the head, forcing me to drill it out and heli-coil that hole.


 Pss try a little lube next time, it will not hurt this much.


 Linear Mode


