Welcome to Club Cobra! The World's largest
non biased Shelby Cobra related site!
- » Representation from nearly all
Cobra/Daytona/GT40 manufacturers
- » Help from all over the world for your
questions
- » Build logs for you and all members
- » Blogs
- » Image Gallery
- » Many thousands of members and nearly 1
million posts!
YES! I want to register an account for free right now!
p.s.: For registered members this ad will NOT show
 
 Main Menu
|
 Nevada Classics
|
 Advertise at CC
|
 April 2025
|
| S |
M |
T |
W |
T |
F |
S |
| |
|
1 |
2 |
3 |
4 |
5 |
| 6 |
7 |
8 |
9 |
10 |
11 |
12 |
| 13 |
14 |
15 |
16 |
17 |
18 |
19 |
| 20 |
21 |
22 |
23 |
24 |
25 |
26 |
| 27 |
28 |
29 |
30 |
|
|
|
|
 CC Advertisers
|
|

06-13-2011, 08:22 AM
|
 |
CC Member

|
|
|
Join Date: May 2010
Location: Birmingham,
AL
Cobra Make, Engine: Kirkham 289 FIA, 363 Stroker
Posts: 751
|
|

 Not Ranked
Good eye. They are too long and i am changing them out. They are great 8 though. I need to place an order with McMaster for some other fasteners and better radiator hose clamps as well.
|
-
Advertising


06-13-2011, 09:20 AM
|
 |
Full Blown Member

|

|
|
Join Date: Sep 2008
Cobra Make, Engine: KMP 427 S/C, Twin Paxton 511 FE
Posts: 2,594
|
|

 Not Ranked
Looks awesome!
Can't wait to see it completed.
Fun thread.
__________________
rodneym
|

06-14-2011, 09:26 AM
|
 |
CC Member

|
|
|
Join Date: May 2010
Location: Birmingham,
AL
Cobra Make, Engine: Kirkham 289 FIA, 363 Stroker
Posts: 751
|
|

 Not Ranked
Thanks!
Driveshaft bolts:
Ok, i just ordered high strength bolts with a rockwell harness of C25 and minimum tensile strength of 116,000 PSI with high strength 12 point flange nuts with a minimum rockwell harness of C34.
Hopefully that will hold it. Im just now educating myself on the rockwell and tensile strength scales/charts/tables
Last edited by RestoCreations; 06-14-2011 at 09:29 AM..
|

06-24-2011, 06:42 AM
|
 |
CC Member

|
|
|
Join Date: May 2004
Cobra Make, Engine: CSX6363
Posts: 180
|
|

 Not Ranked
Looking great Chris! I was home on R&R a few weeks ago and spent most of my time either at the lake or white-water rafting so we never headed in your direction. Like everyone else, I'm eagerly awaiting the day that you have this car out on the road. Send the girlfriend down to the beach for a few more weekends and you'll have a better chance of having the car running w/in the next month!!!
|

06-27-2011, 07:38 PM
|
 |
CC Member

|
|
|
Join Date: May 2010
Location: Birmingham,
AL
Cobra Make, Engine: Kirkham 289 FIA, 363 Stroker
Posts: 751
|
|

 Not Ranked
haha Mike! If only dating/female companionship and sleeping weren't such a strong human need.
I'm working on the sidepipe cutouts tonight. Not much else to do while i wait on the bulkhead to be powdercoated and a few parts to come in from summit. Hopefully the little parts will be in soon. Im not going to attempt to start the car again until at least the header tubes are hooked up.
|

06-28-2011, 07:42 AM
|
 |
CC Member

|
|
|
Join Date: May 2010
Location: Birmingham,
AL
Cobra Make, Engine: Kirkham 289 FIA, 363 Stroker
Posts: 751
|
|

 Not Ranked
I had a good time with my new 20.00 high speed cutting saw last night. The holes had to be enlarged quite a bit. Initially I thought i would be able to make the cutouts similiar to how the kirkhams cut them, but the hole had already been cut too far back at the top, so i just ended up making sort of an oval shape.
It took 4 hours to cut this hole out. I had to install a pipe, remove a pipe, make a cut, install the pipe again, make another cut, remove the pipe, etc and so on. Im pretty happy with how it turned out. I went very slowly to make sure that i did not cut a hole too large.
Initially, i thought i was just going to need to give it a light trim, but once I installed the number 1 header tube, it was obvious that a good bit of metal needed to be removed.
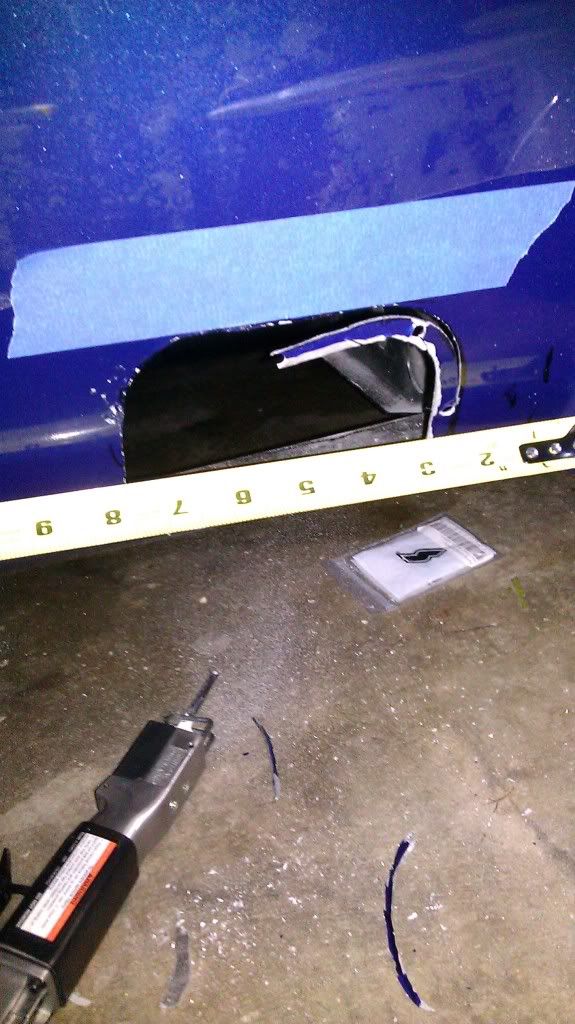
 |

06-28-2011, 10:11 PM
|
 |
CC Member

|
|
|
Join Date: Mar 2011
Location: Sleepy Hollow,
IL
Cobra Make, Engine: Kirkham #647 brushed
Posts: 412
|
|

 Not Ranked
Looks good Chris! I'm glad it worked out  if you put some metal edging on it, it could reduce the hole size a bit. |

06-29-2011, 01:27 PM
|
 |
CC Member

|
|
|
Join Date: May 2010
Location: Birmingham,
AL
Cobra Make, Engine: Kirkham 289 FIA, 363 Stroker
Posts: 751
|
|

 Not Ranked
I might do that to prevent it from chipping as well. The hole actually looks quite normal when you look down on it from a normal height. If you get down on the ground and stare at it, it looks a little too big, but I really dont think most people will be crawling around on the ground looking at the sidepipe cut out.  |

06-29-2011, 04:33 PM
|
 |
CC Member

|
|
|
Join Date: Dec 2001
Location: San Diego,
CA
Cobra Make, Engine:
Posts: 2,979
|
|

 Not Ranked
A bare aluminum surround piece could finish it off nicely and help close up the gap.
__________________
Remember, It's never too early to start beefing up your obituary.
|

06-30-2011, 11:45 PM
|
 |
CC Member

|
|
|
Join Date: Jun 2004
Location: Leicestershire,
UK
Cobra Make, Engine: Kirkham #523, 427 S/O
Posts: 1,137
|
|

 Not Ranked
Quote:
Originally Posted by xlr8or

A bare aluminum surround piece could finish it off nicely and help close up the gap.
|
No. Once the edge is cleaned up and painted, it will look fine.
I thought the gaps an mine were on the large side to start with, but now I'm used to them, they look exactly as they should.
The rear edge of the hole should be angled backwards i.e. the hole is wider at the bottom than it is at the top.
Looking good. I'm looking forward to seeing it all finished. My only comment would be that the side roundals and numbers are on the small side, but I assume they're just stick on, are they?
Paul |

07-07-2011, 09:04 PM
|
 |
CC Member

|
|
|
Join Date: May 2010
Location: Birmingham,
AL
Cobra Make, Engine: Kirkham 289 FIA, 363 Stroker
Posts: 751
|
|

 Not Ranked
I could not cut an angle in for the side pipe cut outs due to the hole that was already cut. I cant paint the cutouts that i have made because i have no idea what color paint cinema vehicles used on the car.
The gumballs are the ones that they, cinema vehicles, stuck on for the movie, so they will stay. And you are correct, they are just stickers. Im not the biggest fan of gumballs, but i am trying to keep the car looking as close to the way it was built for the movie as possible. Actually, if was building one from start to finish, it would be black with no stripes.
|

07-07-2011, 11:07 PM
|
 |
CC Member

|
|
|
Join Date: Jun 2004
Location: Leicestershire,
UK
Cobra Make, Engine: Kirkham #523, 427 S/O
Posts: 1,137
|
|

 Not Ranked
Good point. I'd actually forgotten it was the Iron Man car, so of course you want to keep it as close as possible.
We have a franchise company here in the UK called Chipsaway, who can match and paint pretty much any paint defect. They specialise in stone chips and scratches and operate from fully equipped vans, so they can go to the customer. I would have though there were similar companies in the US.
Putting an edging trim around the hole just won't look right, IMO.
Looking at your picture with the tape measure, that dimension is about right for the top of the hole. I've just been out to the garage to measure mine and it tapers from around 6" at the top to around 8" at the bottom. If you hole has parallel vertical sides at around 6", you can still get the correct taper.
Paul
|

07-08-2011, 06:46 AM
|
 |
CC Member

|
|
|
Join Date: May 2010
Location: Birmingham,
AL
Cobra Make, Engine: Kirkham 289 FIA, 363 Stroker
Posts: 751
|
|

 Not Ranked
Paul, if you take a second look at the tape measurer, the top of the hole extends back to 8" on both the top and the bottom. The only way i could taper the hole at this point would be to take the bottom out to 10", which would look really bad. The hole honestly doesnt look ginormous at any angle. Perhaps a little large when viewed while lying down on the ground, but other than that, it looks more or less normal. And honestly, if the hole was any smaller i would not have been able to stuff the headers tubes through it to connect them to the engine. I'll take another picture of the car from the height where it will normally be viewed and post it later today. Currently I just want to get the car finished and on the road. Little details such as the exhaust cut out can be addressed later if they start to bother me or the paint ends up flaking or bubbling due to heat.
BTW, the engine is a alive and running. I'll have a video soon.
Last edited by RestoCreations; 07-08-2011 at 06:48 AM..
|

07-08-2011, 06:53 AM
|
 |
CC Member

|
|
|
Join Date: Jun 2004
Location: Leicestershire,
UK
Cobra Make, Engine: Kirkham #523, 427 S/O
Posts: 1,137
|
|

 Not Ranked
I noticed the rear of the hole was at 8" on the tape, but the front of the hole was at 2", so I figured 6" in total. 
The hole looks fine and about the same size as mine at the top, which was why I assumed you still have room to taper it out at the bottom.
Paul
Last edited by FatBoy; 07-08-2011 at 06:55 AM..
|

07-08-2011, 07:00 AM
|
 |
CC Member

|
|
|
Join Date: Mar 2011
Location: Sleepy Hollow,
IL
Cobra Make, Engine: Kirkham #647 brushed
Posts: 412
|
|

 Not Ranked
Quote:
Originally Posted by RestoCreations

BTW, the engine is a alive and running. I'll have a video soon.
|
Woohoo! I hope I get another Birmingham overnight soon 
I got more pictures heading your way today Chris. |

07-08-2011, 10:56 AM
|
 |
CC Member

|
|
|
Join Date: May 2010
Location: Birmingham,
AL
Cobra Make, Engine: Kirkham 289 FIA, 363 Stroker
Posts: 751
|
|

 Not Ranked
That was an in progress photo before i had to cut the front to make the two front bound pipes fit. I thought i was going to be able to get away with trimming them less towards the front, but i was very incorrect. The hole actually ends up being right around .75" out from the start of the fender flare. It's pretty close to the fender, as I am sure you are well aware of. I never even realized that the holes were tapered from the Kirkham factory until i saw Arnaud's photos of the arrival of his car. I wonder if they have always tapered the sidepipe cutouts.
Thanks Arnaud! You da man! The pictures have been very helpful so far and i really appreciate you taking the time to send them to me. I am not looking forward to cutting the foam and putting it in the wheel wells, but I am sure your pictures will make the task much more painless.
|

07-30-2011, 08:55 PM
|
 |
CC Member

|
|
|
Join Date: May 2010
Location: Birmingham,
AL
Cobra Make, Engine: Kirkham 289 FIA, 363 Stroker
Posts: 751
|
|

 Not Ranked
Finally got the panels back from the powdercoaters.
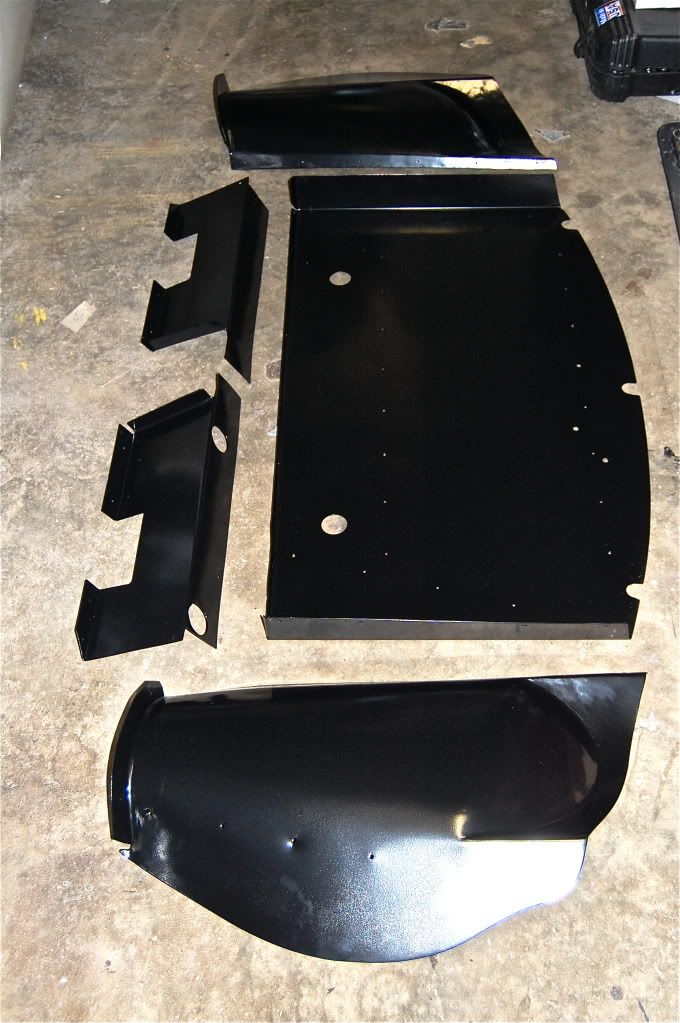
Dont make fun of my AC Delco battery, it was free. 
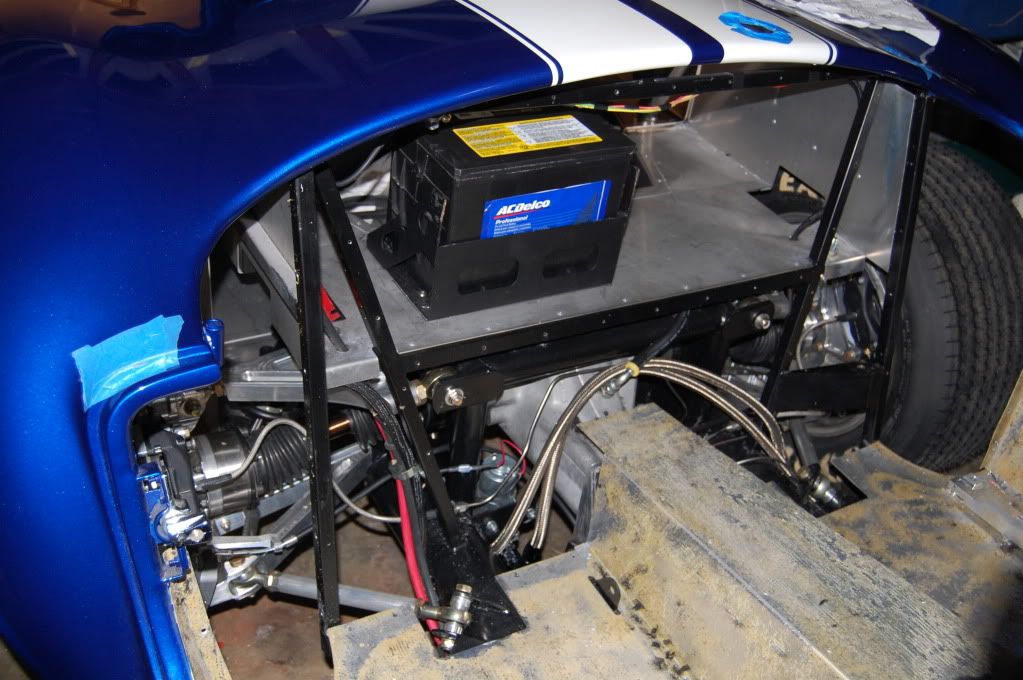
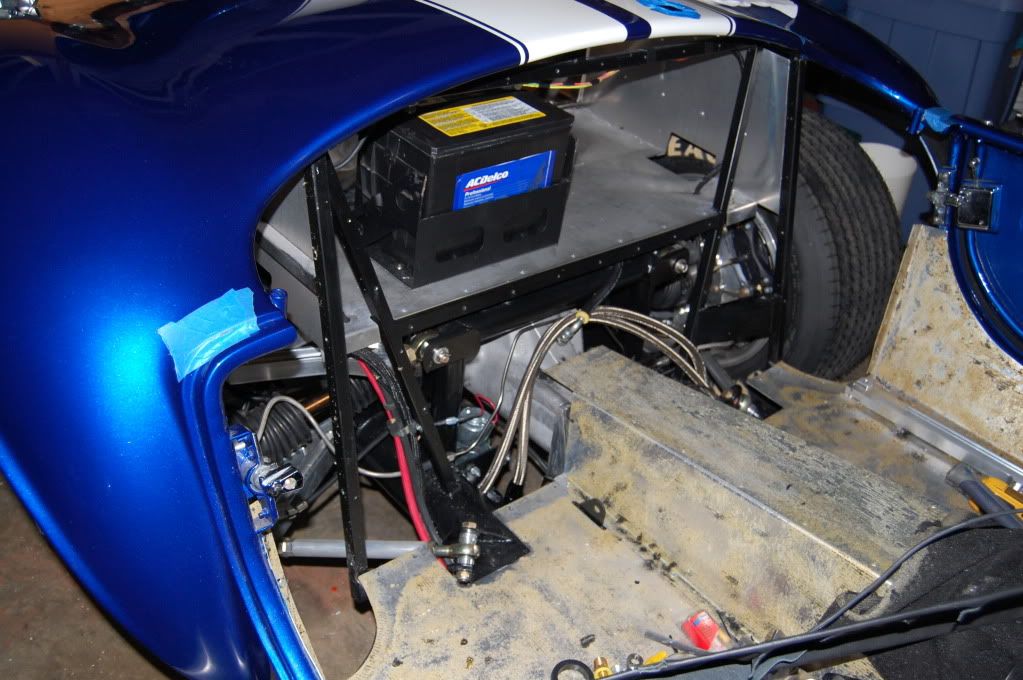
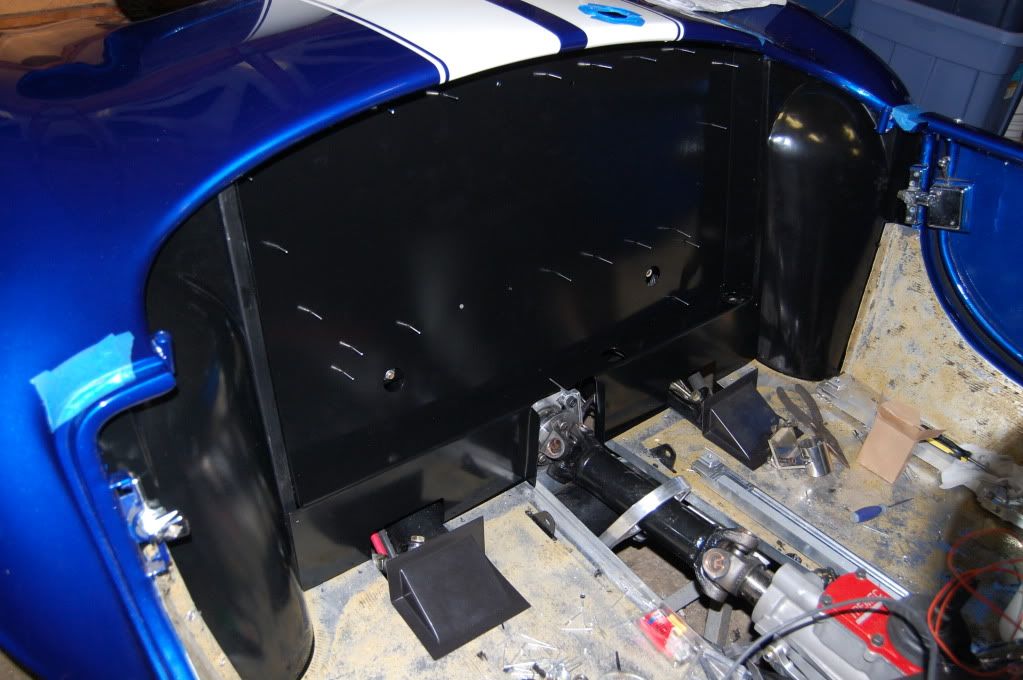
I've decided to go with the black rivet. They just look better in my opinion. Ill post more pictures once i get it all in place. The smash rivets for the fender portions were not fun to install.
Before
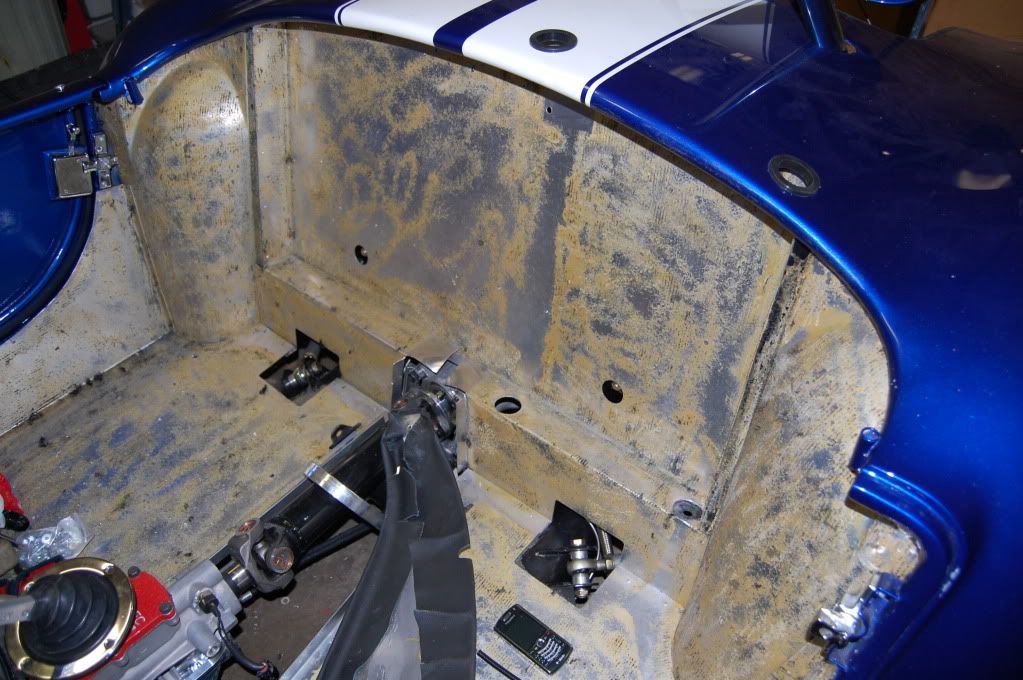
Almost After
Last edited by RestoCreations; 08-09-2011 at 10:15 AM..
|

07-30-2011, 11:10 PM
|
 |
CC Member

|
|
|
Join Date: May 2004
Cobra Make, Engine: CSX6363
Posts: 180
|
|

 Not Ranked
You're getting super close to finishing the car......how much longer before the inaugural start??? I checked the calendar and I have 105 more days of fun in the sun and about 120 before my CSX rolls into my garage.
|

07-31-2011, 08:24 AM
|
 |
CC Member

|
|
|
Join Date: May 2010
Location: Birmingham,
AL
Cobra Make, Engine: Kirkham 289 FIA, 363 Stroker
Posts: 751
|
|

 Not Ranked
Mike, its been up and running, but i had a bad Magnentic pick up, some fuel pressure issues, and i am still chasing down issues with the MSD system. I also have an oil leak at the oil pan drain plug for some reason, so i am going to need to drop the pan and probably rethread the plug hole. Perhaps i overtightened the drain plug and messed up the threads.
Ill be tackling the rest of the interior today and the wheel well foam while i have the car up on jack stands.
It's very close to being finished, but i still have a long list of small items to tackle.
I hope the next 4 months fly by for you. Stay safe! |

07-31-2011, 09:16 AM
|
 |
Senior Club Cobra Member

|
|
|
Join Date: Mar 2005
Location: Manchester,
NH
Cobra Make, Engine: AK1085 (302 Street), HTM111 (427 Comp), CSX2375R (289 Comp) and COB5999 (427 S/C)
Posts: 19,104
|
|

 Not Ranked
Looking great!
|
 Posting Rules
|
You may not post new threads
You may not post replies
You may not post attachments
You may not edit your posts
HTML code is Off
|
|
|
All times are GMT -7. The time now is 01:08 AM.
|
|


 if you put some metal edging on it, it could reduce the hole size a bit.


 Linear Mode


