Welcome to Club Cobra! The World's largest
non biased Shelby Cobra related site!
- » Representation from nearly all
Cobra/Daytona/GT40 manufacturers
- » Help from all over the world for your
questions
- » Build logs for you and all members
- » Blogs
- » Image Gallery
- » Many thousands of members and nearly 1
million posts!
YES! I want to register an account for free right now!
p.s.: For registered members this ad will NOT show
 
 Main Menu
|
 Nevada Classics
|
 Advertise at CC
|
 February 2025
|
| S |
M |
T |
W |
T |
F |
S |
| |
|
|
|
|
|
1 |
| 2 |
3 |
4 |
5 |
6 |
7 |
8 |
| 9 |
10 |
11 |
12 |
13 |
14 |
15 |
| 16 |
17 |
18 |
19 |
20 |
21 |
22 |
| 23 |
24 |
25 |
26 |
27 |
28 |
|
|
 CC Advertisers
|
|
 1Likes 1Likes

11-21-2011, 08:08 PM
|
 |
CC Member

|
|
|
Join Date: Jun 2008
Location: Chester Springs,
PA
Cobra Make, Engine: Kirkham 289 FIA #690, FRPP 427 Boss engine
Posts: 764
|
|

 Not Ranked
This morning I started my cobra and backed it out of the garage, let it warm up, and started tuning the engine. My voltage regulator was bad, so I replaced it and then it started to rain. I started the engine (Ford Boss 427w) to pull it back in the garage and it kicked back, the starter made a horrible grinding sound, and smoke came out of the carb! I wasn't really worried about the smoke, but all I could imaging was my poor flywheel. I pulled the starter and found this:
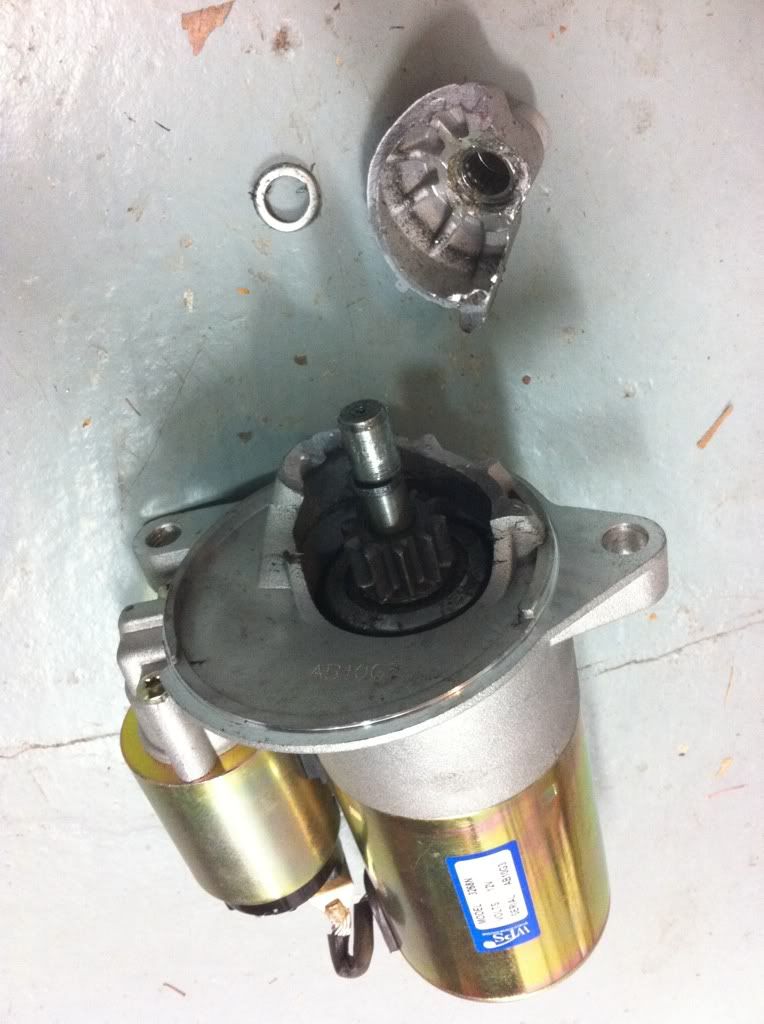
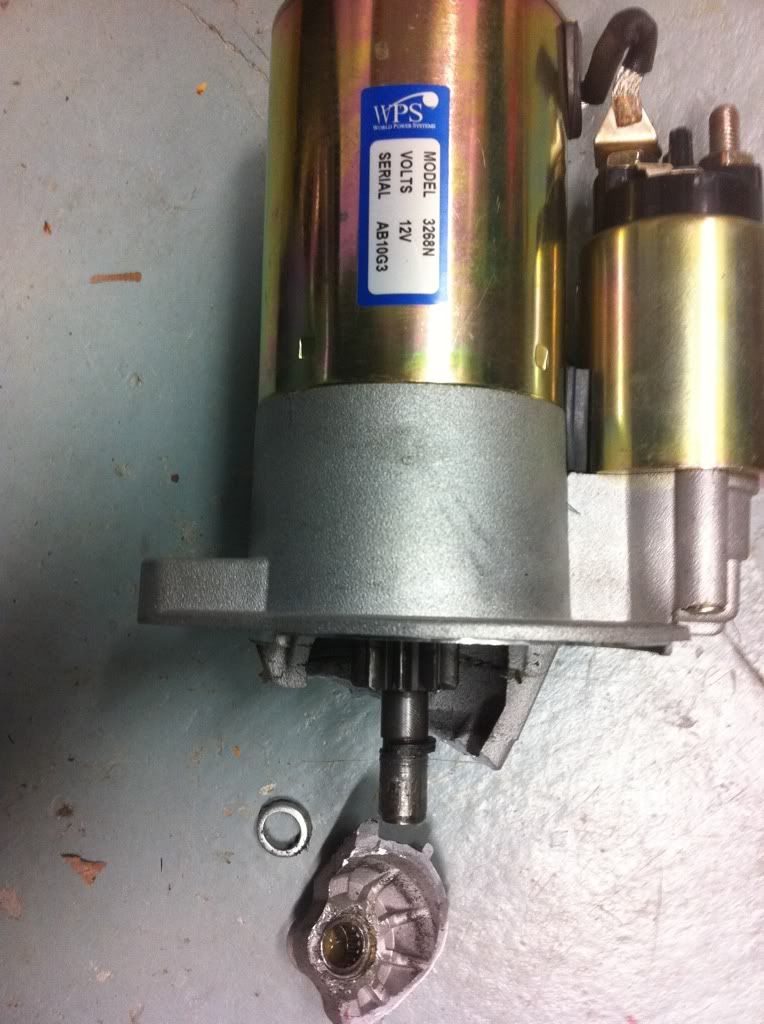
The flywheel looks fine and I got all the pieces out of the bellhousing, but could this just be the result of a cheap starter or something else?
I've since discovered that the starter was made in China. Figures...
__________________
RCR GT40 SOLD to Fast 5
Kirkham #690 289 FIA
|
-
Advertising


11-21-2011, 11:25 PM
|
|
CC Member

|
|
|
Join Date: Jan 2010
Cobra Make, Engine:
Posts: 11
|
|

 Not Ranked
A loooong time ago, that happened to me three times in about three months. It was caused by poor alignment between the starter and the flywheel (Or so I was told) on a 65 Corvair. I sold the car.
|

11-22-2011, 07:32 AM
|
 |
CC Member

|
|
|
Join Date: Mar 2003
Location: McConnellsburg,
PA
Cobra Make, Engine: ERA FIA #2124
Posts: 687
|
|

 Not Ranked
Mark:
Were both bolts tight that held the starter to the bellhousing? I'm wondering why there are bolt thread marks in the mounting hole located by the solenoid in this picture:

The nose doesn't support the weight of the starter at all and only experiences a shear force when the gear contacts the flywheel under normal circumstances...I just can't understand why it would have experienced such a catastrophic event.... Is the shaft the starter gear slides on bent at all as a result? - it doesn't appear to be. Weird...
If all your flywheel teeth are fine and it appears there was good engagement between the starter gear and flywheel (as evident by any witness markes on the starter gear), I would go get another starter and make sure your timing is correct..(kickback??)
- Allen. |

11-22-2011, 07:39 AM
|
 |
CC Member

|
|
|
Join Date: May 2010
Location: Birmingham,
AL
Cobra Make, Engine: Kirkham 289 FIA, 363 Stroker
Posts: 751
|
|

 Not Ranked
Been there before. Mine broke on the first start of a fresh engine rebuild and i about dumped my pants when i heard all the commotion from the starter nose breaking. It turned out to be aligned wrong. Had a new nose installed on the starter and then made extra, extra sure to pay special attention to the alignment of the starter when reinstalling. Still, i seem to attract this type of "bug" no matter how careful i am. Some of us are just gifted....join the club  |

11-22-2011, 08:09 AM
|
 |
CC Member

|
|
|
Join Date: Jun 2008
Location: Chester Springs,
PA
Cobra Make, Engine: Kirkham 289 FIA #690, FRPP 427 Boss engine
Posts: 764
|
|

 Not Ranked
Allen, both bolts were tight. I believe those marks are from when I was mocking up the engine and had a difficult time getting that bolt to thread in properly. I took it apart and that is when I discovered that Quicktime has a problem with their small block engine plate. I needed to grind the starter index hole to match the stock engine plate (this is a well documented problem). After that, it fit perfectly.
After checking everything out, I believe this problem was caused by engine kickback during starting in combination with a cheap cast aluminum starter nose from China.
__________________
RCR GT40 SOLD to Fast 5
Kirkham #690 289 FIA
|

11-24-2011, 03:42 AM
|
 |
CC Member

|
|
|
Join Date: Nov 1999
Location: Brisbane, Australia,
Q
Cobra Make, Engine: Contemporary CCX3117 427FE
Posts: 4,381
|
|

 Not Ranked
Bummer about the little bugs that need to be ironed out, but that motor sounds fabulous!!!
__________________
Craig
|

01-19-2012, 05:23 PM
|
 |
CC Member

|
|
|
Join Date: Jun 2008
Location: Chester Springs,
PA
Cobra Make, Engine: Kirkham 289 FIA #690, FRPP 427 Boss engine
Posts: 764
|
|

 Not Ranked

I spent most of today setting ride height and getting the front end dialled in.
First I set the ride height. I started with 3 11/16" up front which explains why my 4" low profile floor jack couldn't get under the front crossmember. The rear was at 5 3/4". Specs call for 4.5" up front and 4.75" in the rear. I got the front up to 4.5", but ran out of adjustment at 5" for the rear. There's no gas or me in the car, so I left it there for now.
On the front, the upper control arm rod ends were screwed all the way in and my baseline was 1/8" toe out, -3 camber and +3.5 caster on both sides. That's interesting as the caster spec calls for +3.5 which means the frame mounts are set at +3.5 caster. The toe adjusters were screwed all the way in, so there was no way with the baseline setting to get any more toe in.
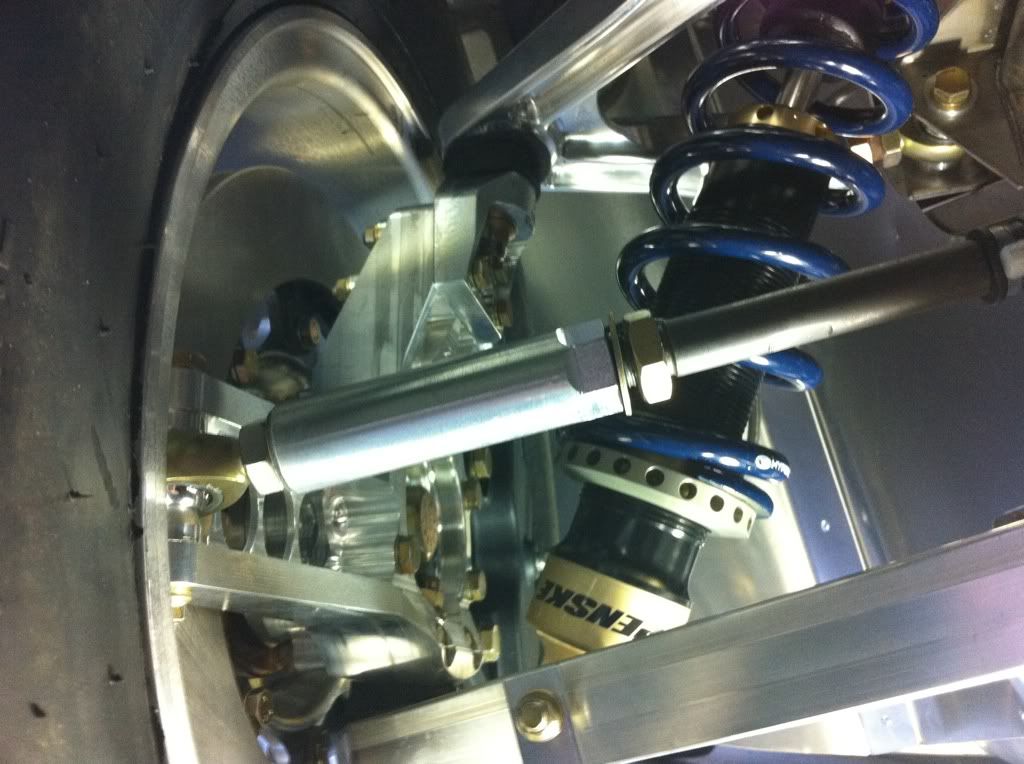
I started by turning both rod ends on the upper control arms 3 complete turns which got me to -1.25 camber on both sides. This meant that one more complete turn should get me to the spec of -.5, so up the front end went again and 30 minutes later, I was ready for another check. I set up the alignment jig (the aluminum pieces are how I measure toe):
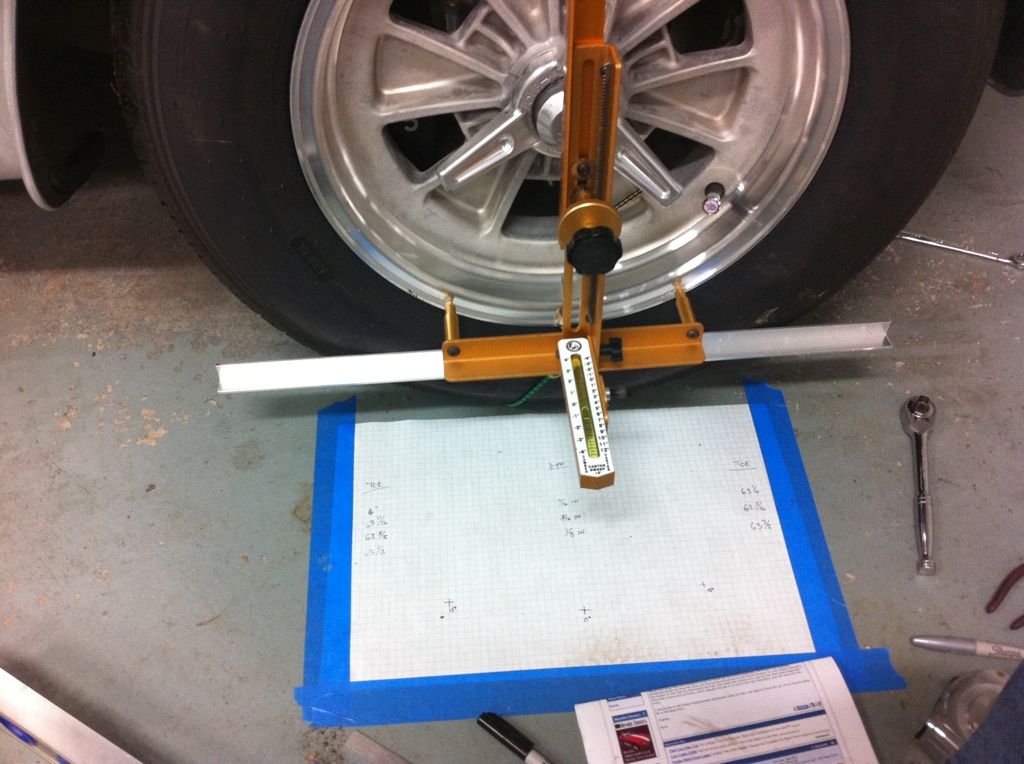
This time my camber came in right at -.5 degrees on both wheels (scale on the left side):
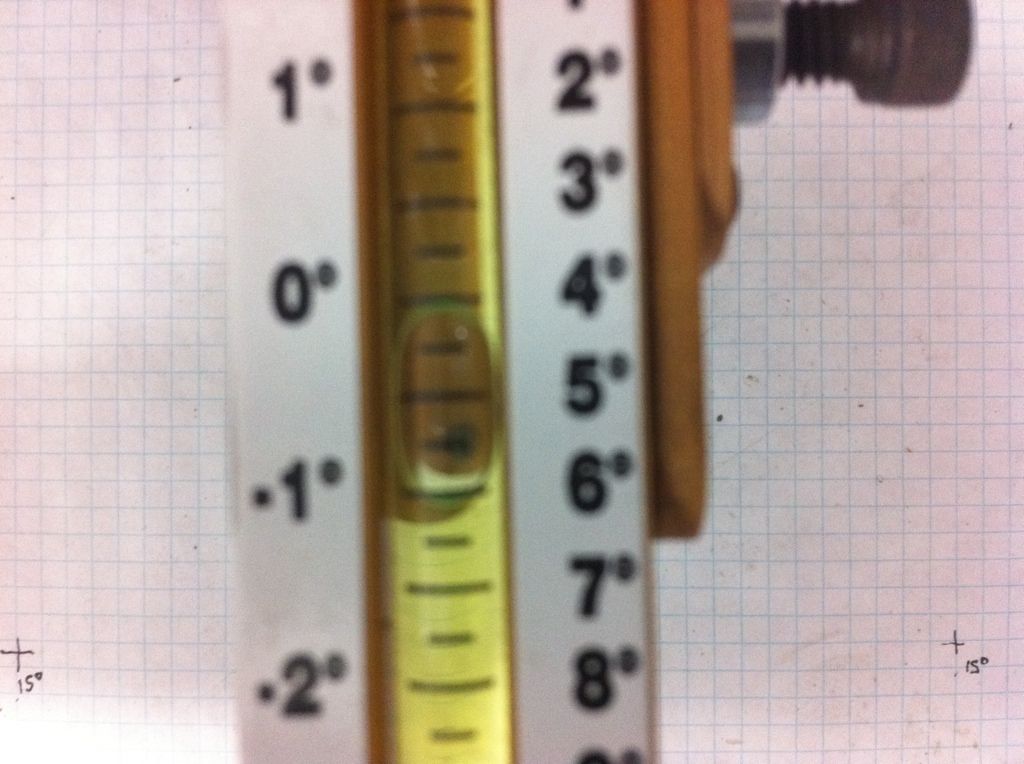
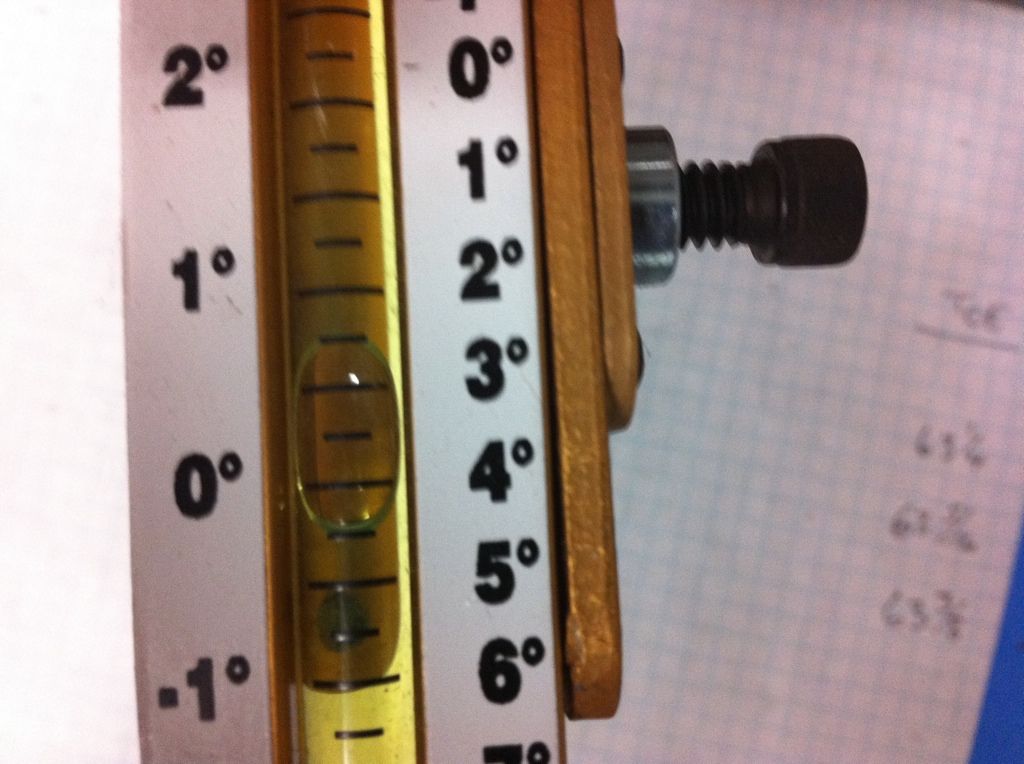
To get caster, you turn the wheel out 15 degrees, zero the level, turn the wheel the other way to 15 degrees, and read the result. Caster on both wheels is equal at +3.5 degrees (scale on the right side):
Now I went back and measured my toe. It was now toed in by almost 1/2". Also, the steering wheel was not perfectly centered when the wheels were centered. I centered the wheel, checked the distance from the rear of each wheel to the frame and there was 1/4" difference with the wheels offset slightly to the left. My aluminum jigs are 24" each and centered on the wheel 4" above the floor. I adjusted the left wheel about 1/2 turn out and the right wheel 4 turns out. Checked it again, one more slight adjustment, and I ended up with 63 1/2" distance at the rear and 63 3/8" at the front with the steering wheel centered and the rear of both tires equal distance from the frame rails for a toe in of 1/8" at 24". Right on spec.
Tommorrow the rear wheels get the same treatment and then it is supposed to be 50 degrees on Monday, so road test! This should get me really close. The last two cars I've aligned this way were almost perfect.
__________________
RCR GT40 SOLD to Fast 5
Kirkham #690 289 FIA
|

01-19-2012, 08:10 PM
|
|
CC Member

|
|
|
Join Date: Oct 2010
Cobra Make, Engine:
Posts: 21
|
|

 Not Ranked
Great car. Hope the weather is good so you can get it out to drive it.
|

01-20-2012, 05:57 AM
|
 |
CC Member

|
|
|
Join Date: Mar 2003
Location: McConnellsburg,
PA
Cobra Make, Engine: ERA FIA #2124
Posts: 687
|
|

 Not Ranked
Nice little alignment tutorial there, Mark!
- Allen.
|

01-22-2012, 10:11 AM
|
 |
CC Member

|
|
|
Join Date: Mar 2011
Location: Sleepy Hollow,
IL
Cobra Make, Engine: Kirkham #647 brushed
Posts: 412
|
|

 Not Ranked
Mark,
Thank you for posting this mini tutorial, very well done.
One question, for the ride height, did you have to screw in the spring holder plates on the shock much to set the height? Ours came really loose (not screwed in very much, no preload on the spring at all).
|

01-22-2012, 11:37 AM
|
 |
CC Member

|
|
|
Join Date: Jun 2008
Location: Chester Springs,
PA
Cobra Make, Engine: Kirkham 289 FIA #690, FRPP 427 Boss engine
Posts: 764
|
|

 Not Ranked
Arnaud, mine came the same way and that was fine without the drivetrain installed. After it was installed and the suspension settled, I had just over 3 1/2" of height in the front and couldn't even get my jack under the front crossmember. To get the front ride height set, I jacked up the front, removed the lower spring adjuster (just unscrewed it and let it sit below the threaded area), and lubed the threads on the coilover lightly with antiseize. I then screwed the adjuster back on until the spring was compressed. After several checks, I ended up with the bottom of the lower adjuster 15/16" from the bottom of the threads on both sides. This gave me 4 1/2" of ride height that I expect will settle a bit more. On the rear, I did the same thing and have the adjuster all the way out and the ride height is still 5". This will settle once I fill the tank, get in, and drive!
__________________
RCR GT40 SOLD to Fast 5
Kirkham #690 289 FIA
|

01-22-2012, 11:39 AM
|
 |
CC Member

|
|
|
Join Date: Jul 2005
Location: Bartlett,
Ill
Cobra Make, Engine: Everett-Morrison LS1
Posts: 2,448
|
|

 Not Ranked
Don't the Penski coil overs go on the other way ???to reduce unsprung weight???thats why they have the name on the end they do---yours may be upside down!!!!
Also do you have some way for your wheels to slide on the floor to equalize suspension when you lower the car ??? Two 12 inch floor tiles with grease between them under each wheel will do in a pinch if you don't have the swivel plates for alignment
Last edited by Jerry Clayton; 01-22-2012 at 11:45 AM..
Reason: added about floor tiles
|

03-31-2012, 09:30 AM
|
 |
CC Member

|
|
|
Join Date: Jun 2008
Location: Chester Springs,
PA
Cobra Make, Engine: Kirkham 289 FIA #690, FRPP 427 Boss engine
Posts: 764
|
|

 Not Ranked
Passed the PA enhanced inspection yesterday and took all my paperwork to the notary. I should have plates in 2 to 3 weeks! Things are getting very exciting now.
__________________
RCR GT40 SOLD to Fast 5
Kirkham #690 289 FIA
|

03-31-2012, 01:57 PM
|
|
CC Member

|
|
|
Join Date: Sep 2007
Cobra Make, Engine:
Posts: 23
|
|

 Not Ranked
Beautiful car and great build thread.
|

04-05-2012, 08:30 AM
|
 |
CC Member

|
|
|
Join Date: May 2010
Location: Birmingham,
AL
Cobra Make, Engine: Kirkham 289 FIA, 363 Stroker
Posts: 751
|
|

 Neutral
Good job on the alignment. I bought one of those alignment tools a few years ago, but it kept falling off the wheel and eventually ended up infuriating me to the point where i said screw it and took the car to the local alignment shop. Glad it worked out for you and things are progressing in the right direction.
|

04-09-2012, 02:30 AM
|
 |
CC Member

|
|
|
Join Date: Jun 2004
Location: Leicestershire,
UK
Cobra Make, Engine: Kirkham #523, 427 S/O
Posts: 1,137
|
|

 Not Ranked

Quote:
Originally Posted by Jerry Clayton

Don't the Penski coil overs go on the other way ???to reduce unsprung weight???thats why they have the name on the end they do---yours may be upside down!!!!
|
Interesting question, mine are also "upside down" as is every other Kirkham that I have pictures of. Could be they don't fit the other way, I haven't tried. Maybe someone from KMS could enlighten us.
When I setup the rear on my car I ran out of adjustment when I was trying to get rid of the bump steer. I could address the bump steer, but I ended up with positive camber. I spoke to Dave Cindrich and he made me a set of new "top hats" for the upper wishbone that allowed me to position the inner end further forward. I was then able to get the rear bump steer to within 0.01" per inch of wheel travel all of which was in the same and right direction, whilst also maintaining the correct camber.
Interestingly, the results from one side to the other were within single digit thous' which I think speaks volumes for the quality and accuracy of manufacture.
Paul

|

05-12-2012, 10:57 AM
|
 |
CC Member

|
|
|
Join Date: Jun 2008
Location: Chester Springs,
PA
Cobra Make, Engine: Kirkham 289 FIA #690, FRPP 427 Boss engine
Posts: 764
|
|

 Not Ranked
Finally was able to add the last bolt on! The state lost my paperwork that was submitted back in March. It usually only takes 3 to 4 weeks, but it took several calls to get them to go find it. Even then, no call back or admission of a mistake, the title just showed up in the mail yesterday and the plate today. They also are using the Kirkham serial plate as the vin plate. For that little bit of good news it was worth the wait:

__________________
RCR GT40 SOLD to Fast 5
Kirkham #690 289 FIA
|

05-12-2012, 06:58 PM
|
 |
CC Member

|
|
|
Join Date: Mar 2011
Location: Sleepy Hollow,
IL
Cobra Make, Engine: Kirkham #647 brushed
Posts: 412
|
|

 Not Ranked
What a rewarding metal rectangle!
|

06-12-2012, 07:47 PM
|
|
CC Member

|
|
|
Join Date: Feb 2004
Location: Downingtown,
PA
Cobra Make, Engine: Superformance. 406 FE
Posts: 25
|
|

 Not Ranked
 690 at the Morgantown Cruise
Saw your car at the Morgantown cruise a couple of weeks ago. Good to see it on the road.
Walked around a bit and didn't see you. Later I noticed you had already left. Sorry I didn't get a chance to say "Hi"
Car looks great!
Carl
__________________
Carl Mentz
CSX 3159
|
 Posting Rules
|
You may not post new threads
You may not post replies
You may not post attachments
You may not edit your posts
HTML code is Off
|
|
|
All times are GMT -7. The time now is 02:10 PM.
|
|


 1Likes


 Linear Mode


