Welcome to Club Cobra! The World's largest
non biased Shelby Cobra related site!
- » Representation from nearly all
Cobra/Daytona/GT40 manufacturers
- » Help from all over the world for your
questions
- » Build logs for you and all members
- » Blogs
- » Image Gallery
- » Many thousands of members and nearly 1
million posts!
YES! I want to register an account for free right now!
p.s.: For registered members this ad will NOT show
 
 Main Menu
|
|
Nevada Classics
|
|
Advertise at CC
|
|
December 2025
|
| S |
M |
T |
W |
T |
F |
S |
| |
1 |
2 |
3 |
4 |
5 |
6 |
| 7 |
8 |
9 |
10 |
11 |
12 |
13 |
| 14 |
15 |
16 |
17 |
18 |
19 |
20 |
| 21 |
22 |
23 |
24 |
25 |
26 |
27 |
| 28 |
29 |
30 |
31 |
|
|
|
|
|
CC Advertisers
|
|
 2Likes 2Likes

07-02-2007, 08:21 PM
|
 |
CC Member

|
|
|
Join Date: Mar 2001
Location: Provo,
Ut
Cobra Make, Engine: Kirkham, 427
Posts: 6,990
|
|

 Not Ranked

Now we are going to install the flywheel BUT, you HAVE to install the engine "saver" plate FIRST...it goes in front of the flywheel (in front of meaning toward the front of the car). Just think, I have just saved you 1/2 hour of all sorts of bad words and thrown wrenches because you probably would have just bolted the flywheel on in your excitement and forgot the "saver" plate. Then you would have had the wonderful opportunity of taking everything back off again and cleaning out all the yucky Locktite that got stuck in the holes. On the bright side, you could have practiced your technique torquing your flywheel bolts...
I am not sure why they call it a "saver" plate because if your flywheel/clutch explodes I am not sure there would be anything left on the block worth saving. But, fortunately, I haven't seen--or heard--of a blown clutch/flywheel since we have been in business. In the early 60's the big three ran cast grey iron flywheels. I have heard they blew up all the time at the drags. In the mid 60's they changed to ductile iron and that stuff is almost indestructible. Not sure if any of those ever blew up. But drag racing started way before the 60's and the rules got made and now we still live by them even though our materials are VASTLY superior to what they ran back in the day. (Come to think of it, we suffer the same problem with Congress. Like Mark Twain said, "The only time a man's life, liberty, and property are all in jeopardy is when the legislature is in session.")
I digress,
Back to the "saver" plate.
The plugs on the back of the motor do NOT sit flush with the back of the motor. The stick out. They will interfere with installing the "saver" plate. So, you have to drill relief holes for them. There are two holes you have to drill. One is here:
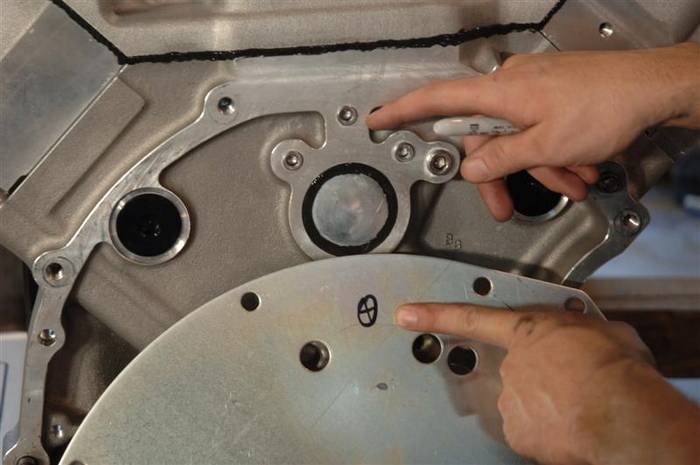
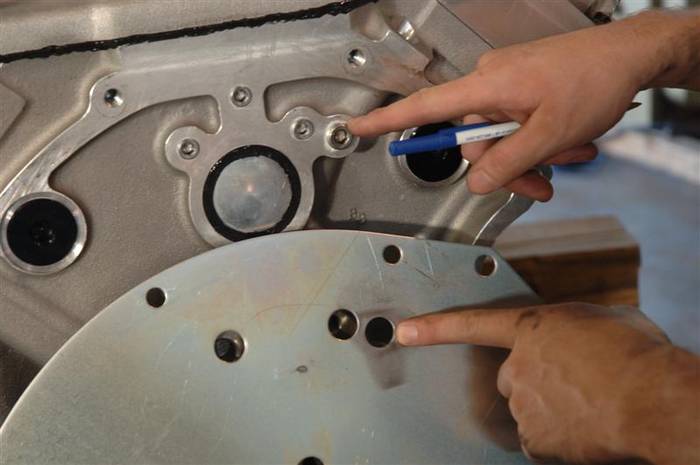
And the other is here: In this picture, Sandwich has already drilled the hole out. To mark the holes, we simply put magic marker, chalk, or anything else that happens to be within reach and cover the offending plug. We then put the plate on and lightly tap the plate over the plugs. We then have a beautiful mark where to drill the holes.
Yes, I have seen people just bolt the plate down and dent the plate. If your mechanic wants to do that, just STOP, blow the whistle, and tell him, "STEP AWAY FROM THE CAR!"
Last edited by David Kirkham; 07-03-2007 at 10:26 AM..
|
07-02-2007, 08:31 PM
|
|
CC Member
|
|
|
Join Date: Mar 2001
Location: Provo,
Ut
Cobra Make, Engine: Kirkham, 427
Posts: 6,990
|
|
Not Ranked
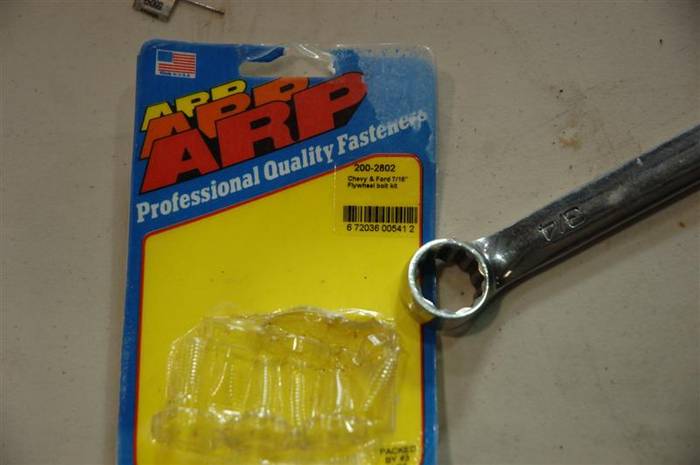
Now we need to find the bolts to bolt on the flywheel. We ONLY use ARP flywheel bolts. Critical bolts are one of those things that you don't want to skimp on. It takes a LOT of work to dial in a bell housing and there is no sense "testing" the scatter shield to see if it "works." 
I forgot to take the picture of the bolts before Sandwich took them out of the package, but here is the package anyway. Flywheel bolts for a Ford FE are ARP part number 200-2802.
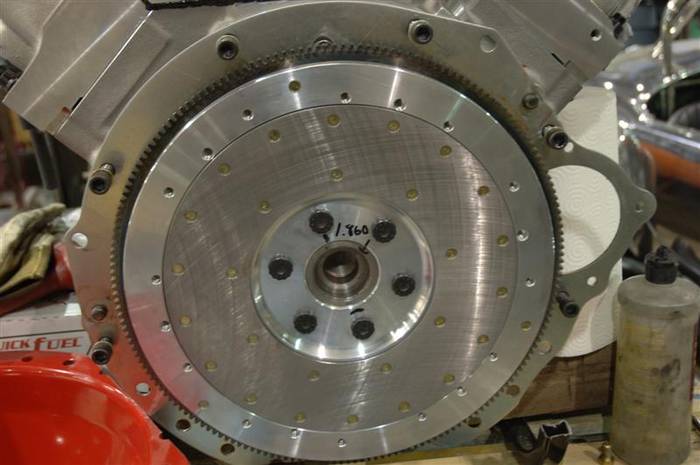
And here they are holding on the flywheel. We use Blue Locktite and CLEAN OUT THE HOLES with brake clean! Like most people, Locktite doesn't like to work when it is dirty. We torque the flywheel bolts to 80 ft/pounds. Notice we use an aluminum flywheel. I HATE steel flywheels! The motor takes WAY too long to rev and which makes canyon driving much less enjoyable.
Last edited by David Kirkham; 07-03-2007 at 10:28 AM..
|
07-02-2007, 08:33 PM
|
|
CC Member
|
|
|
Join Date: Mar 2001
Location: Provo,
Ut
Cobra Make, Engine: Kirkham, 427
Posts: 6,990
|
|
Not Ranked
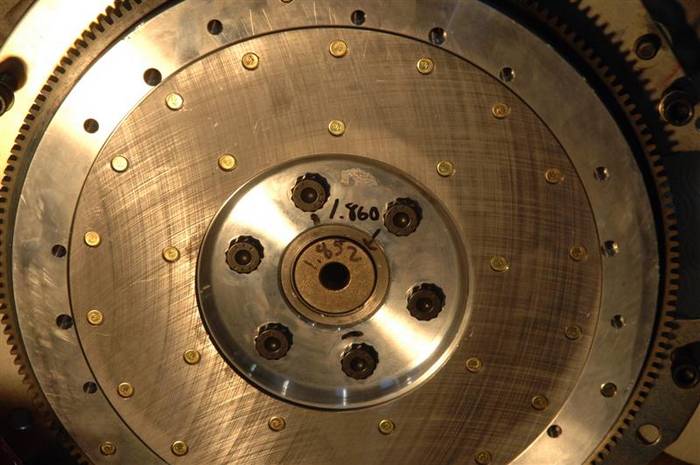
And now we run into our first major problem! I should have known the FE gods were going to get me back when dialing in the bell housing was so easy (see below). We actually put the pilot bearing in after we dialed in the bell housing but it doesn't matter when you do it.
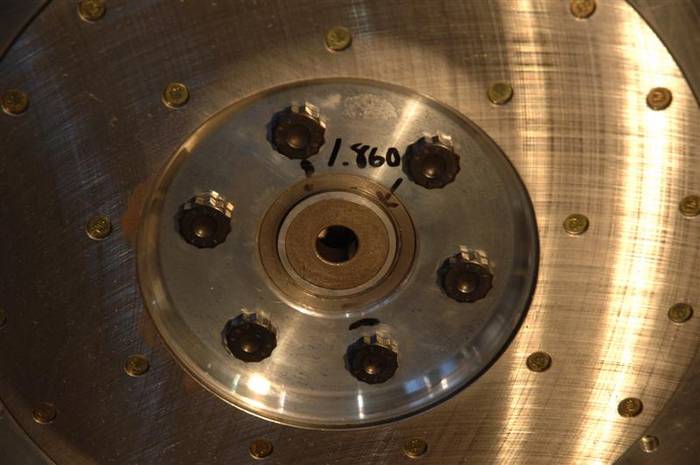
Anyway, the hole in the Scat crankshaft is TOO BIG! It was machined wrong by Scat. When we tried to put the pilot bearing in--it just FELL in. The hole in the crank measured 1.860 inches and the bearing measures 1.852 inches. Thinking we need about a 0.002 inch interference fit, that means the crank was machined 0.010 inches over sized.
So, the master machinist Sandwich trimmed 0.200 inches off the outside diameter of the pilot bearing and then machined an aluminum sleeve to go over the outside of the bearing and bring it back up to the proper 1.862 inch outside diameter. Sandwich is to the lathe what Jason Bell is to a Stradivarius.
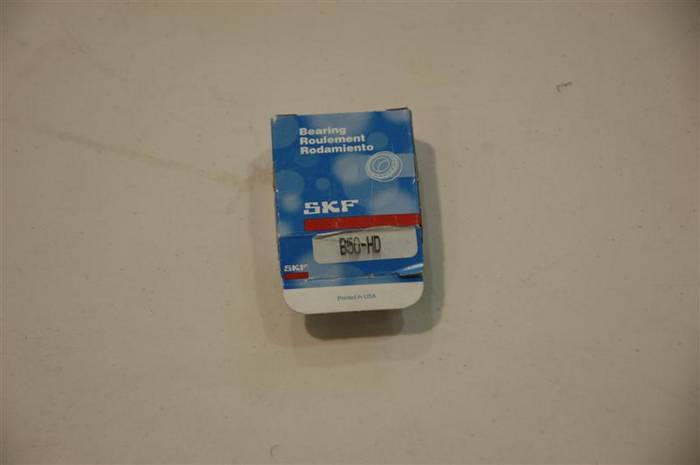
Here is the pilot bearing we use: Part number SKF B50-HD Sorry the picture is blurry, but the box is blurry.
Last edited by David Kirkham; 07-03-2007 at 11:58 AM..
|
07-02-2007, 08:36 PM
|
|
CC Member
|
|
|
Join Date: Mar 2001
Location: Provo,
Ut
Cobra Make, Engine: Kirkham, 427
Posts: 6,990
|
|
Not Ranked
Now, for the thing we always get a million questions on. Dialing in a bell housing. You may ask, "Why do I need to dial in my bell housing?" Good question. The bell housing is what holds the transmission on to the engine. The center of the transmission input shaft is supposed to be pointed directly at the center of the crankshaft. There is a pilot bearing/bushing in the end of the crankshaft. The bearing or bushing can be a true needle bearing, or it can be made out of bronze.
The snout on the input shaft of the transmission fits very snugly into the bearing/bushing. If they are not "perfectly" in line then the input shaft on the transmission will be cocked over and the bearing on the input shaft will start screaming it is UNHAPPY! Well, in a very short time, you will be unhappy too as you have to pull your interior, seats, tunnel, emergency brake cable, throw out bearing assembly, drive shaft, and drive shaft safety loop--for those of you who were smart and bought that option. (Nothing like a free wheeling drive shaft by the family jewels to give you an unexpected vasectomy if it unexpectedly comes loose or apart. But hey, look at the bright side--if it broke it'll probably be sharp, so it'll be quick--but probably not too painless...).  Anyway, it is about a 4 hour job to fix everything--(the tranny, that is, not the neutering). Signs of a bad alignment on the bell housing are: hard shifting, noisy front bearing, and if you are really unlucky, a complete failure of the bearing with lots of little metal parts scattered in your transmission.
So, to avoid purchasing stock in the antacid companies, please dial in your bell housing or have someone who is competent do it--I have seen several that are NOT competent. The current "record" is actually from a "professional" installer--0.139" out! That is more than 1/8 of an inch! The bearing didn't last 100 miles, but that was more than the warranty the installer gave and the customer was left out in the cold. The car ended up here where so many of them do that have had Backyard Bob working on them--right here back in our shop for a "tune up."
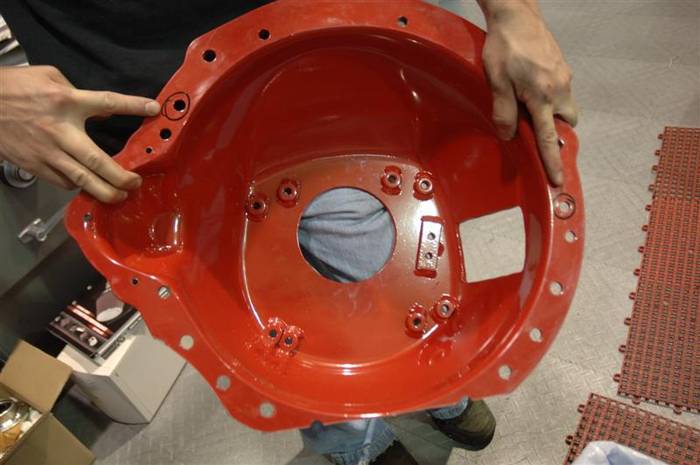
First thing to do is drill the dowel pin holes over sized in the bell housing--we drill them to 1/16 inch larger than the bushings we are going to weld in. Sandwich is kindly pointing to the 2 holes that need to be drilled out. They are circled with black magic marker.
Last edited by David Kirkham; 08-03-2007 at 10:36 PM..
|
07-02-2007, 09:10 PM
|
|
CC Member
|
|
|
Join Date: Mar 2001
Location: Provo,
Ut
Cobra Make, Engine: Kirkham, 427
Posts: 6,990
|
|
Not Ranked
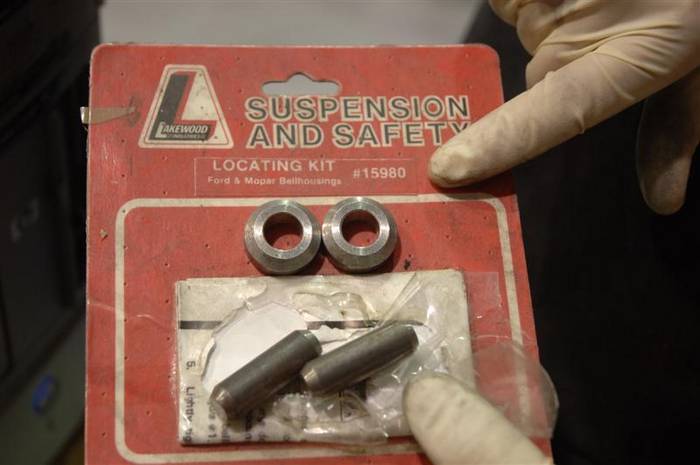
Then you will need to buy (or make as we usually do) these babies. Here are the weld bushings we use.
Last edited by David Kirkham; 07-03-2007 at 07:49 AM..
|
07-02-2007, 09:15 PM
|
|
CC Member
|
|
|
Join Date: Mar 2001
Location: Provo,
Ut
Cobra Make, Engine: Kirkham, 427
Posts: 6,990
|
|
Not Ranked
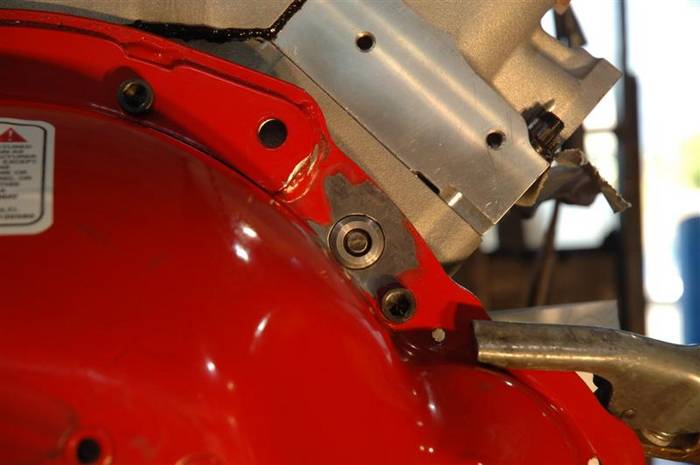
Then you need to bolt on your bell housing on to the back of the motor. We use Socket Head Cap Screws (Allen bolts) because they offer a lot more clearance. If you use a normal hex bolt you will NOT be able to tighten up the bolts with a normal socket as the bell housing is formed too close to the holes. Notice how we do NOT have washers under the head of the bolts. We ALWAYS put washers under the head of all bolts, but here we are about to adjust the bell housing and they may get in the way. Some bell housings have to move a LONG way. We will install the washers when we are done dialing in the bell housing. Also, notice that we have put the weld bushing in place over the dowels in the engine block. There is about 0.030 inch clearance all the way around between the bushings and the bell housing to give us enough clearance to move things around. The idea here it to get the hole in the bell housing centered with the center of the crank.
Last edited by David Kirkham; 07-03-2007 at 07:51 AM..
|
07-02-2007, 09:19 PM
|
|
CC Member
|
|
|
Join Date: Mar 2001
Location: Provo,
Ut
Cobra Make, Engine: Kirkham, 427
Posts: 6,990
|
|
Not Ranked
***NOTE***
You need to pull your spark plugs out of your motor when you do this to make turning the engine over easier. Of course, you may want to get a workout...
Stick your dial indicator--only about $15 (made in China) to $50 (made in USA) on to the flywheel. Dial indicators have a magnetic base. We cut the stand to make it easier to put into the bell housing hole as we do this every so often.
Now for something that is not so obvious. IT DOESN'T MATTER WHERE YOU STICK THE DIAL INDICATOR ON THE FLYWHEEL!!! They flywheel moves in a circle and so will your dial indicator. Just adjust it so it points toward the edge of the bell housing and you will be OK.
Set the dial to 0 facing straight up.

Last edited by David Kirkham; 07-03-2007 at 05:08 PM..
|
 Posting Rules
|
You may not post new threads
You may not post replies
You may not post attachments
You may not edit your posts
HTML code is Off
|
|
|
All times are GMT -7. The time now is 11:39 AM.
|
|


 Hybrid Mode

