Welcome to Club Cobra! The World's largest
non biased Shelby Cobra related site!
- » Representation from nearly all
Cobra/Daytona/GT40 manufacturers
- » Help from all over the world for your
questions
- » Build logs for you and all members
- » Blogs
- » Image Gallery
- » Many thousands of members and nearly 1
million posts!
YES! I want to register an account for free right now!
p.s.: For registered members this ad will NOT show
 
 Main Menu
|
 Nevada Classics
|
 Advertise at CC
|
 April 2025
|
| S |
M |
T |
W |
T |
F |
S |
| |
|
1 |
2 |
3 |
4 |
5 |
| 6 |
7 |
8 |
9 |
10 |
11 |
12 |
| 13 |
14 |
15 |
16 |
17 |
18 |
19 |
| 20 |
21 |
22 |
23 |
24 |
25 |
26 |
| 27 |
28 |
29 |
30 |
|
|
|
|
 CC Advertisers
|
|
 2Likes 2Likes

08-04-2007, 03:36 PM
|
 |
CC Member

|
|
|
Join Date: Mar 2001
Location: Provo,
Ut
Cobra Make, Engine: Kirkham, 427
Posts: 6,990
|
|

 Not Ranked
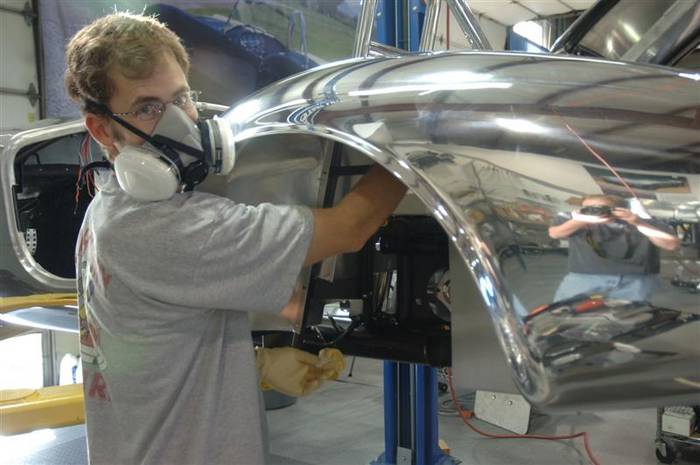
This is one of those times you really need a "buddy" to "help" you. If you are reallllllllly lucky, you can convince him to do it while you go search for parts, pick up cold drinks, go out for burritos, mow your lawn, do some of your wife's honey-do's or best of all, watch SHARK WEEK. If you are not very lucky, then you will need one of these. They are the only thing that will work to keep the fumes out. Even in the dead of winter, we open the overhead door, put a BIG fan in the door, and suck the fumes out. I don't care about the heating cost, but the fumes are deadly. I will never understand how how kids concentrate these fumes and breathe them!
On the bright side, if you or your friends had burritos for lunch, it'll save your nose...but your eyes may still burn 
Last edited by David Kirkham; 08-04-2007 at 03:47 PM..
|
-
Advertising


08-04-2007, 03:37 PM
|
 |
CC Member

|
|
|
Join Date: Mar 2001
Location: Provo,
Ut
Cobra Make, Engine: Kirkham, 427
Posts: 6,990
|
|

 Not Ranked

Carefully coat BOTH sides of the parts you want to stick together. In this case, coat the fender foam and then the fender. Don't make a mess or get it on your clothes; it is impossible to get out.
Let them DRY to the touch and then say a prayer. You have to pray to the Cobra gods that you get it right on the first stick--because you will NOT get another chance. Once this stuff touches each other in the dry state, it is permanent! You HAVE to push the CENTER of the fender foam in first to stick the center down. DO NOT BRIDGE the center of the fender and expect to push the foam into place up into a hole. It will never stick. I have NEVER understood this. If you put it where you don't want it, you will have to TEAR it off to change positions. If you push it up into a hollow without sticking the center first, it will fall off. This is really one of the worst jobs on the car.
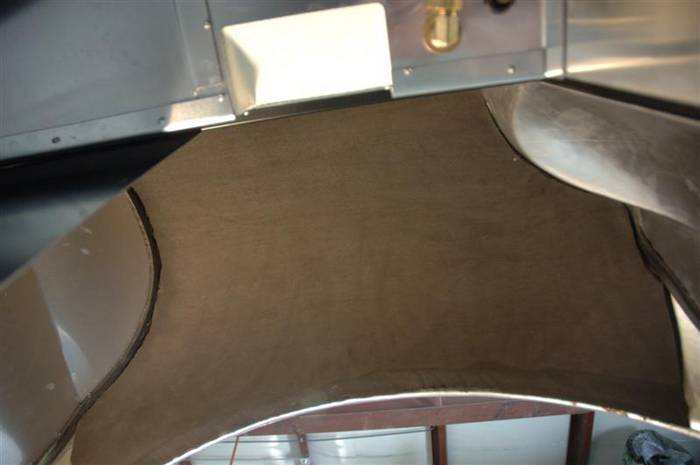
BUT, this is what a really nice job looks like. We actually cut the foam way over sized and then glue it in with the edges hanging out all over the place. We then trim the sides to perfect fit. DO NOT try to fit your foam in perfectly before you glue it in. You will miss and have a crappy job on your hands. You don't have to cover every square inch of exposed aluminum. Rocks are generally only thrown rather straight up.
This is a shot of the top of the left rear fender.
Forward is to the right in this picture. If you look closely at the bottom edge of the foam by the fender lip, you can see we took a small hand grinder and tapered the foam so it didn't stick out so much and look bad. If you are lazy and don't want to trim it (or you really want to have a LOT of fun), just take a few laps around Miller Motorsports Park (or drive up the nearest canyon) and your tire will do the trimming for you. 
Last edited by David Kirkham; 08-05-2007 at 03:40 PM..
|

08-04-2007, 03:43 PM
|
 |
CC Member

|
|
|
Join Date: Mar 2001
Location: Provo,
Ut
Cobra Make, Engine: Kirkham, 427
Posts: 6,990
|
|

 Not Ranked
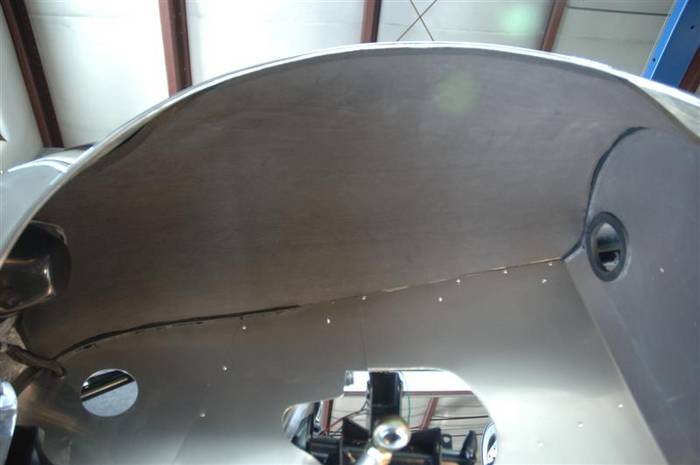
Here is a picture of the left front fender finished. Forward it to the left in the picture.
Last edited by David Kirkham; 08-05-2007 at 03:37 PM..
|

08-05-2007, 03:36 PM
|
 |
CC Member

|
|
|
Join Date: Mar 2001
Location: Provo,
Ut
Cobra Make, Engine: Kirkham, 427
Posts: 6,990
|
|

 Not Ranked
The hole in the interior panel (left side of the picture) in the nose of the car is for the fresh air system. The hole in the panel on the right of the picture is where the fresh air goes into the driver's side foot box. The panel on the right is the panel that we remove to put the engine in.
|

08-16-2007, 10:16 AM
|
 |
CC Member

|
|
|
Join Date: Mar 2001
Location: Provo,
Ut
Cobra Make, Engine: Kirkham, 427
Posts: 6,990
|
|

 Not Ranked
Finally, I am sneaking away to get back on this manual. I hope there is not a lynch mob waiting for me at the next event because of my absence...
I am getting calls every day on this now--many from customers of other manufacturers. I never figured other people would use this to help them get their cars together. You guys are really creative! Regardless, I am glad we can help any way we can. Feel free to call or to drop me a line if you have any questions and we will do our best to help you any way we can.
|

08-16-2007, 10:32 AM
|
 |
CC Member

|
|
|
Join Date: Mar 2001
Location: Provo,
Ut
Cobra Make, Engine: Kirkham, 427
Posts: 6,990
|
|

 Not Ranked

On to the roll bar.
Over the years, many people have wanted their roll bar chromed because it really looks nice. There is a HUGE problem with chrome, however. The chrome plating process is horribly toxic and is heavily regulated in the US--as it should be. As such, chrome plating is really expensive here in the US. We could have our roll bars plated overseas, but that would just move the 2 headed babies from here to there...
Chrome is extremely thin and as anyone who has an old 65 Mustang knows, chrome pits, and looks like the driver's seat of that guy who missed his braking point at our last Miller Motorsports event. Chrome scratches; chrome sucks. There had to be a better way...
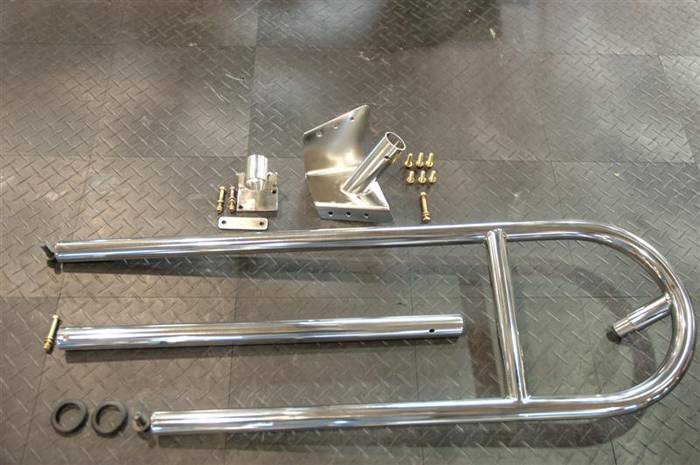
Hello Stainless! There are severals alloys of stainless to choose from. So, why did we choose 321? Well, it was the only acceptable alloy we could get in the size we needed (1.500 inches x 0.125 wall) in Poland--or actually, Switzerland to be more exact. 321 is alloyed with a small amount of titanium and you know it if you have ever tried to work with it. It is a BEAST! But it polishes exceptionally well and looks like a million bucks.
 |

08-16-2007, 03:39 PM
|
 |
CC Member

|
|
|
Join Date: Mar 2001
Location: Provo,
Ut
Cobra Make, Engine: Kirkham, 427
Posts: 6,990
|
|

 Not Ranked
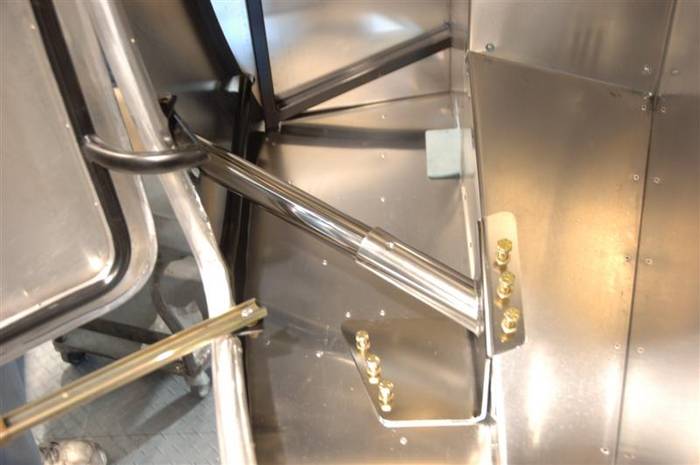
First thing to put in is the rear roll bar brace. We were kind and made threaded sleeves in the tubes so all you have to do is thread in the bolts! Original Cobras had just a hole in the tube so you had to put a nut on the back which made it a two-man job. LEAVE THE BOLTS LOOSE OR YOU WILL NEVER GET THE ROLL BAR IN!!!
Sorry the car is sideways in the pictures, but that is how we assemble the cars--WAY BETTER THAN A LIFT!!! I could have rotated the photo, but then I would have had to have answered all sorts of questions about Yoda.
Last edited by David Kirkham; 08-16-2007 at 03:56 PM..
|

08-16-2007, 03:47 PM
|
 |
CC Member

|
|
|
Join Date: Mar 2001
Location: Provo,
Ut
Cobra Make, Engine: Kirkham, 427
Posts: 6,990
|
|

 Not Ranked
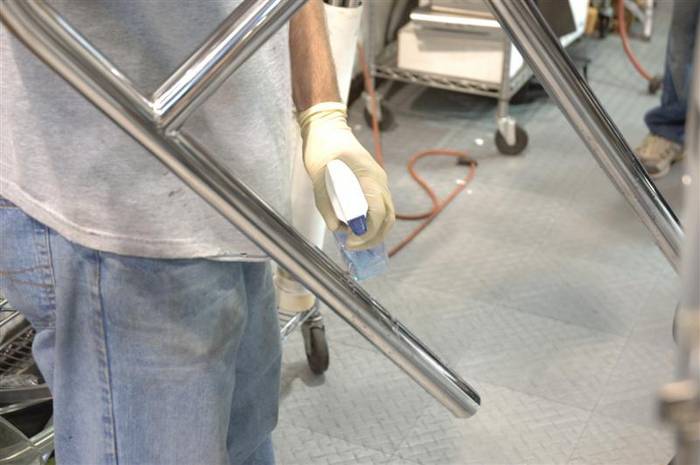
Put the grommets in the body, whip out the Windex and spray a little on the roll bar...everything works better with lube.
NOTE!!! Be careful with the Windex and don't spray it all over your body (or your car's). Windex is basic (as in the opposite of acidic) and will stain the aluminum if it is left on the body. We DO clean our cars with Windex, but you MUST wipe the Windex off or you will stain your body that you took 300 hours to polish (or paid us a lot of $$$ to polish). Don't worry if it gets on the body (the car body that is), that is OK. You just can't leave it on the body--for even 2 minutes or it will stain.
Notice the professional application of Windex. Lew/Jamo, I thought about having him wear a speedo...don't tempt me. You NEVER know what madness will seize me. 
Last edited by David Kirkham; 08-16-2007 at 03:59 PM..
|

08-16-2007, 03:50 PM
|
 |
CC Member

|
|
|
Join Date: Mar 2001
Location: Provo,
Ut
Cobra Make, Engine: Kirkham, 427
Posts: 6,990
|
|

 Not Ranked
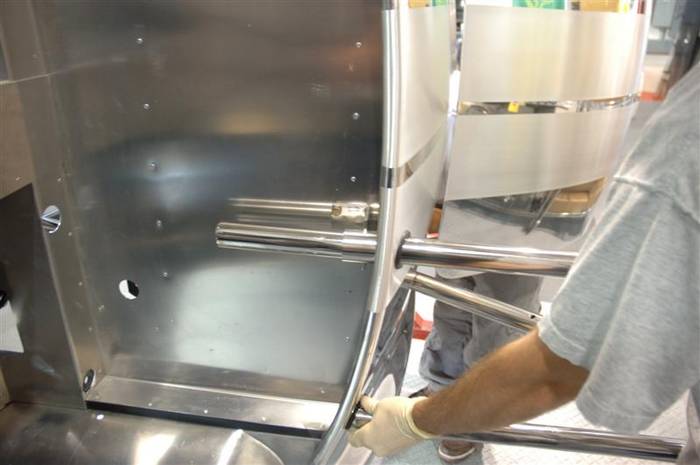
After you lube it up, just slide it in. Notice you have to make sure the roll bar slides through the little tube that is bolted on to the rear fire wall. Don't forget! (Unless you like taking it in and out).
Last edited by David Kirkham; 08-16-2007 at 03:56 PM..
|

08-16-2007, 04:04 PM
|
 |
CC Member

|
|
|
Join Date: Mar 2001
Location: Provo,
Ut
Cobra Make, Engine: Kirkham, 427
Posts: 6,990
|
|

 Not Ranked
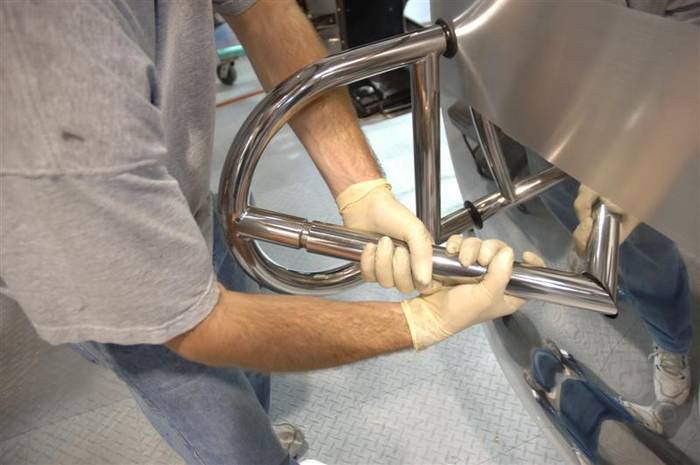
Now slide the rear brace onto the main hoop and align the holes.
 |

08-16-2007, 04:08 PM
|
 |
CC Member

|
|
|
Join Date: Mar 2001
Location: Provo,
Ut
Cobra Make, Engine: Kirkham, 427
Posts: 6,990
|
|

 Not Ranked
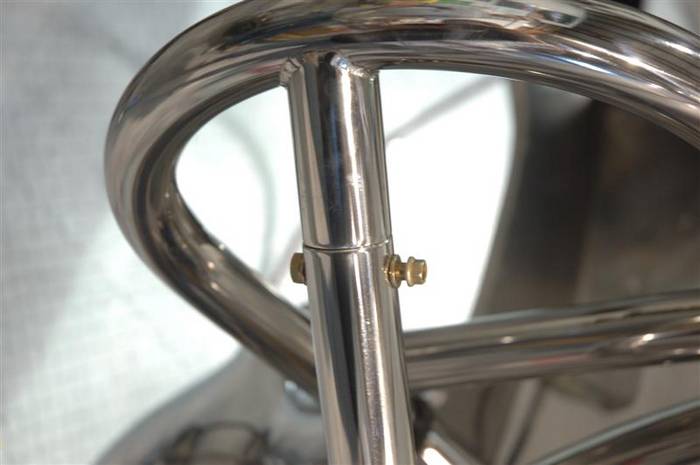
Notice the bolt goes through the hole in an "across the car fashion." In original 427 Cobras, the bolt goes forward--leaving a nice bolt head to crack your helmet should some unfortunate "event" take place. I always thought sharp things sticking out by my head was a bad idea.
 |

08-16-2007, 04:09 PM
|
 |
CC Member

|
|
|
Join Date: Mar 2001
Location: Provo,
Ut
Cobra Make, Engine: Kirkham, 427
Posts: 6,990
|
|

 Not Ranked
Now you can finally put in the two 1/2-20 socket head cap screws into the bottom of the roll bar.
Once you have all the bolts in, you can tighten everything up.
|

08-25-2007, 12:54 PM
|
 |
CC Member

|
|
|
Join Date: Mar 2001
Location: Provo,
Ut
Cobra Make, Engine: Kirkham, 427
Posts: 6,990
|
|

 Not Ranked

DRIVE SHAFT INSTALLATION
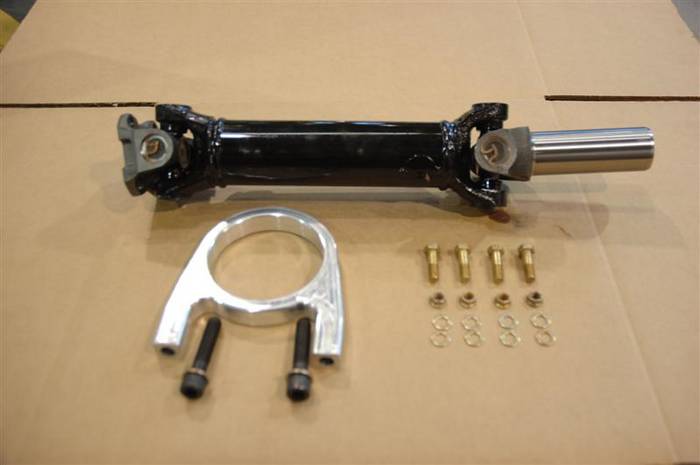
Here are the goodies you are going to need to put in your drive shaft. You MUST pull the tunnel out to take the drive shaft out! (We are working on a fix for that, but I am not sure we will get it done in this life time).
This is what you will need:
Drive shaft
Drive shaft bolts (we only use aircraft bolts here--and throughout most of the car for that matter). Notice the cool looking 3/8 jet nuts. They have a reduced head on them to make them easier to get a wrench on in those tight places.
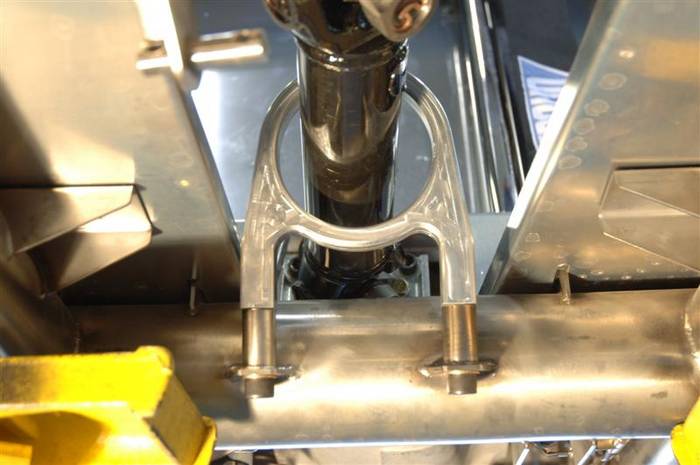
New cool BILLET drive shaft safety loop. Notice we connected the bottom of the safety hoop together at the bottom so we could safely run the ebrake cables (and other things) through the bottom of the loop and still have them protected from the drive shaft in case of drive shaft breakage. We have seen many kit cars (and original cars too!) that run fuel lines, brake lines, electrical lines and who knows what else RIGHT NEXT TO THE DRIVE SHAFT!!! IF THE DRIVE SHAFT BREAKS, THE FUEL LINES WILL BE CUT AND THE RESULTING SHOWER OF SPARKS WILL TURN YOU INTO A 4TH OF JULY BBQ--ONLY THIS TIME, YOU ARE THE ONE ON THE GRILL. But you can always look at the bright side...you will be FAMOUS within 3 days as you will have over a million views on You Tube 
Last edited by David Kirkham; 08-25-2007 at 12:57 PM..
|

08-25-2007, 01:00 PM
|
 |
CC Member

|
|
|
Join Date: Mar 2001
Location: Provo,
Ut
Cobra Make, Engine: Kirkham, 427
Posts: 6,990
|
|

 Not Ranked
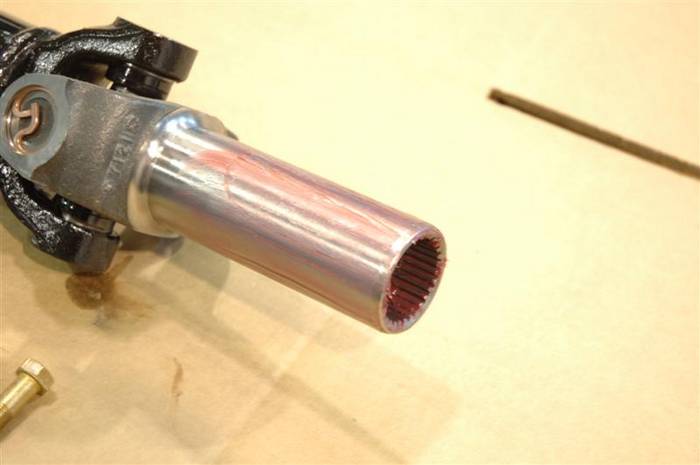
Make sure you grease up the input shaft on the transmission before you put it in. Make sure you grease up the INSIDE splines as well. You do NOT want the seal on the outside to start rubbing on a dry shaft--you will tear the seal out. You want grease on the inside because even though your chariot of fire has an independent rear suspension, there is still a tiny bit of movement on the splines as you step on the gas to pass that VETTE 
 |

08-25-2007, 01:02 PM
|
 |
CC Member

|
|
|
Join Date: Mar 2001
Location: Provo,
Ut
Cobra Make, Engine: Kirkham, 427
Posts: 6,990
|
|

 Not Ranked
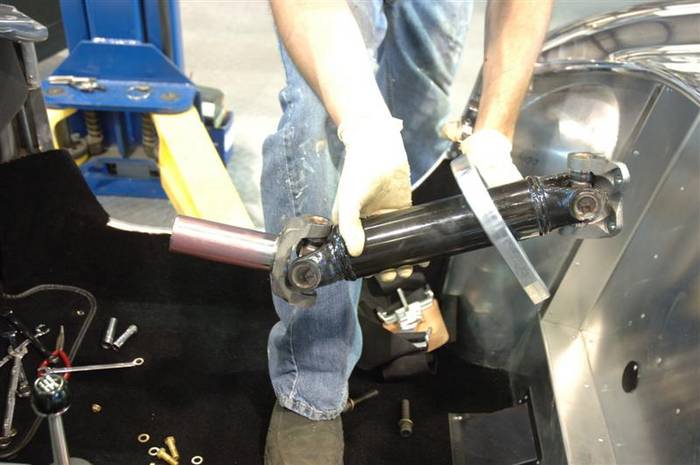
Make sure you slide your new, cool billet drive shaft safety loop onto the drive shaft BEFORE you install it or you won't get it on--and you will definitely NOT look cool in front of your friends.
 |

08-25-2007, 01:04 PM
|
 |
CC Member

|
|
|
Join Date: Mar 2001
Location: Provo,
Ut
Cobra Make, Engine: Kirkham, 427
Posts: 6,990
|
|

 Not Ranked
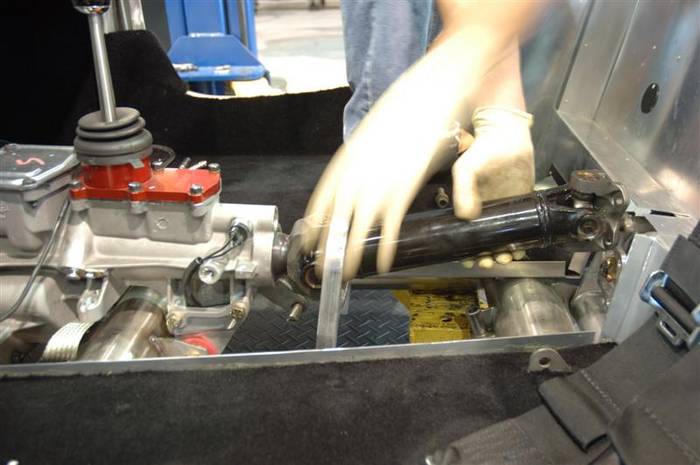
Twist the drive shaft around GENTLY until the splines line up and then slide the baby in.
 |

08-25-2007, 01:08 PM
|
 |
CC Member

|
|
|
Join Date: Mar 2001
Location: Provo,
Ut
Cobra Make, Engine: Kirkham, 427
Posts: 6,990
|
|

 Not Ranked
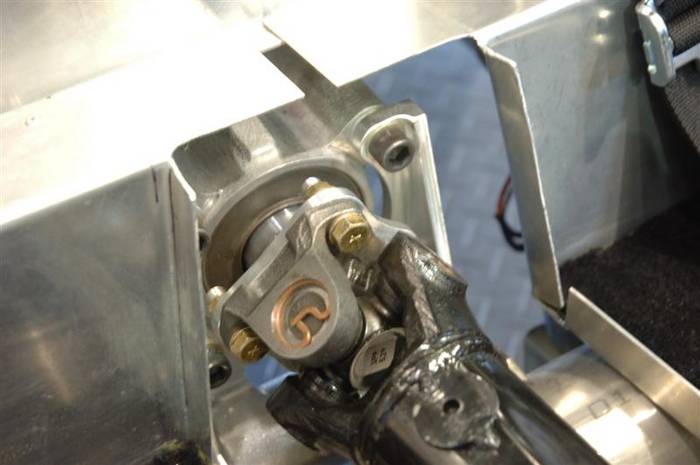
Line up the holes on the drive shaft with the holes on the differential input flange. The hole pattern is a rectangular pattern--not a square! If you can't get the bolts in one way, index the drive shaft 90 degrees and try again.
Make sure you put a washer on the under side of the head of the bolt and one under the head of the cool jet nut.
You will need a 9/16 wrench and a 7/16 wrench to tighten up the bolts.
Bring ALL of the bolts up snug and then tighten them all. We torque them to 25-28 foot pounds.
 |

08-25-2007, 01:14 PM
|
 |
CC Member

|
|
|
Join Date: Mar 2001
Location: Provo,
Ut
Cobra Make, Engine: Kirkham, 427
Posts: 6,990
|
|

 Not Ranked
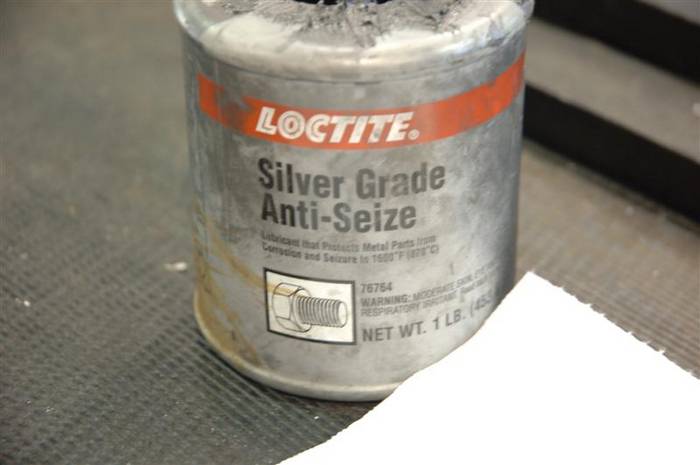
Next, whip out the anti-seize. WARNING, this stuff is NASTY!!! Loctite part number 76764. The good part about this stuff is it doesn't come off. The bad part about this stuff is it doesn't come off! Thomas calls it "Never-Leaves." Don't get this stuff anywhere near your wife's clothes or you will have to make yourself a new bed in the garage (at least it is next to your cool car).
 |

08-25-2007, 01:17 PM
|
 |
CC Member

|
|
|
Join Date: Mar 2001
Location: Provo,
Ut
Cobra Make, Engine: Kirkham, 427
Posts: 6,990
|
|

 Not Ranked
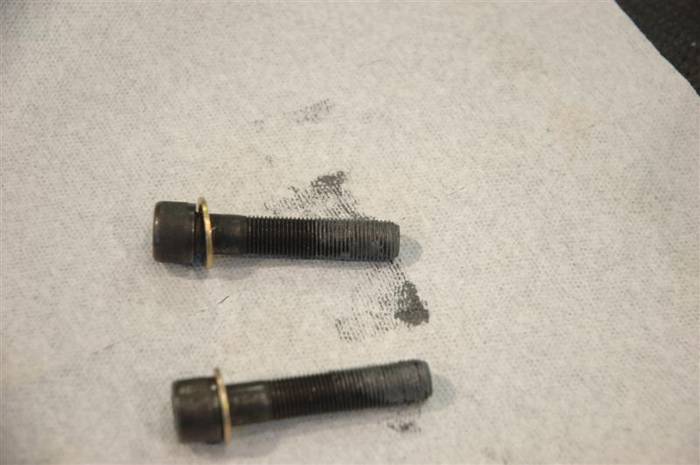
As the drive shaft safety loop is billet aluminum, you will need to anti-seize the bolts before you put them in--unless you NEVER want to take them out again.
 |

08-25-2007, 01:24 PM
|
 |
CC Member

|
|
|
Join Date: Mar 2001
Location: Provo,
Ut
Cobra Make, Engine: Kirkham, 427
Posts: 6,990
|
|

 Not Ranked
You will need a 3/8 hex wrench (allen wrench) to tighten up the bolts. Now, from this angle, you can see the space in between the frame and the drive shaft safety look where we will run the ebrake cables.
 |
 Posting Rules
|
You may not post new threads
You may not post replies
You may not post attachments
You may not edit your posts
HTML code is Off
|
|
|
All times are GMT -7. The time now is 01:44 AM.
|
|


 2Likes


 Linear Mode


