Welcome to Club Cobra! The World's largest
non biased Shelby Cobra related site!
- » Representation from nearly all
Cobra/Daytona/GT40 manufacturers
- » Help from all over the world for your
questions
- » Build logs for you and all members
- » Blogs
- » Image Gallery
- » Many thousands of members and nearly 1
million posts!
YES! I want to register an account for free right now!
p.s.: For registered members this ad will NOT show
 
 Main Menu
|
 Nevada Classics
|
 Advertise at CC
|
 November 2024
|
| S |
M |
T |
W |
T |
F |
S |
| |
|
|
|
|
1 |
2 |
| 3 |
4 |
5 |
6 |
7 |
8 |
9 |
| 10 |
11 |
12 |
13 |
14 |
15 |
16 |
| 17 |
18 |
19 |
20 |
21 |
22 |
23 |
| 24 |
25 |
26 |
27 |
28 |
29 |
30 |
|
 CC Advertisers
|
|
 1Likes 1Likes

09-03-2007, 11:56 AM
|
 |
CC Member

|
|
|
Join Date: Mar 2001
Location: Provo,
Ut
Cobra Make, Engine: Kirkham, 427
Posts: 6,990
|
|

 Not Ranked
 Original 427 Street Cobra Suspension Rebuild
Gents,
We had a TON of comments on our assembly manual thread (still working on it) and we just got an original 427 Street Cobra in the shop...so, I figured you guys would like to see a "check out/rebuild" of an original 427 Cobra Street Suspension. This suspension is almost identical to a 427 SC Cobra suspension. The main difference being the brake caliper and rotor. I will get into the specific details later.
The customer asked us to go over his car and see if there was anything that needed to be done to make his car "right" so he could drive it. Owning one of these babies is not for the feint of heart. It is not unusual to spend $10,000-$20,000 to go through the suspension of an original car. Parts are unobtainable in most instances and so you end up making them--usually out of UNOBTAINIUM, of course!
When we got the car it was supposedly "completely concourse restored." Well, I am sure most of us know what that means. There was a little TLC that the car still needed. The alignment needed some love and I was sure there were other gremlins lurking in the woods that needed to be ferreted out as there seem to be on all these cars. They are now over 40 years old, after all, and that is a LONG time for things to happen!
Feel free to comment and ask questions! I am happy to answer what I can.
Here is the first picture. This is a shot of the left rear suspension. The first thing you notice, of course, is that original 427 Cobras had INDEPENDENT rear suspensions! You would not believe the amount of people who have called us and told us they went for a ride in an uncle's, cousin's best friend's original 427 Cobra and they knew it had a solid rear axle... 
Well, they DON'T!
Original 427 Cobras had a true independent rear suspension. (The following has been corrected due to a brain short on my part. ***Incidentally, Jaguars do NOT have a true independent rear suspensions*** Should read, Incidentally, Jaguars do not have a true upper control arm as they use the 1/2 shaft as the upper control arm.) Sorry!
Cobras do not use the 1/2 shaft as the upper control arm. They have a true rear upper control arm with plunging 1/2 shafts. You can see in the picture the top of the upright were the upper control arm bolts into the upright.
Another interesting thing is you notice the on rear suspension, ORIGINAL COBRAS HAVE OUTBOARD REAR BRAKES. On this car (street 427) the original calipers are cast iron. They are HEAVY!!! Notice an original Cobra has rear wheel disk brakes. It was one of the 1st production cars to have 4 wheel disk brakes.

Last edited by David Kirkham; 09-05-2007 at 07:46 AM..
|
-
Advertising


09-03-2007, 12:09 PM
|
 |
CC Member

|
|
|
Join Date: Mar 2001
Location: Provo,
Ut
Cobra Make, Engine: Kirkham, 427
Posts: 6,990
|
|

 Not Ranked

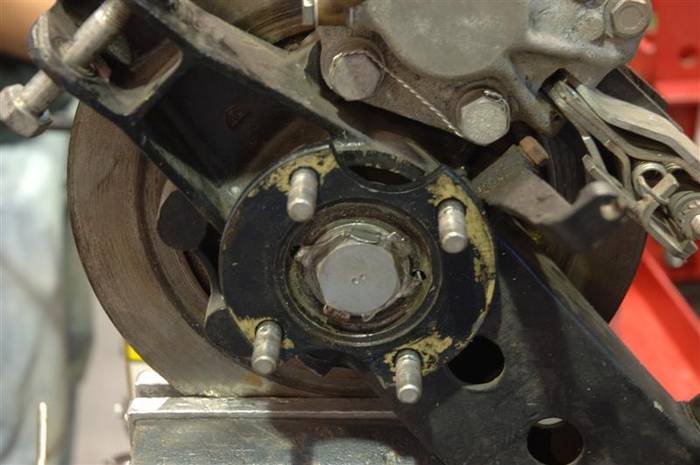
Here is a picture of the interesting "locking" mechanism for the rear hub bolt. I am sorry the picture is not 100% in focus, but Sandwich is working faster than I can take pictures and post them on the web!
Anyway, this it the infamous locking tab the English were so enamored with. At first glance it looks like a good answer to the question of keeping the bolt in place...in practice it is incredibly stupid. But, as they say, "Hind sight is 20/20" and who knows what people will be posting about me on the web 20 years from now!
This is how the locking tab is "supposed" to work. First you place the locking tab into the two little drilled holes in the drive flange. Then you tighten up the bolt to the required torque (we use 225 foot pounds BTW) and then bend over the tabs against the flats of the bolts to prevent the bolt from loosening up. Very BAD idea.
In order for the tab to even be able to be bent, they have to be made out of a SOFT steel. Soft steel will pound out as you drive down the road. The rear suspension takes an incredible abuse. If you have ever driven with a professional driver, you know what I mean. If the steel yields (which it will surely do) YOU WILL LOSE ALL PRELOAD ON THE BOLT! ONCE YOU LOSE THE PRELOAD ON THE BOLT YOU LOSE THE PRELOAD ON THE BEARINGS!!! This means your hub bolt is about to play "Free Willy" and exit the premises. This means your hub is now loose and is about to fall off--which will loosen the preload on your sphincter as you face Turn 1 going 150 mph with a Miller Motorsports instructor showing you things you didn't know cars could do.
Talk about a YOU TUBE moment! "Original Cobra into the wall at over 100 mph!!!" I bet there would be 1,000,000 hits the first day alone.
Last edited by David Kirkham; 09-05-2007 at 07:50 AM..
|

09-03-2007, 12:12 PM
|
 |
CC Member

|
|
|
Join Date: Mar 2001
Location: Provo,
Ut
Cobra Make, Engine: Kirkham, 427
Posts: 6,990
|
|

 Not Ranked
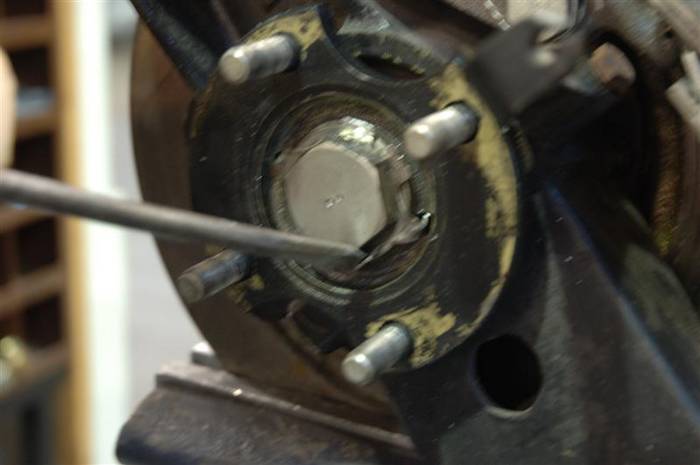
Here you can see Sandwich taking a screwdriver to the tab to bend it out of the way so he can get a socket on the bolt. (Don't worry, it isn't a Snap On screwdriver!) I guess this is the one that is in bad focus! Sorry! Notice the little divots in the bolt where someone else had taken the upright apart earlier in its life.
 |

09-03-2007, 12:15 PM
|
 |
CC Member

|
|
|
Join Date: Mar 2001
Location: Provo,
Ut
Cobra Make, Engine: Kirkham, 427
Posts: 6,990
|
|

 Neutral
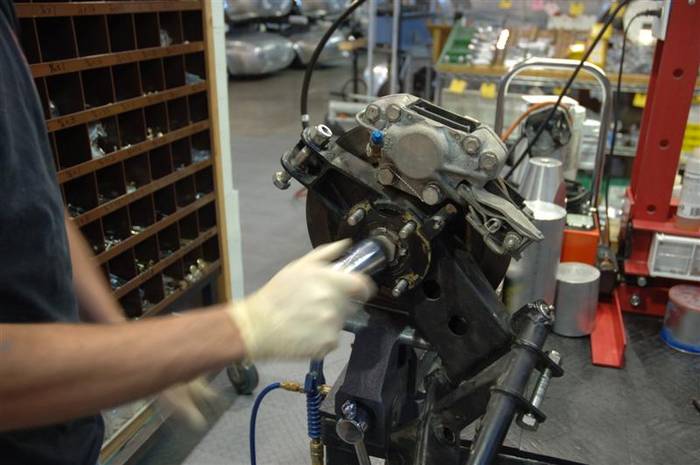
Here Sandwich is taking a socket to the rear hub bolt to loosen it.
 |

09-03-2007, 12:17 PM
|
 |
CC Member

|
|
|
Join Date: Mar 2001
Location: Provo,
Ut
Cobra Make, Engine: Kirkham, 427
Posts: 6,990
|
|

 Not Ranked
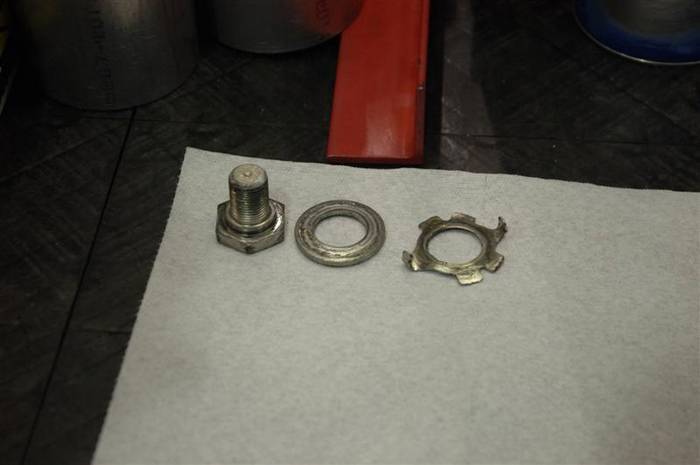
Here you can see the bolt, washer, and "locking" washer have been removed. In the "locking" washer you can see the two ends that are bent AWAY from you as look at the washer in the car. In this picture, they are bent up. Those two tabs stick into the flange and are "supposed" to prevent the tab from turning.
BUT,
Already we are starting to see problems.
Last edited by David Kirkham; 09-04-2007 at 05:28 PM..
|

09-03-2007, 12:22 PM
|
 |
CC Member

|
|
|
Join Date: Mar 2001
Location: Provo,
Ut
Cobra Make, Engine: Kirkham, 427
Posts: 6,990
|
|

 Not Ranked
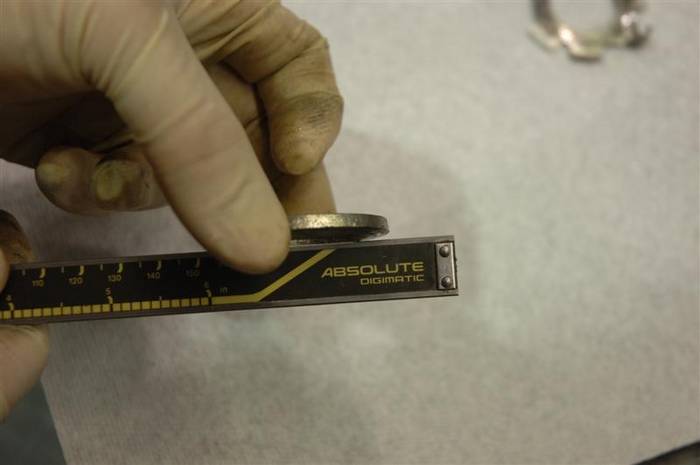
Here you can see Sandwich putting the straight edge of some calipers across the washer. You can see it is severely bent! The steel of the washer indicates is is probably mild steel and so it has no spring to resist permanent deformation from the pounding of the rear suspension. As the suspension beat on the washer over time, it has yielded letting all the preload out of the suspension--major bummer waiting to happen in the driver's seat.
Last edited by David Kirkham; 09-03-2007 at 01:39 PM..
|

09-03-2007, 12:27 PM
|
 |
CC Member

|
|
|
Join Date: Mar 2001
Location: Provo,
Ut
Cobra Make, Engine: Kirkham, 427
Posts: 6,990
|
|

 Not Ranked
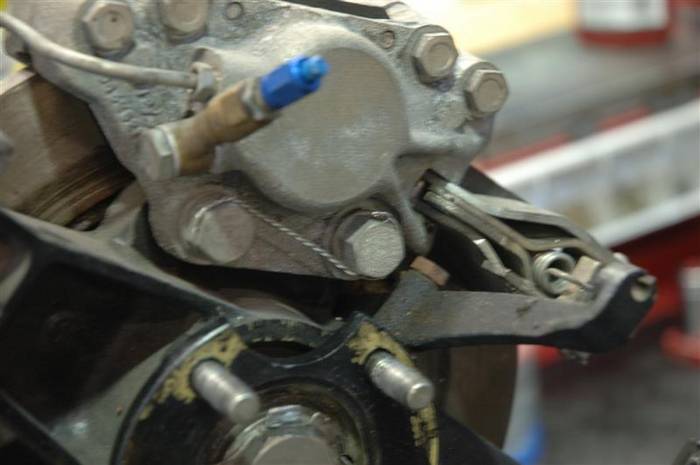
Now Sandwich is going to take the caliper off. (I took this photo earlier in the process.) Notice the nice safety wire job someone did on the brake caliper bolts. Nice to see some nice work.
You have to cut the safety wire to get the caliper off so you can get the hub out to inspect it.
 |

09-03-2007, 12:32 PM
|
 |
CC Member

|
|
|
Join Date: Mar 2001
Location: Provo,
Ut
Cobra Make, Engine: Kirkham, 427
Posts: 6,990
|
|

 Not Ranked

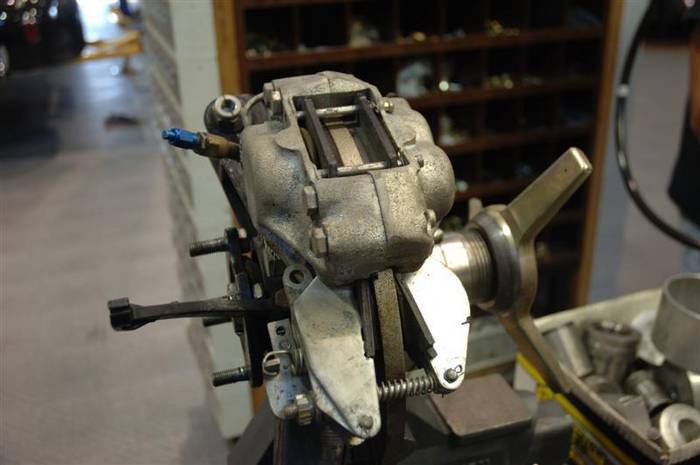
Here is another shot of the rear caliper. The rear caliper on a 427 Street Cobra is made out of cast iron. In the photo you can see the original brass Lucas brake line fitting that is screwed into the caliper. The brake flex lines then bolt into that brass fitting. The fitting is screwed down to the caliper by a banjo bolt and crush washers. We have capped the brake line with an AN #3 cap. ALWAYS cap your brake lines! If you leave them open, crap will find its way inside and eventually make it to the caliper pistons...
SCRATCH
LEAK
Call Kirkham and spend big $$$ to get my caliper fixed.
These calipers are one of the big reasons why making an EXACT copy of an original 427 Street Cobra (or a 289 Street Cobra) is almost impossible. These calipers are a strange beast. They are EXTREMELY rare and as such are worth a small fortune. But, no one really wants them as they want the big aluminum Girling calipers like the Comp 289's, Comp 427's and, 427 S/C's had. They are a strange 3 piston caliper and they are IMPOSSIBLE to find now. The "Big Aluminum Girlings" are just that...they are BIG and they will NOT fit under wire wheels.
Last edited by David Kirkham; 09-03-2007 at 01:42 PM..
|

09-03-2007, 01:10 PM
|
|
CC Member

|
|
|
Join Date: Jan 2001
Location: greensboro,
NC
Cobra Make, Engine: CSX 2401 street 289 Cobra and CSX 3288 Street "427" Cobra
Posts: 712
|
|

 Not Ranked
David, this is a fantastic thread. Having and driving one of these wrecks waiting to happen, what is the cure? Jim Maxwell CSX 3288
|

09-03-2007, 01:17 PM
|
 |
CC Member

|
|
|
Join Date: Mar 2001
Location: Provo,
Ut
Cobra Make, Engine: Kirkham, 427
Posts: 6,990
|
|

 Not Ranked

All that just to show you these bolts! These funny bolts have a special place in my heart! You see, they were the FIRST Cobra part I ever made! Back in 1989 when I was at BYU I had to figure out a way to make Cobra parts...so, I ventured over to the Manufacturing Engineering Department. I just showed up for a CNC class one day with some old Cobra parts. I think the professor was so stunned he didn't pay too much attention to the fact I wasn't accepted to the department--let alone I hadn't completed ANY of the prerequisites to his class! I figured that was the only place I was going to learn to make Cobra parts so I just followed my Dad's advise when he sent me off to college, "Son, there are two rules you need to learn in life. Rule #1--It is easier to ask forgiveness than it is to ask permission. Rule #2--If you don't like the answer...DON'T ASK THE QUESTION!" The school's CNC equipment just sat idle all night long...surely it could be put to better use! I didn't have anywhere near the money to buy my own CNC equipment so I would just use that class to make the parts. What happened is I just kept taking classes in the BYU Manufacturing Engineering Department so I would have access to the machines! 
The first class I took was beginning CNC machining. The first part I made was this bolt! (Well, not this exact bolt, but one just like it for another Cobra). When everyone else in class was doing dumb projects (like writing their name in a block of aluminum to use as a stupid book end) just to get through the class, I kept bringing Cobra parts to school to reverse engineer. I made spindles, rotors, ball pins, brake bolts and all sorts of things! I NEVER took any of the prerequisite classes. I didn't have the time! I just showed up in the various classes and learned, casting processes, welding processes, tool design, basic CNC programming, Advanced CNC programming, Advanced tool design, Metrology, Metallurgy, stress analysis, material selection, Advanced Composites...
I learned how to use optical comparators, micrometers, program CNC machines, use both CAD and CAM systems, autoclaves, etc. I was a dumb student looking for my place in life and the Manufacturing Engineering Department took me in like an orphan. We have since done many projects with BYU and donated countless CNC machine hours to the department for land speed record cars, electric cars, and other projects. I will never be able to repay those kind professors who took me under their wings.
I will never forget the first day I took Advanced Tool Design (without any of the prerequisite classes, of course). I just HAD to learn CAD! The professor (who I had taken other classes from) just looked at me that first day and said right in front of EVERYONE, "Are you sure you want to be here?!!!!!" I said yes. Little did I know... Thankfully, he spent countless hours bringing me up to speed in that class--even at times going over basic mathematics to help me succeed. EVERY night he saw me in the CAD lab working away late at night. I constantly visited him in his office asking for help--which he graciously gave. Many nights we talked past 10:00 pm. He didn't make me turn in any assignments until 1 week before the final. I guess he could see I was determined to succeed and he wasn't going to stand in my way, but instead he wanted to be a help. I turned in my first assignment of the semester 5 days before the semester ended and all others over the next 5 days. It took me that long to figure out CAD. I received the highest score in the class on the final--and got an A in the class. My eternal thanks to Professor Kohkonen! We are still friends and I invite him to all of our Open Houses--along with other professors from the department.
As the semesters went by, all the professors in the department knew me by name and knew what I was up to. They all loved it (I think) and just looked the other way on the rules and spent endless hours of their office time helping me to learn. I was very, very fortunate to have such good and dedicated professors as I did! Good thing they were all car nuts too!
Anyway, back to the rear brake caliper bolts!

Last edited by David Kirkham; 09-05-2007 at 07:59 AM..
|

09-03-2007, 01:19 PM
|
 |
CC Member

|
|
|
Join Date: Mar 2001
Location: Provo,
Ut
Cobra Make, Engine: Kirkham, 427
Posts: 6,990
|
|

 Not Ranked

Oh yes! Back to the bolts!
The bolts are 7/16 BSF--or British Standard Fine. If you look closely, you can see the bolts actually have a shoulder on them that fits down into the upright. The threads on the bolt are 55 degrees instead of the standard 60 degree threads that are universal today. I remember looking at the bolt under the optical comparator with Professor Kohkonen. We were perplexed by the 55 degree threads--until his face lit up and he said, "I bet those are Whitworth threads!" He was right. He convinced the Sandvik salesman to "donate" some 55 degree threading inserts to the university which Professor Kohkonen eventually gave to me for all the work I helped him with in the labs. I still have those inserts in the top drawer of my tool box! I remember making my first bolts out of 4130 chromoly. Chromoly was the buzz word then (and now). You wouldn't believe how many people think chromoly is made in heaven. It has SERIOUS drawbacks. I will get into that a little later. As I look back it wasn't the best choice for a number of reasons. Today I would make them from 17-4 PH H1150.
Last edited by David Kirkham; 09-05-2007 at 08:06 AM..
|

09-03-2007, 01:21 PM
|
 |
CC Member

|
|
|
Join Date: Mar 2001
Location: Provo,
Ut
Cobra Make, Engine: Kirkham, 427
Posts: 6,990
|
|

 Not Ranked
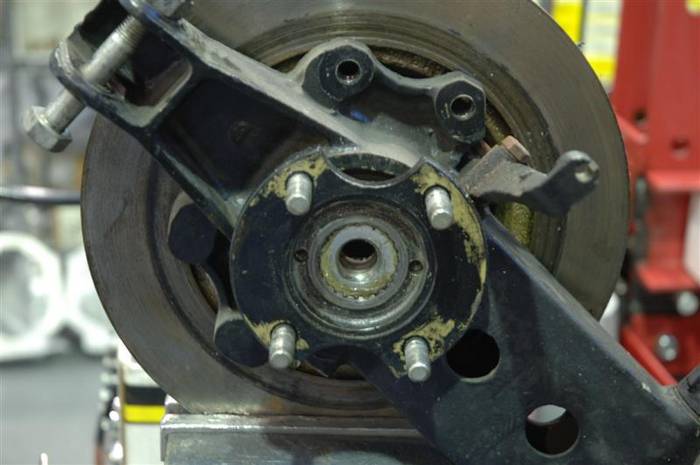
Back to the rear Hub Bolt.
Here Sandwich has taken the bolt out.
 |

09-03-2007, 01:23 PM
|
 |
CC Member

|
|
|
Join Date: Mar 2001
Location: Provo,
Ut
Cobra Make, Engine: Kirkham, 427
Posts: 6,990
|
|

 Not Ranked
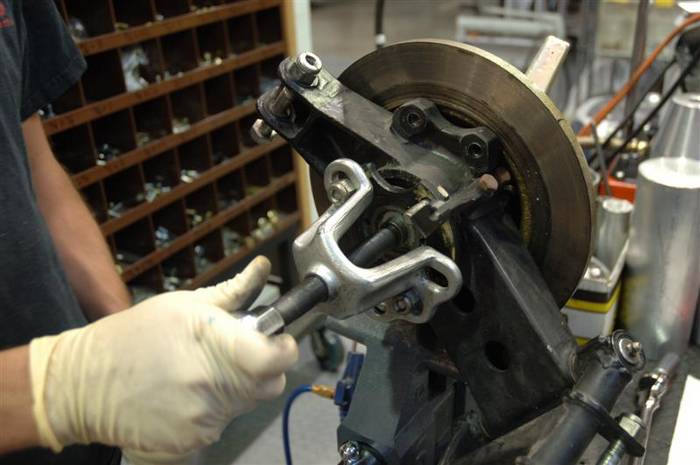
Here Sandwich has put a puller on the drive flange. The puller we use has a special tapered end on it which fits right into the hub--so we don't make those little divot marks in the rear hub bolt.
 |

09-03-2007, 01:25 PM
|
 |
CC Member

|
|
|
Join Date: Mar 2001
Location: Provo,
Ut
Cobra Make, Engine: Kirkham, 427
Posts: 6,990
|
|

 Not Ranked
Flange is now off and you can see the splines on the rear hub.
 |

09-03-2007, 01:29 PM
|
 |
CC Member

|
|
|
Join Date: Mar 2001
Location: Provo,
Ut
Cobra Make, Engine: Kirkham, 427
Posts: 6,990
|
|

 Not Ranked
Jim,
I have been posting like a fiend and I just went back to proof the thread and noticed you posted! Sorry I missed it.
I am going to show you the tricks we do to correct the original problems the car had. There are many little things you can do to make the car better and safer. I will show you some really ugly things coming up that NO ONE ever thinks of with these cars. I will discuss metallurgy and why we do what we do and why the original guys did what they did--complete with the advantages and disadvantages of both. It will be an interesting thread. I will move on to the front suspension when I am done with the rear suspension.
Stand by!
David
   |

09-03-2007, 01:53 PM
|
 |
CC Member

|
|
|
Join Date: Mar 2001
Location: Provo,
Ut
Cobra Make, Engine: Kirkham, 427
Posts: 6,990
|
|

 Not Ranked
Here is a picture of the drive flange that Sandwich just took off. It has to be taken off with a puller. I have seen a few of these come off without a puller and that is BAD!!! What happens is setting up the rear bearings on an original Cobra is a LOT of work. It is much easier if the drive flange does not have to be pressed on. You will understand why later when I show you what is inside of these hubs. Anyway, if the flange is pressed on, it helps to keep the entire system rigid so you are not entirely relying on the bolt to keep everything tight. If the flange can move, it will begin to "fret." Fretting is when two parts rub together and start to transfer metal from one surface to the other. The metal literally turns to powder as it grinds away. It is very BAD to have a flange move on a shaft. We use Loctite on loose ones when customers are dead set on keeping the original parts.

Last edited by David Kirkham; 09-05-2007 at 08:13 AM..
|

09-03-2007, 01:54 PM
|
 |
CC Member

|
|
|
Join Date: Mar 2001
Location: Provo,
Ut
Cobra Make, Engine: Kirkham, 427
Posts: 6,990
|
|

 Not Ranked
Now the upright will simply pull away from the hub and rotor.
Notice the two shims that are still on the hub shaft...they smell like trouble. They always are trouble when you see bent hub washers like the washer above.
 |

09-03-2007, 01:58 PM
|
 |
CC Member

|
|
|
Join Date: Mar 2001
Location: Provo,
Ut
Cobra Make, Engine: Kirkham, 427
Posts: 6,990
|
|

 Not Ranked
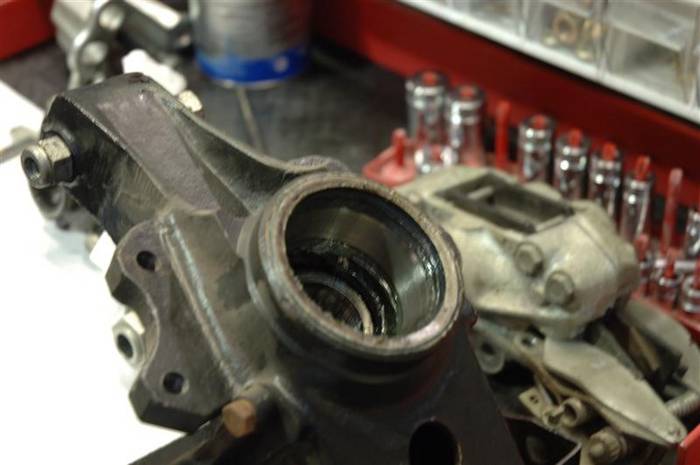
This is what the inboard side of the upright looks like when you pull the hub out. The first thing you see is the seal, then you see the inner race just a little bit further inside the upright.
 |

09-03-2007, 02:19 PM
|
|
CC Member

|
|
|
Join Date: Jun 2004
Location: Christchurch,
NZ
Cobra Make, Engine: Ram 427 SC CSX6042. Chev 355. Quad Weber DCNFs
Posts: 208
|
|

 Not Ranked
Quote:
|
Originally Posted by David Kirkham
Incidentally, Jaguars do NOT have a true independent rear suspension as they use the 1/2 shaft as the upper control arm. Cobras do not use the 1/2 shaft as the upper control arm. They have a true rear upper control arm with plunging 1/2 shafts.
|
I can't see why you consider the Jag IRS to be not a true IRS. An independant suspension is surely one that transfers no suspension forces from one side of the car to the other and the Jag unit clearly fulfills this. It is not a double wishbone IRS; that is obvious, it's just a different design.
__________________
Cheers
Myles D-W
|

09-03-2007, 02:22 PM
|
|
Senile Club Cobra Member

|
|
|
Join Date: Feb 2001
Location: Buffalo, NY USA,
NY
Cobra Make, Engine: Superformance
Posts: 4,527
|
|

 Not Ranked
David,
I beg to differ that the "Jag rear suspension is not a true IRS" True, it is NOT an "SLA" IRS, but it IS IRS! Neither wheel is affected by the movement of the other. Yes, the halfshaft IS the upper control arm and does not plunge like a Cobra, but it is IRS. BTW, Colin Chapman was also enamored of the use of the halfshaft as a suspension link. Works great until a "U" joint fails and then it gets ugly fast!
I understand the comment as I have heard an "expert" at a car show describe his replica as "having Jag suspension, just like the REAL Cobras used!"
Rick
|
 Posting Rules
|
You may not post new threads
You may not post replies
You may not post attachments
You may not edit your posts
HTML code is Off
|
|
|
All times are GMT -7. The time now is 04:38 PM.
|
|


 1Likes


 Linear Mode


