Welcome to Club Cobra! The World's largest
non biased Shelby Cobra related site!
- » Representation from nearly all
Cobra/Daytona/GT40 manufacturers
- » Help from all over the world for your
questions
- » Build logs for you and all members
- » Blogs
- » Image Gallery
- » Many thousands of members and nearly 1
million posts!
YES! I want to register an account for free right now!
p.s.: For registered members this ad will NOT show
 
 Main Menu
|
 Nevada Classics
|
 Advertise at CC
|
 November 2024
|
| S |
M |
T |
W |
T |
F |
S |
| |
|
|
|
|
1 |
2 |
| 3 |
4 |
5 |
6 |
7 |
8 |
9 |
| 10 |
11 |
12 |
13 |
14 |
15 |
16 |
| 17 |
18 |
19 |
20 |
21 |
22 |
23 |
| 24 |
25 |
26 |
27 |
28 |
29 |
30 |
|
 CC Advertisers
|
|
 1Likes 1Likes

09-04-2007, 04:48 PM
|
 |
CC Member

|
|
|
Join Date: Mar 2001
Location: Provo,
Ut
Cobra Make, Engine: Kirkham, 427
Posts: 6,990
|
|

 Not Ranked
Here is a picture of the front hub assembly. The bearings have been checked and the outer bearings have been replaced to the larger bearings.
 |
-
Advertising


09-04-2007, 04:56 PM
|
 |
CC Member

|
|
|
Join Date: Mar 2001
Location: Provo,
Ut
Cobra Make, Engine: Kirkham, 427
Posts: 6,990
|
|

 Not Ranked
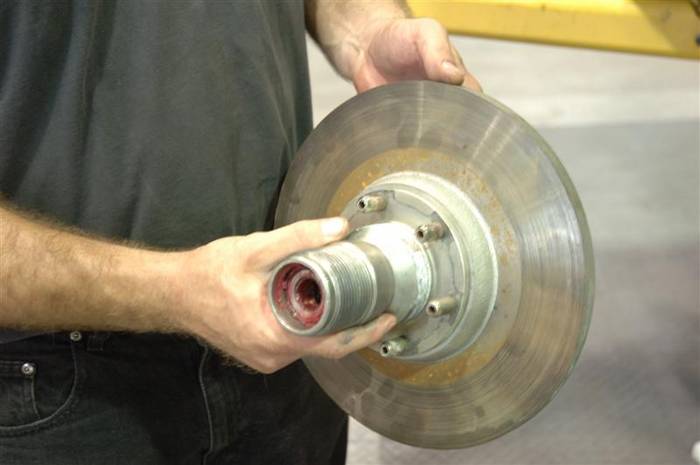
Here is the outboard view of the hub and rotor assembly with the new Set 12 bearing ready to go on.
Notice the synthetic red Mobil 1 grease we use. It has a very high working temperature. If you have ever raced on those solid rotors, then you know why you need the high temperature grease.
 |

09-04-2007, 04:59 PM
|
 |
CC Member

|
|
|
Join Date: Mar 2001
Location: Provo,
Ut
Cobra Make, Engine: Kirkham, 427
Posts: 6,990
|
|

 Not Ranked
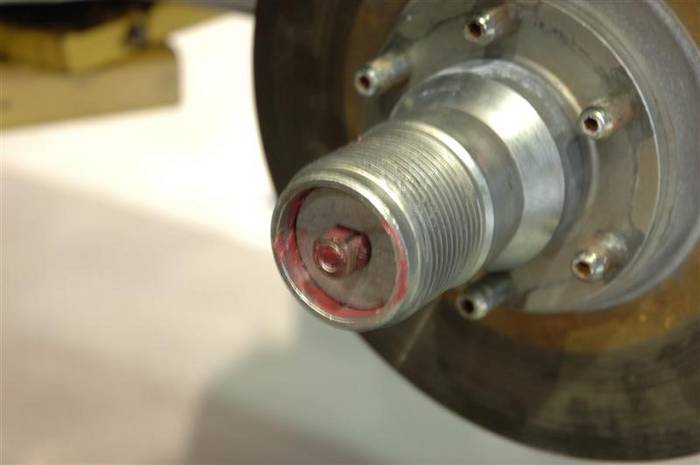
Here you can see the new 5/8 "D" washer we made to go with the new upsized outer bearing. The original spindle only had a 9/16 "D" washer and nut.
 |

09-04-2007, 05:00 PM
|
 |
CC Member

|
|
|
Join Date: Mar 2001
Location: Provo,
Ut
Cobra Make, Engine: Kirkham, 427
Posts: 6,990
|
|

 Not Ranked
Here you put the new 5/8 castle nut on.
 |

09-04-2007, 05:02 PM
|
 |
CC Member

|
|
|
Join Date: Mar 2001
Location: Provo,
Ut
Cobra Make, Engine: Kirkham, 427
Posts: 6,990
|
|

 Not Ranked
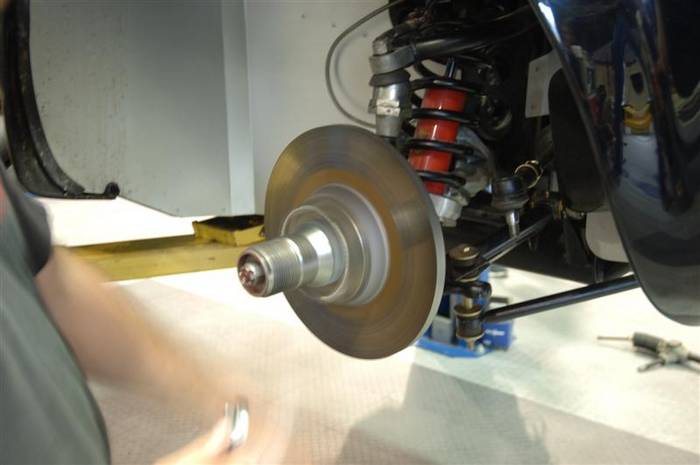
Here Jeremy is giving the hub a spin while he tightens up the castle nut. You do this to seat the bearing. Just keep turning and working the bearing down tight until the hub stops turning. Then back off 1/4 turn and put in cotter pin.
Done!
 |

09-04-2007, 05:13 PM
|
 |
CC Member

|
|
|
Join Date: Mar 2001
Location: Provo,
Ut
Cobra Make, Engine: Kirkham, 427
Posts: 6,990
|
|

 Not Ranked

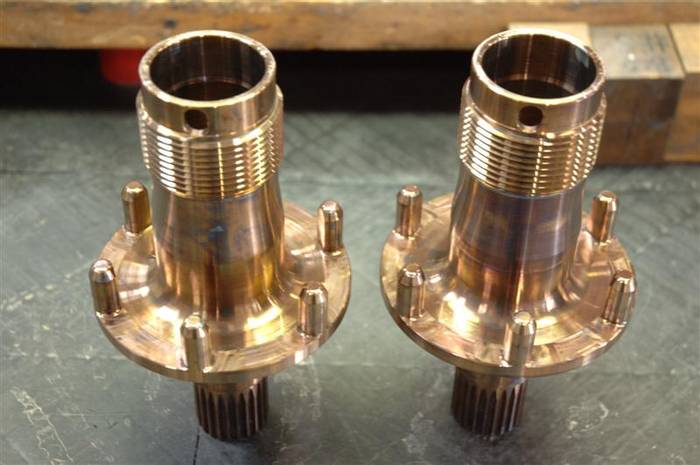
Just for comparison, here is our latest set of rear hubs. Our front hubs are very similar. Notice the drive pins are milled directly into the hub. This is done for MAXIMUM strength, MINIMUM part count, and minimum weight. By milling the drive pins directly into the hubs, we are able to make the entire part much lighter. Also, there is NEVER the question of "Did you tighten the drive pins????" 
These drive pins will NEVER come loose!
The milling operation to make the drive pins is extremely difficult. At first Sandwich told me it wasn't even possible. I "persuaded" him there was enough room and he moaned and groaned, but got it done. I knew it could be done...there was at least 10 microns of tool clearance! What was all that complaining about anyway? 
There is a very long reach that has to be done with the end mill to get around the snout of the hub and preventing chatter and tool destruction is a major challenge. This milling operation eats end mills like Rosie eats candy. But it makes the strongest, lightest, most corrosion resistant part possible.
Anyway, milled in drive pins is the LATEST and GREATEST mod on F1 cars which was only started this year. I like not having to keep track of so many parts, nuts, and drive pins falling all over the place and rolling under the bench.
 |

09-04-2007, 05:14 PM
|
 |
CC Member

|
|
|
Join Date: Mar 2001
Location: Provo,
Ut
Cobra Make, Engine: Kirkham, 427
Posts: 6,990
|
|

 Not Ranked
Also,
You can see in the above photo the oval shaped hole at the end of the snout. That hole is for our safety pop up button to keep the knock offs from coming off accidentally! Another F1 modification. It is very nice to have friends in high places!
David
   |

09-04-2007, 06:34 PM
|
 |
CC Member

|
|
|
Join Date: Mar 2001
Location: Provo,
Ut
Cobra Make, Engine: Kirkham, 427
Posts: 6,990
|
|

 Not Ranked

I just get into this posting daze and don't realize other people are posting and asking questions. I will try to answer.
FIA-ERA,
Please PM me and I will get you out your prize!
rbray,
For heating to the temperatures I am talking about to do you any good, you will have to use a precipitation hardening alloy.
CobraV8,
Chromoly steel is notoriously bad for corrosion resistance. You are correct that a standard heat treatment on heat treatable steels actually makes the steel grow in size. But, that only works on steels that are "heat treated" by quenching to keep the martensite. For example, 4340 changes from austenite to martensite at 1525-1550 degrees F. You are correct martensite takes up more volume.
Here, however, we are working with precipitation hardening stainless steels. In our case, we "only" heat it up to 900 degrees and the process actually makes our parts SMALLER--but it is actually very, very slight. We do not quench and temper with 17-4 ph. This touches on another VERY important reason to use 17-4. It is stable during heat treat. There is no quenching to cause cracks or to warp the part. Our parts come out perfectly concentric and through hardened when we are done. You pay for it initially as it is extremely expensive--the billet alone for our hubs is $235! 
You gain it back when you can sleep at night knowing your parts are the best you could have possibly made.
mickmate,
If you look in the picture, the worst corrosion is actually right by the junction of the spindle to the upright. You can see a darker band there. The bearings are sealed, but that little part of the spindle is NOT. Water gets in there and the rust monster rears his ugly butt. (But not as ugly as Jamo's) 
As for the color--the straw color is the color the hubs come out of the oven when they are cooled. They darken as they cool. Notice in the above picture the blue is just starting to appear on the hubs.
mylesdw,
On an original Cobra, the hub and spindle never touch as they are separated by the bearings. It is VERY true, however, that parts that touch and rub LIKE THAT DUMB BEARING SPACER must be made out of hard steel.
Dean,
I spend a lot of nights awake trying to figure out how to do this better. One ride with a professional driver on a track and your perspective changes. WOW, these cars better be put together RIGHT! At our event last Thursday, a Miller Motorsports instructor posted lap times 30 seconds faster in one of our cars than a pretty experienced (although ametuer driver) in a HIGHLY modified Ford GT. When you ride with one of those guys (or girls) you simply can't believe what the car can do. Like I said, I only see as far as I do because I stand on the shoulders of giants.
Lowell,
I am happy to share what we have learned over the years. Hopefully it will just make the entire industry better. Over the years many, many people have shared freely what they do with us. That is where I got all the information. Like my mother always said, "There'll be more for all of us if you share."
David
  
Last edited by David Kirkham; 09-05-2007 at 07:33 AM..
|

09-04-2007, 07:47 PM
|
 |
Senior Club Cobra Member

|
|
|
Join Date: Nov 2003
Cobra Make, Engine: ERA #698 428 Toploader
Posts: 292
|
|

 Not Ranked
I enjoyed this thread very much, thanks for taking the time to post it. Any videos of the instructor doing some hot laps in a Kirkham?
|

09-04-2007, 09:03 PM
|
|
Senior Club Cobra Member

|
|
|
Join Date: Jun 2007
Location: Friant,
ca
Cobra Make, Engine:
Posts: 106
|
|

 Not Ranked
this is like a history/metallurgy/mechanical engineering class all in one..
awesome!
|

09-04-2007, 09:59 PM
|
|
CC Member

|
|
|
Join Date: May 2006
Location: Exeter,
CA
Cobra Make, Engine: KMP 498
Posts: 495
|
|

 Not Ranked
David nice thread, very nice. I have already sent a couple of my engineering friends to the thread- they were very impressed. The rocket sicentist for Northroup- emailed and said
"I didn't think those models you put together had that much tech".
He said you are right on about the corrosion-Jim said they not only use heat treating when they can-but this is where the bad boy coatings come into play their big part.
David thanks again- This is why you are selling cars like hot cakes!
|

09-04-2007, 10:40 PM
|
 |
CC Member

|
|
|
Join Date: Apr 2002
Location: Portland,
OR
Cobra Make, Engine: Kirkham 427 S/C #253, KCR Built CSX #452
Posts: 178
|
|

 Not Ranked
 Unbelievable Ride
Quote:
|
At our last event last Thursday, a Miller Motorsports instructor posted lap times 30 seconds faster in one of our cars than a pretty experienced (although ametuer driver) in a HIGHLY modified Ford GT. When you ride with one of those guys (or girls) you simply can't believe what the car can do.
|
As someone who personally experienced one of these rides, I will say that these cars perform absolutely remarkably in the hands professionals.
David, please thank Cindy (again) for the absolutely awesome ride in the new track car. The track car has a second rollbar with a six point harness and kirkey racing seat on the passenger side. It held me firmly in place to savor every bit of g-force that the car delivered with Cindy's precise control. This ride was on the more technical east track.
I'm hopeful that the early discussions that took place between the head instructor and Thomas will lead to overlapping of the track day and training from these instructors. And of course, more rides with the instructors too. 
Thanks for the track day
Scott

|

09-04-2007, 11:19 PM
|
 |
CC Member

|
|
|
Join Date: Jun 2005
Location: Carmichael,
ca
Cobra Make, Engine:
Posts: 279
|
|

 Not Ranked
I am humbled by your high tech. Very fun and informative to read. -John
__________________
"What's behind me does not matter"
|

09-05-2007, 03:08 AM
|
 |
CC Member

|
|
|
Join Date: Jan 2001
Location: Cape Coral,
FL
Cobra Make, Engine: 2009 Solbra
Posts: 3,861
|
|

 Not Ranked
David I have really enjoyed ready this thread but then the reference to Florida and rust and now talking about Jamo’s ugly butt, Well there I have to agree.
__________________
Dan Wulff
I carry a gun because a cop is too heavy.
(No doubt, most will blame it on the donuts.)
You're just jealous because the voices only talk to me
Earth is the insane asylum for the universe.
The gene pool could use a little chlorine.
The original point and click interface was a Smith & Wesson.
|

09-05-2007, 05:00 AM
|
 |
CC Member

|
|
|
Join Date: Feb 2006
Location: Gore. New Zealand.,
SI
Cobra Make, Engine: DIY Coupe, F/T ,MkIV.
Posts: 808
|
|

 Not Ranked
David,
Thank you for a very informative thread on why & how you go about a rebuild of these cars. Also your ability to write it in a manner that we can easily understand with a background as to why you have made the changes leaves no doubt that considerable thought has gone into curing some of the inherent flaw's of the original design ,while still retaining 'the original' appearance. I hope there is more to come.
regards
Jac Mac
|

09-05-2007, 09:21 AM
|
 |
CC Member

|
|
|
Join Date: Mar 2001
Location: Provo,
Ut
Cobra Make, Engine: Kirkham, 427
Posts: 6,990
|
|

 Not Ranked

cobred,
Great idea! We will get some videos for our next track event...maybe even as close as October! We are hooked.
brobehr,
Thanks for the kind words! I hope you didn't fall asleep in class!
big-boss,
We have struggled with coatings and protection, etc. They work great IF they are done right and they don't get scratched. One of the BIG reasons we went to 17-4 was because it is so corrosion resistant and we don't have to use coatings. Coatings slow down the production process as you have to wait for the coating guys to get it done--which can take many days. Shipping dings the parts, UPS eats them, who knows what happens in shipping BOTH ways! Many coatings mess with dimensional tolerances. When you are tying to hold 0.0002-0.0005 inches the coating will screw you up. All and all, they don't work for us. I would rather pay more for the billet and then have EXACTLY what I want when I am done.
We are trying to make them more high tech as we go...
John,
You are kind. I can only see because of the graciousness of others who showed me. Mike McCluskey being foremost on the list.
CobraDan,
I have NEVER seen rust like rust in Florida! I am surprised they even have cars more than 5 years old. I once saw an old 1969 Shelby that the ROOF was rusted out on! Beware of cars from Florida!
Jac Mac,
There is more to come. Eventually you get to the point where you modify and modify but are constrained by the original design and you need to cut bait and start with a fresh piece of paper. We are now at that point...
David
   |

09-05-2007, 10:25 AM
|
 |
Renegade Nuns on Wheels

|
|
|
Join Date: Aug 2001
Location: columbus,
Oh
Cobra Make, Engine: Unique 427 roadster with 351C-4B
Posts: 5,129
|
|

 Not Ranked
Interesting and informative thread David. Thanks!
|

09-05-2007, 11:01 AM
|
 |
CC Member

|
|
|
Join Date: Mar 2001
Location: Provo,
Ut
Cobra Make, Engine: Kirkham, 427
Posts: 6,990
|
|

 Not Ranked
rdorman,
Thanks!
Here comes more!
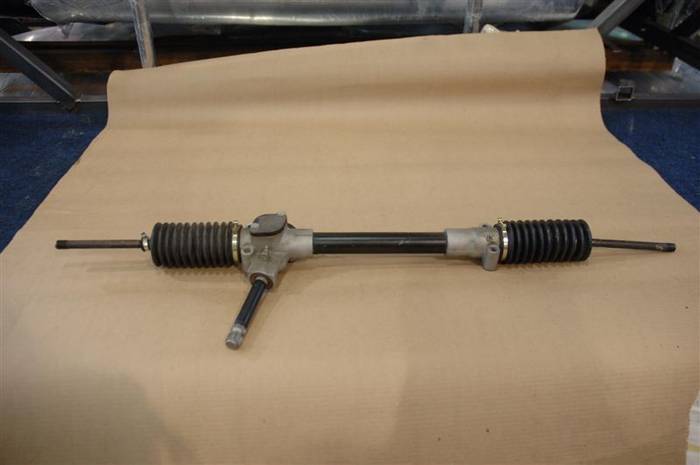
This is the steering rack off of an original Cobra.
 |

09-05-2007, 11:03 AM
|
 |
CC Member

|
|
|
Join Date: Mar 2001
Location: Provo,
Ut
Cobra Make, Engine: Kirkham, 427
Posts: 6,990
|
|

 Not Ranked
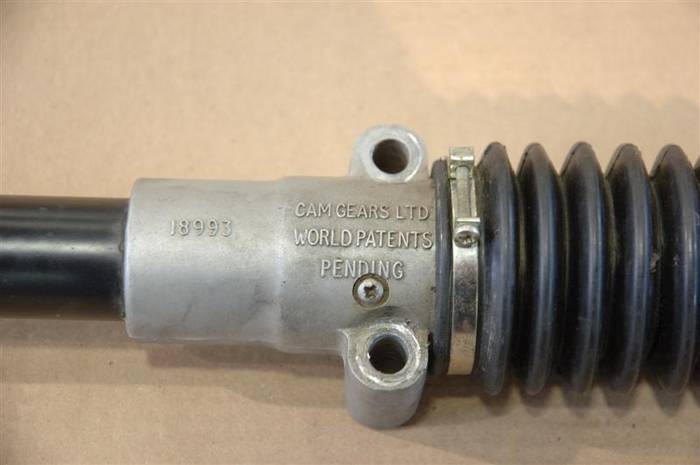
This is the famous Cam Gears steering rack. They are next to impossible to find...and we are about to replace this one!
 |

09-05-2007, 11:06 AM
|
 |
CC Member

|
|
|
Join Date: Mar 2001
Location: Provo,
Ut
Cobra Make, Engine: Kirkham, 427
Posts: 6,990
|
|

 Not Ranked
The first thing you do when you are checking out a car is to grab a hold of wheels and give them a good shaking. Try to rip the wheel off the car. (Just don't pull the car off the rack or the jack stands!) If the wheel moves...time to break out your wallet 
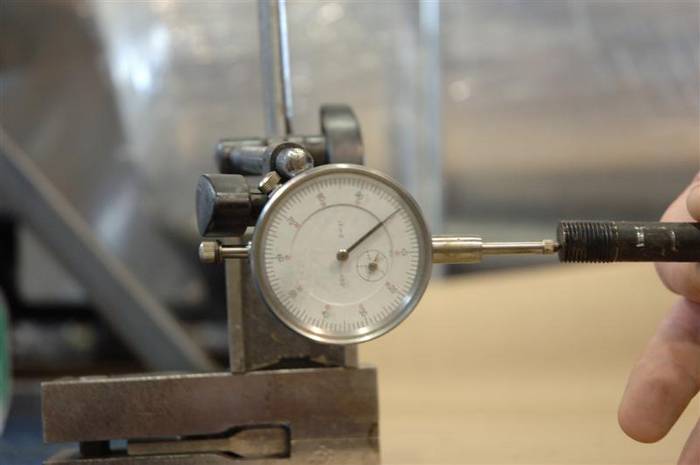
Well, the front wheel moved and so you start checking things. We found the steering rack was completely shot. You initially find these things by putting your fingers on all the joints to feel for movement as someone moves the wheel. This one was so bad we could see things moving with our eyes.
Here we put the dial indicator on the end of the inner tie rod end. Notice the dial indicator reads "0."
Last edited by David Kirkham; 09-05-2007 at 12:04 PM..
|
 Posting Rules
|
You may not post new threads
You may not post replies
You may not post attachments
You may not edit your posts
HTML code is Off
|
|
|
All times are GMT -7. The time now is 07:30 PM.
|
|


 1Likes


 Linear Mode


