 
 Main Menu
|
 Nevada Classics
|
 Advertise at CC
|
| S |
M |
T |
W |
T |
F |
S |
| |
|
|
|
|
|
1 |
| 2 |
3 |
4 |
5 |
6 |
7 |
8 |
| 9 |
10 |
11 |
12 |
13 |
14 |
15 |
| 16 |
17 |
18 |
19 |
20 |
21 |
22 |
| 23 |
24 |
25 |
26 |
27 |
28 |
|
|
 CC Advertisers
|
|
 37Likes 37Likes

05-12-2017, 07:27 AM
|
 |
CC Member

|
|
|
Join Date: Apr 2004
Posts: 1,029
|
|

 Not Ranked
Quote:
Originally Posted by morgy

I am about to refurb my 2800 geese gun and was wondering What the colour used on Tecalemit Geese gun and was the Brass ring painted or left natural Brass finish? I've seen a few different shades of blue some with a green tinge to them...
Thanks
|
A link to a thread you might find useful.
AC Owners Club - Grease Guns
__________________
Dan Case
1964 Cobra owner since 1983, Cobra crazy since I saw my first one in the mid 1960s in Huntsville, AL.
|

05-12-2017, 07:57 AM
|
|
CC Member

|
|
|
Join Date: Jul 2015
Location: west sussex,
Wes
Cobra Make, Engine: AC289 sports
Posts: 81
|
|

 Not Ranked
Thanks...
|

05-12-2017, 09:00 AM
|
 |
CC Member

|
|
|
Join Date: Apr 2005
Location: Tucson,
AZ
Cobra Make, Engine:
Posts: 5,391
|
|

 Not Ranked
Armrer painted mine, so I'm not sure of the color. It was a custom mix, two part base/clear. A little nicer than original but it's only for display anyway.
Larry
__________________
Alba gu bràth
|

06-24-2017, 06:12 PM
|
|
CC Member

|
|
|
Join Date: Jan 2001
Location: greensboro,
NC
Cobra Make, Engine: CSX 2401 street 289 Cobra and CSX 3288 Street "427" Cobra
Posts: 712
|
|

 Not Ranked
 Morgy's screwdriver
Morgy,
The screwdriver you acquired is probably very close to the correct one that came with the Cobras. Notice the "FOREIGN" stamped on the shaft.
The screwdrivers in the Cobra tool kits were about 10.5" in length and were stamped "Made in Italy" on the shaft. The handle was European birch with red paint. The same screwdriver was also made stamped "FOREIGN", I suspect later than the "made in Italy" ones that were supplied with the Cobras.
So, you have an almost correct screwdriver if it is 10.5" in length!
|

12-13-2021, 07:15 AM
|
 |
CC Member

|
|
|
Join Date: May 2021
Cobra Make, Engine:
Posts: 521
|
|

 Not Ranked

I thought I would share my foibles of the Shelley 12DL rebuild, since this is the hands down best thread on the subject. First, here is a great video on rebuilding Shelley jacks: https://www.youtube.com/watch?v=TuOwiwNPdM8 his is a 10DL, but same parts as the Cobra jacks. I combined two jacks, a 12DL with an L saddle, and a cheap Shelley, with the correct cast curved saddle. Not being the brightest bulb in the room, I took the L bracket off the 12DL first, messed that up but good, then I took the curved saddle off, that one came off perfect! I wanted to stake the saddle like the original Shelley, so I turned down the inner screw a little on the lathe so the curved saddle would fit. After rebuilding the jack fallowing the video and this thread, painting it Rust-Oleum Gloss Winter Grey, looks pretty close to original. Now for the staking, I followed the method in the video, no joy, and I gave up! I thought about welding like was done here, or drilling and tapping like others have done, but I wanted staking! Fortunately, I fallowed the immortal words of Fred Sanford, "never put off tell tomorrow, what you can do better, the day after." I realized, I tried to hammer on my wood bench, so the shock of the hammer was being absorbed by the wood. The next day, I put the jack on concrete, got the punch out and my big Whitworth hammer, and started tapping around like the video. After a minute or so, success, the saddle was on for good! If you look at photos of the staking on originals, it is really crude, must have been the first job for the poor apprentices. Here is a photo of my staking job. Not bad, should look good in the boot of which ever small block Cobra I end up with soon I hope. The price of the two jacks, shipped from the UK, plus the jack handles from Action, I gave up trying to find originals, still came out to less then $500, so not bad. Cheers, Dennis

Last edited by Harpoon PV2; 12-13-2021 at 11:29 PM..
|

12-13-2021, 09:53 PM
|
 |
CC Member

|
|
|
Join Date: Apr 2005
Location: Tucson,
AZ
Cobra Make, Engine:
Posts: 5,391
|
|

 Not Ranked
Looks good!
Larry
__________________
Alba gu bràth
|

04-21-2022, 05:06 PM
|
 |
CC Member

|
|
|
Join Date: Jul 2021
Cobra Make, Engine: Alloy Shelby CSX 8057/Kirkham 1010, 289 Vintage Lykins Build
Posts: 129
|
|

 Not Ranked

Bumping this old thread, regarding creating a proper curved saddle 12DL jack.
I found a 12DL with the L shaped saddle and a broken handle socket. I felt confident that I could get a new pivot off of another model, a cheap 10DL - I haven't received that yet - so the jury is still partially out, but I expect it will work.
I wasn't happy about the notion of prying/grinding the L-saddle off the inner screw and then restaking the proper curved saddle in its place. So I used a different approach that has turned out well:
1. I obtained an inexpensive Shelley 6 inch jack. This has the proper curved saddle. I guessed that the inner screw would be the same thread as the 12DL. It is. I removed the inner screw from the "6 inch" by partially unstaking it on the bottom of the screw and then winding the screw up and out - importantly without removing the saddle.
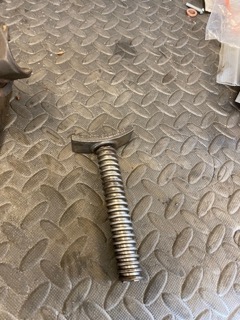
2. I removed the double screw mechanism, from the bottom of the 12DL by grinding/prying the L saddle off. The normal procedure. This allows removal of the internal screw out through the bottom.
3. I cut 1/2" off the bottom of the "6 inch" internal screw (with intact curved saddle). This makes it the same length as the original 12DL internal screw.
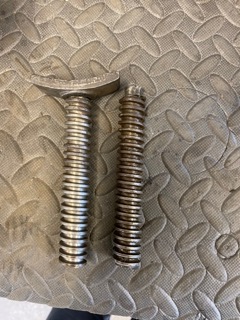
4. I then threaded the shortened "6 inch" internal screw with curved saddle through the top of the 12DL outer screw.

Result: An original, factory secured, intact curved saddle on the 12DL. No workarounds (milling counterbores/spacers/screws) or blunt force staking required. Clean factory finish to the top of the curved saddle.

Last edited by nkb; 04-21-2022 at 11:29 PM..
Reason: Try to make pictures show up
|

04-21-2022, 07:19 PM
|
 |
CC Member

|
|
|
Join Date: Apr 2005
Location: Tucson,
AZ
Cobra Make, Engine:
Posts: 5,391
|
|

 Not Ranked
Pics didn't post, at least not for me.
Larry
__________________
Alba gu bràth
|

04-21-2022, 11:00 PM
|
 |
CC Member

|
|
|
Join Date: May 2021
Cobra Make, Engine:
Posts: 521
|
|

 Not Ranked
I intended to go that rout, but the 10DL I got, had damaged threads and would not come apart, not from rust, just jammed but good!
|

04-21-2022, 11:03 PM
|
 |
CC Member

|
|
|
Join Date: May 2021
Cobra Make, Engine:
Posts: 521
|
|

 Not Ranked
I should add, the factory staked the saddle on, it's crude, but it worked!
|

04-21-2022, 11:25 PM
|
 |
CC Member

|
|
|
Join Date: Jul 2021
Cobra Make, Engine: Alloy Shelby CSX 8057/Kirkham 1010, 289 Vintage Lykins Build
Posts: 129
|
|

 Not Ranked
The factory "staking" doesn't look that crude. Certainly better than I could have achieved.

Note: I haven't even cleaned all the dirt off yet.
BTW: Finally figured out how to post the pictures in my earlier post, above.
Last edited by nkb; 04-21-2022 at 11:30 PM..
|

04-22-2022, 08:43 AM
|
 |
CC Member

|
|
|
Join Date: Apr 2005
Location: Tucson,
AZ
Cobra Make, Engine:
Posts: 5,391
|
|

 Not Ranked
Looks great!
Larry
__________________
Alba gu bràth
|

05-06-2022, 03:47 PM
|
 |
CC Member

|
|
|
Join Date: Jul 2021
Cobra Make, Engine: Alloy Shelby CSX 8057/Kirkham 1010, 289 Vintage Lykins Build
Posts: 129
|
|

 Not Ranked

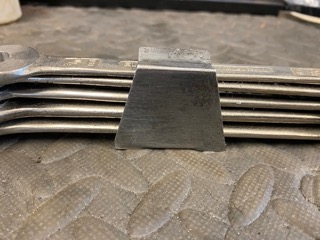
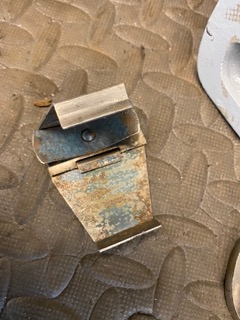
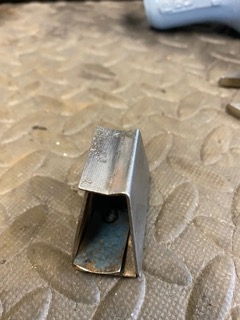
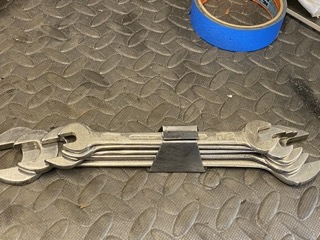
Continuing progress on my tool kit during the long wait for my car to appear. I obtained a vintage set of Elora 100 wrenches. The set actually included 7 wrenches but I selected out the 5 that are appropriate for the Cobra.
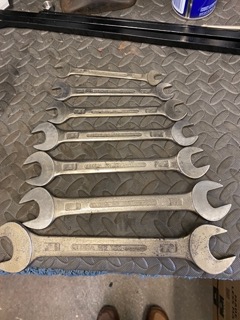
I looked at obtaining the thumb screw or the accordion style spanner clip. The latter, as everyone knows, is virtually impossible to find. The repop thumb screw was still an option but I found a vintage, hinged clip from the UK that does the job nicely and looks appropriate, if not absolutely correct. It has no markings. Interestingly there is evidence of a similar shade of blue that seems to appear on some of the original Elora clips.
I would further add some information to the "controversy" about the Elora wrenches being either labelled "Made in W. Germany" vs "Made in Germany". Since a united Germany did not exist from 1949 to 1990 it was concluded by some that the Made in Germany versions must have either pre-dated 1949 or come after 1990 or were perhaps counterfeit.
However, a little research shows that the "Made in Germany" label was used widely even after 1949 when "Germany" per se did not exist.
From various sources:
Made in Germany is not a controlled designation of origin (AOC); however, the status of this label has been the subject of several court decisions in Germany. Thus in 1974, the Federal Court (Bundesgerichtshof) admitted that the designation Made in Germany effectively created confusion between the two Germanies, thereby encouraging the new designations Made in West Germany and, before German reunification, also Made in the GDR.
From this historical fact it could be construed that the “Made in W. Germany” Elora 100 Whitworth wrenches came about from 1974 and would therefore not be correct for an original tool kit. And that the “Made in Germany” spanners (wrenches) would pre-date 1974 and therefore be possibly more correct for a Cobra.
However, there are other sources that say that the “Made in W. Germany" label was used PRIOR to 1974, at the whim of the manufacturer. So, one can easily argue that either version could be right for the 1960's. That both versions could have co-existed in the Cobra timeframe seems to be borne out in the evidence collected by others (e.g. Dan Case). |

05-19-2022, 02:54 PM
|
|
CC Member

|
|
|
Join Date: Jan 2001
Location: greensboro,
NC
Cobra Make, Engine: CSX 2401 street 289 Cobra and CSX 3288 Street "427" Cobra
Posts: 712
|
|

 Not Ranked
 Elora wrench mystery solved!
I recently had a German friend send this e-mail to the Elora Company:
"I own numerous Elora tools, including complete sets of Elora No. 100 BSF/BSW wrenches. These tools are from the 1960's. Some of the wrenches in each set are labeled "Made in Germany" and others in the same set are labeled "made in West-Germany". This is true for multiple sets.
Can you explain this to me, please? Were the "made in Germany" wrenches made from holdover molds from before the war? Or were some factories using "Made in Germany" and others using "Made in West Germany"?
Thank you for any enlightenment you can provide about this finding."
Here is the reply from Elora, which should clear things up:
"Guten Tag Herr Csapo,
vielen Dank für Ihre Mail, welche wir Ihnen wie folgt beantworten möchten.
Bis zur Teilung Deutschlands wurden unsere Gesenke mit "Made in Germany" beschriftet. Nach der Teilung in die Ihnen zwei bekannten Staaten, wurde man nicht nur Territorial abgegrenzt, sondern wollte sich daraus ergebend auch technologisch gegenüber dem "Osten" abgrenzen und beschriftete alle neuen Gesenke mit "Made in West Germany". Aufgrund der Übergangszeit aber auch der noch voll funktionsfähigen Gesenke, konnte es über längere Zeiträume zu Vermischungen der jeweiligen Kennzeichnung der Schraubenschlüssel in den Sets kommen.
Wir hoffen Ihre Frage ausreichend beantwortet zu haben und verbleiben.
Mit freundlichen Grüßen
i.A. Tobias Klein"
English translation:
"Hello Mr. Csapo,
Thank you for your email, which we would like to answer as follows.
Until the division of Germany, our dies were labeled "Made in Germany". After the division into the two states you know, one was not only territorially demarcated, but also wanted to demarcate technologically from the "East" and labeled all new dies with "Made in West Germany". Due to the transitional period, but also because the dies were still fully functional, the respective markings on the wrenches in the sets could get mixed up over a longer period of time.
We hope to have answered your question sufficiently and remain.
Kind regards
on behalf of Tobias Klein"
I have examined three known to be original Cobra Elora wrench sets that have a mixture of both "Germany and West-Germany" wrenches. Two of the sets had never been opened, including one we unwrapped for the first time last Thursday night, from a one owner car purchased at auction 12 years ago. The current owner had never opened the box.
|

05-20-2022, 06:48 AM
|
|
CC Member

|
|
|
Join Date: Jan 2001
Location: greensboro,
NC
Cobra Make, Engine: CSX 2401 street 289 Cobra and CSX 3288 Street "427" Cobra
Posts: 712
|
|

 Not Ranked
 Original Cobra Elora wrench set
|

06-10-2022, 05:34 PM
|
 |
CC Member

|
|
|
Join Date: Jul 2021
Cobra Make, Engine: Alloy Shelby CSX 8057/Kirkham 1010, 289 Vintage Lykins Build
Posts: 129
|
|

 Not Ranked
With a gracious assist, I have now completed my tool kit for my (to be) 289.

All I need now is the car. In process. |

06-10-2022, 07:01 PM
|
 |
CC Member

|
|
|
Join Date: Apr 2005
Location: Tucson,
AZ
Cobra Make, Engine:
Posts: 5,391
|
|

 Not Ranked
Quote:
Originally Posted by nkb

With a gracious assist, I have now completed my tool kit for my (to be) 289.

All I need now is the car. In process. |
Nice job! You need to get a bag to roll it up in too!
Larry
__________________
Alba gu bràth
|

06-11-2022, 12:03 PM
|
|
CC Member

|
|
|
Join Date: Jan 2001
Location: greensboro,
NC
Cobra Make, Engine: CSX 2401 street 289 Cobra and CSX 3288 Street "427" Cobra
Posts: 712
|
|

 Not Ranked
I have been making replica Cobra toolkit bags for years with original and new British Everflex vinyl depending on the look you want. Correct ties and cotton thread as original.
|

06-13-2022, 01:44 AM
|
 |
CC Member

|
|
|
Join Date: Sep 2003
Location: Switzerland,
CH
Cobra Make, Engine:
Posts: 536
|
|

 Not Ranked
You're talking about 289.
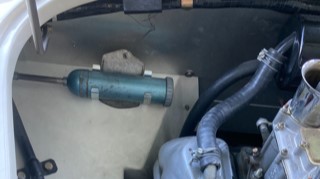
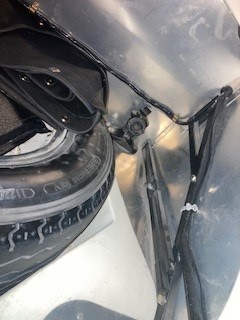
Mount the tecalemit greas gun on the passenger footbox inside the engine compartment.
Mount jack and handle inside the trunk.
It will save you some space on the toolkit bag. ;-)
__________________
Driving with your Cobra is fun,
Racing with your Cobra is amazing,
Driving hill-climbing races with your Cobra is.... HAVEN!! 
Last edited by ALF; 06-13-2022 at 02:02 AM..
|

06-13-2022, 01:31 PM
|
 |
CC Member

|
|
|
Join Date: Jul 2021
Cobra Make, Engine: Alloy Shelby CSX 8057/Kirkham 1010, 289 Vintage Lykins Build
Posts: 129
|
|

 Not Ranked
Quote:
Originally Posted by ALF

You're talking about 289.
Mount the tecalemit greas gun on the passenger footbox inside the engine compartment.
Mount jack and handle inside the trunk.
It will save you some space on the toolkit bag. ;-)

 |
Yep, I have the clips for the grease gun and the clips for the jack and handle on order. I laid out all the various tools in one place just for a photo. No intention of stuffing all into the bag.
One thing I notice is that a lot of replicas clutter up the passenger footbox with a voltage regulator and placing the solenoid on the firewall. Not original to the 289, I believe. I will probably have to correct this once I get my "roller". |
 Posting Rules
|
You may not post new threads
You may not post replies
You may not post attachments
You may not edit your posts
HTML code is Off
|
|
|
All times are GMT -7. The time now is 09:06 PM.
Links monetized by VigLink
|


