 Main Menu
|
 Nevada Classics
|
 Advertise at CC
|
| S |
M |
T |
W |
T |
F |
S |
| |
|
|
1 |
2 |
3 |
4 |
| 5 |
6 |
7 |
8 |
9 |
10 |
11 |
| 12 |
13 |
14 |
15 |
16 |
17 |
18 |
| 19 |
20 |
21 |
22 |
23 |
24 |
25 |
| 26 |
27 |
28 |
29 |
30 |
31 |
|
|
 CC Advertisers
|
|
 2Likes 2Likes

02-10-2010, 09:44 PM
|
|
CC Member

|
|
|
Join Date: Mar 2009
Location: Mendota,
IL
Cobra Make, Engine:
Posts: 697
|
|

 Neutral
 Daytona coupe scratch build
Hi everybody,
It looks like the scatch builders has been a little slow lately. I have been meaning to post here for awhile. I am scratch building a Daytona Coupe, using a set of plans. When I start a thread on my build, how much detail should I go into? Such as, should I post pictures and descriptions of some setups of the drill press, the mill or the saw or jigs made to hold the parts in the right positions to get them welded? If I post that kind of information, where should I post the pictures? In my gallery or attach them directly to the post? I posted to the Daytona Coupe section and attached a couple of shots of my partially completed chasis, but the pictures weren't very big compared to what other people post. How should I go about it? I have read about posting pictures and the file size, but my pictures came out real small, while other pictures that other people have posted are full page. When they have the full page picture, are they within the limits of the file size that you can post? Thanks Mark

|

02-11-2010, 09:26 AM
|
|
CC Member

|
|
|
Join Date: Nov 2008
Location: Anchorage,
AK
Cobra Make, Engine: TBD
Posts: 73
|
|

 Not Ranked
 Build thread
I can't answer most of your questions and know nothing about posting pictures.
I am sure others will give you valuable information on that.
Seems to me there is a sticky on how to do pictures in here somewhere. 
But I can say that you can start a thread whenever you want to.
Like now, and we will enjoy following your progress.
Be as detailed as you want to.
Look at other build threads to get an idea of what others have done and then do what you want to.
I recommend the Kirkham skunkworks build as an excellent example of a very detailed build.
When you start posting, we will follow along with your project 
__________________
ATTITUDE =
The difference between
Ordeal and Adventure
James 
|

02-11-2010, 11:54 AM
|
 |
CC Member

|
|
|
Join Date: Jul 1999
Location: istanbul,
TR
Cobra Make, Engine: scratch built 289 eclectic mix of fia/ussrc/early comp
Posts: 820
|
|

 Not Ranked
welcome
i prefer to post 640x480 pix. pictures within text
it's going to be great to follow your project as per chuck's daytona plans
Last edited by Ozgur_Tan; 02-11-2010 at 11:56 AM..
|

02-11-2010, 03:05 PM
|
|
CC Member

|
|
|
Join Date: Mar 2003
Location: Baltimore,
Md
Cobra Make, Engine: EM Replica, 427 s/o, Vette suspension
Posts: 84
|
|

 Not Ranked
I would definitely appreciate pictures / descriptions of the tools and setups that you use in fabricating the components and the chassis.
Good luck with your Daytona.
__________________
*** OF GREAT WORTH *** And JESUS asked again, “The Kingdom of GOD, how shall we think about it, and to what can it be compared? Is it not like a Dark blue 427 Cobra, which a man found parked on his street one day? He hurried off and sold all that he had; the ’57 Thunderbird, the ’63 Stingray, the XKE, and bought the dark blue 427 Cobra.” The disciples frowned and scraped their feet; JESUS grinned and popped the clutch. --- Harris Wolfe
|

02-14-2010, 10:22 AM
|
 |
CC Member

|
|
|
Join Date: Mar 2007
Location: Alpena,
Mi
Cobra Make, Engine: Scratch building frame,FFR Mkll body ,302w, and T5 trans, 3.0 rear.
Posts: 416
|
|

 Not Ranked
When I post pics of my build, I first post to the gallery then from there to the thread, I find this is easiest. Lots of luck on your build, it's fun but takes lots of time.
Carl
__________________
1963 Mercury Monterey 460+ .060 .//Cobra clone, Scratch build frame /302/ T-5 WC / 3.00-9in/FFR mkll body (Broken but repairable) /91 Lincoln Wire Wheels   //  :   N.S.M.C Charter/Life Member// Die Hard Blue Oval Nut   
The finish is better than the beginning. Ecc7:8
|

02-14-2010, 12:49 PM
|
 |
CC Member

|
|
|
Join Date: Feb 2006
Location: IGH, MN,
mn
Cobra Make, Engine: scratch build self design 4.6l DOHC
Posts: 769
|
|

 Not Ranked
As resident photo hog on the Scratch Builders forum. I can suggest before you upload you photos to your gallery, get a copy of "Power tools for XP" it comes with a photo re sizer that can quickly reduce the footprint of your photos. and make lots of room in your gallery. I have about 400 pics in mine and I'm close to winding up my project(yea right). Please start posting I need something to watch.
Patrick
|

02-14-2010, 01:47 PM
|
 |
Senior Club Cobra Member

|
|
|
Join Date: Sep 2000
Location: Holderness, NH, US of A,
NH
Cobra Make, Engine: CSX 4772 old iron FE
Posts: 5,499
|
|

 Not Ranked
I would focus more on building it. Keep a good record of your process and progress on file. Figure out picture posting later. Get some in your gallery to use in your posts or set up a good imagehosting account somewhere. Free ones are good. The trick is get them online somewhere and figure out sizing and manipulation from there.
|

02-16-2010, 08:20 PM
|
|
CC Member

|
|
|
Join Date: Mar 2009
Location: Mendota,
IL
Cobra Make, Engine:
Posts: 697
|
|

 Not Ranked
Hi everybody,
Thanks for all your suggestions on pictures, etc. I will have to work on it. And to mickmate, I have been trying to keep records of what I am doing. Sometimes when you get busy you just forget about pictures or records of how it is getting done. I am a member on scratch building engine sites, sometimes people are on the internet a whole lot more than they are working on their project. I have quite a bit done on this project, but it has been too cold to work in the unheated garage. Can't keep the welding helmet from fogging up. I have a hard time seeing when it isn't fogged up. That's why I was asking questions, so I could start a thread on building my coupe. Thanks Everybody!
|

02-16-2010, 09:35 PM
|
 |
Senior Club Cobra Member

|
|
|
Join Date: Sep 2000
Location: Holderness, NH, US of A,
NH
Cobra Make, Engine: CSX 4772 old iron FE
Posts: 5,499
|
|

 Not Ranked
I hear ya on trying to stand back and look never mind remembering to photgraph progress. You must be working off Chucks drawings? Welcome, we need some activity over here. I've been too busy with customers cars and parts to make enough progress on mine. If we keep each other motivated that all helps.
|

03-16-2010, 01:01 AM
|
|
CC Member

|
|
|
Join Date: Mar 2009
Location: Mendota,
IL
Cobra Make, Engine:
Posts: 697
|
|

 Not Ranked
 Body buck
Hi just thought I would post a few pictures of my build. All of the buck parts are cut out but not all parts are installed. No room in the garage! Anyway haven't worked on buck since Feb 09. Still trying to figure out how to align all the parts. Stopped on the buck to build partial chassis to put buck on . This will help position buck parts. Got 2 1000 pound dollies at Menard's they fit nice. Sure is easier to move around. Side view Front view Front spring tower Rear spring tower
Last edited by MAStuart; 03-21-2010 at 11:09 PM..
|

03-21-2010, 06:09 PM
|
 |
CC Member

|
|
|
Join Date: Feb 2001
Location: Leechburgastain,
PA
Cobra Make, Engine: Myself/Body from CSX-2575 & hand built Birdcage
Posts: 676
|
|

 Not Ranked
Quote:
Originally Posted by MAStuart

Hi just thought post a few pictures of my build. All of the buck parts are cut out but not all parts are installed. No room in the garage! Anyway haven't worked on buck since Feb 09. Still trying to figure out how to align all the parts. Stopped on the buck to build partial chassis to put buck on . This will help position buck parts. Got 2 1000 pound dollies at Menard's they fit nice. Sure is easier to move around. Side view Front view Front spring tower Rear spring tower |
Why don't you just buy a body from MR Bruce?


__________________
6S1941
Allied 289 Slab Side
73 2.3 turbo pinto
|

03-21-2010, 11:23 PM
|
|
CC Member

|
|
|
Join Date: Mar 2009
Location: Mendota,
IL
Cobra Make, Engine:
Posts: 697
|
|

 Not Ranked
Map my plan is to build as close to original as I can including aluminum body. What does the frame look like under that body ? What windshield does it take?
|

05-18-2010, 03:11 PM
|
|
CC Member

|
|
|
Join Date: Mar 2009
Location: Mendota,
IL
Cobra Make, Engine:
Posts: 697
|
|

 Not Ranked
 How would you fab this part
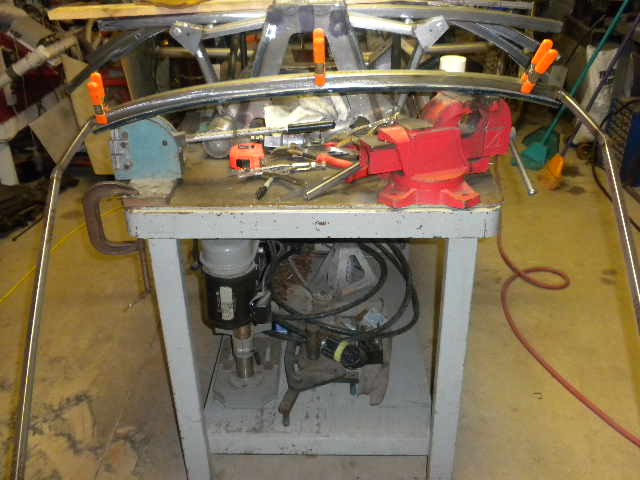
Hi I have been working on coupe parts and was wondering how other fabricators would form this part. I have them all done but it was a lot of nasty work. So how would you fab them? These jams or gutters for the hatch area are 1 inch deep 1 inch wide and return up 1/2 inch and have changing radius across the withe of the part. Thanks mark  
Last edited by MAStuart; 05-18-2010 at 03:29 PM..
Reason: trying to get pics bigger
|

05-18-2010, 09:26 PM
|
 |
CC Member

|
|
|
Join Date: Apr 2005
Location: Tucson,
AZ
Cobra Make, Engine:
Posts: 5,391
|
|

 Not Ranked
You do know about Chuck's Daytona build, don't you? It's mind blowing what a craftsman he is and might be some reference for you too.
Larry
http://home.comcast.net/~chuckcobra/...ex_daytona.htm
__________________
Alba gu bràth
|

05-19-2010, 08:50 PM
|
|
CC Member

|
|
|
Join Date: Feb 2003
Location: Plymouth,
MA
Cobra Make, Engine: MidStates, 351C, 4spd, 9"
Posts: 400
|
|

 Not Ranked
 Fabrication....
Hi Mark,
I would have used the stretching method. Long lip, short lip...
should get you where you need to be the fastest. I would suggest
a ring roller, however, a purpose built die would be required. Same
with a Pullmax, etc...
Mike.
__________________
"It's not about getting from point A to point B. It is the point"
-J. James
M. Krause
1.508.944.3368
|

05-19-2010, 09:11 PM
|
|
CC Member

|
|
|
Join Date: Mar 2009
Location: Mendota,
IL
Cobra Make, Engine:
Posts: 697
|
|

 Not Ranked
Larry and Mike,
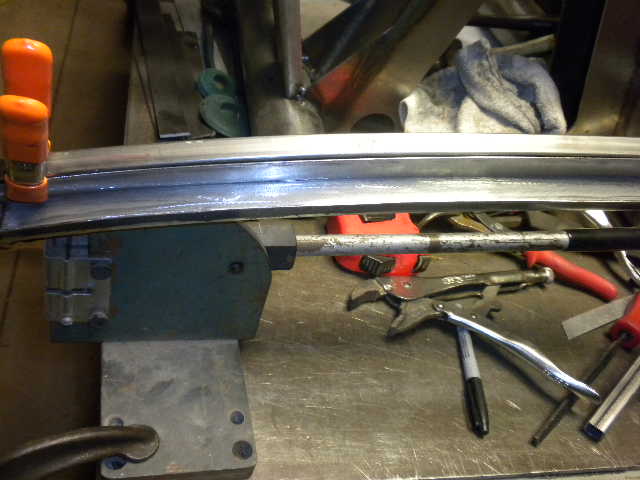
Thanks for the replies. Larry, I am using Chuck's plans. I purchased all he has. Mike, in the picture of the perimeter frame it is leaning up against the shrinker/stretcher. You really can't use it because you can only put the long size in it because of the shrinker/stretcher design. Do you have a link to a picture of a shrinker/stretcher of a different design that would allow both sides of the trough to be used in it? With my shrinker/stretcher if both sides had a 1inch lip you wouldn't be able to get either side in it. Does anyone else have any suggestions? Keep in mind, I already have all of them formed and I will tell you how I did it in a day or two. I was just wanted other ideas for future reference on making things like this. Thanks Mark
|

05-20-2010, 05:44 AM
|
 |
Senior Club Cobra Member

|
|
|
Join Date: Sep 2000
Location: Holderness, NH, US of A,
NH
Cobra Make, Engine: CSX 4772 old iron FE
Posts: 5,499
|
|

 Not Ranked
You made it from two pieces of angle back to back didn't you. That makes it easier to fit the parts in a shrinker strecher or a set of rolls to curve it. Then when they are joined back to back it makes it stronger and easier to weld whether you use spot or fusion.
|

05-20-2010, 06:52 AM
|
|
CC Member

|
|
|
Join Date: Mar 1999
Location: Huntington, CT,
CT
Cobra Make, Engine: engineer
Posts: 22
|
|

 Not Ranked
 Scratch Build
Mark,
I see two options.
Start with a brake-formed piece and shrink/stretch as you did.
Not sure I see the limitations with your shrinker/stretcher since the part isn't that deep.
There are deep throat machines available. Big $$.
The other option would be to develop a flat pattern; in this case it would be a long gradual curve.
Then create a hardwood hammer form that would clamp the blank in place and fold the flange over with hammer and or slapper.
|

05-20-2010, 01:27 PM
|
|
CC Member

|
|
|
Join Date: Mar 2009
Location: Mendota,
IL
Cobra Make, Engine:
Posts: 697
|
|

 Not Ranked
Hey Mick,
If I get your idea right, it doesn't sound too bad. I assume you mean 2 L shaped pieces stretched to the proper curve and then one sat down on top of the other and welded together to form the channel. For some things that may work good, but i would think it would let water leak between the 2 pieces. Thanks for your idea. Mark
|

05-20-2010, 01:43 PM
|
|
CC Member

|
|
|
Join Date: Mar 2009
Location: Mendota,
IL
Cobra Make, Engine:
Posts: 697
|
|

 Not Ranked
 Raingutter
John,
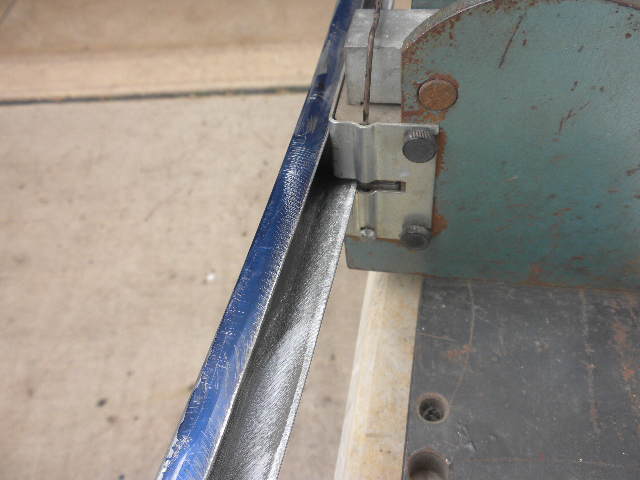
Your first suggestion was my original thought. Get a piece of 16ga steel sheared and bent to the proper dimensions, then use the shrinker/stretcher to put the proper curve into it. The picture posted below should make it a little more clear why you can't shrink or stretch the channel in my machine. The channel inside dimension is only about 7/8 wide. Do you know of a machine that could do both sides of this and if you do, do you have a link to it? If the width of the channel was 2in or more I would be able to do both lips, the 1in lip and the 1/2in lip. I have used the machine I have for a lot of projects in the past. As long as it is an L shaped piece you can curve it in any direction imaginable. I was discussing your second option with my son and we thought that if you bent the 1in lip and then stretched it to the curve needed and bolted it into a hammer form to do the 1/2 in lip it would probably work pretty good. Certainly a lot easier to do the 1/2 in lip than the 1 inch lip because of the 16ga material. By the way, do you have your gutters made for your coupe project yet? Thanks Mark 
Last edited by MAStuart; 05-20-2010 at 03:24 PM..
Reason: spelling
|
 Posting Rules
|
You may not post new threads
You may not post replies
You may not post attachments
You may not edit your posts
HTML code is Off
|
|
|
All times are GMT -7. The time now is 11:19 PM.
Links monetized by VigLink
|


