 
 Main Menu
|
 Nevada Classics
|
 Advertise at CC
|
| S |
M |
T |
W |
T |
F |
S |
| |
|
|
|
|
|
1 |
| 2 |
3 |
4 |
5 |
6 |
7 |
8 |
| 9 |
10 |
11 |
12 |
13 |
14 |
15 |
| 16 |
17 |
18 |
19 |
20 |
21 |
22 |
| 23 |
24 |
25 |
26 |
27 |
28 |
29 |
| 30 |
31 |
|
|
|
|
|
|
 CC Advertisers
|
|
 110Likes 110Likes

01-26-2022, 08:52 PM
|
 |
CC Member

|
|
|
Join Date: Oct 2017
Location: Baysville,
Ont
Cobra Make, Engine: Mine, small block FORD
Posts: 312
|
|

 Not Ranked
 And another thing
Hey all,
The next update……
First off today I saw one of my best friends for a far to brief visit and when he asked about project roadster I directed him here for progress updates so if you are now reading along ……Hi Shawn! 
And in answer to your comments Larry I did not know about the other tail shaft options for the T5, so thanks again as I ended up checking those out too.
The most amazing thing I saw was Tremec’s new TKX  if you have not checked it out it looks like they have finally answered all the classic muscle car guy’s needs, stronger gears, smaller case, GM and Ford mountings and 3 shifter positions including one that should line up nicely with all the T-10, and top loader types at about 16.5 inches back! Very nice indeed! I don’t think it is currently in my budget but wow what a nice option.
I will stick with my current plan of hanging the engine and trans in there and see how my current 2 tail housing options line up.
I was also looking at MDL again and considering one of their forward or rear offset shifter bases, they can move it 2 inches if there is enough clearance to the top of the tunnel…….. Stay tuned……
I did manage to get the steering sorted, those little adjustments took more time than I expected and I did revamp my fixture holding the rack with some threaded rod for easier and more precise vertical adjustments and improved my setup for checking the bump steer. With the dial indicator clamped to the king pin and indicating at about one foot from hub center I can watch the change as I move the arms through their travel with my trusty floor jack.


In the end I found a very happy spot, more forward then I had thought but it ended up about half an inch further forward and an inch lower than the original chassis had it mounted and that’s OK clearance wise so we will go with it.
What it really all means is from theoretical ride height it toes out about .003 in the first inch and in the second and third inches it gets to about .025 progressively so I think that will be quite manageable and predictable. I got the same on both sides and it’s quite repeatable so I am sure it is not a fluke. I did a small celebration dance and moved on…
I then remounted the rack so the steering shaft was facing the right way and had to clearance the main tower a bit to get it back in the right spot, nothing to radical and after a couple of refits I like it.


Then on to brackets, I used the same angle as the original mounts and made the appropriate spacers. Then using CAD again, made up some modified original style mountings from 3/16 plate and tacked it all up….


Then I took everything back off and got down to some welding.
In the end I re-mounted the rack and ….good news……. is it still fits perfectly


Now on to finishing up all the little bits on the front and most of the major welding so after another after noon in the shop with steel and grinders I give you ……..
Gussetpaloozza!

Hopefully next time I will have them all welded in place and be moving on to the engine mount towers and such things. But that’s enough for now….
In other news my SWF turn switch arrived and looks good.
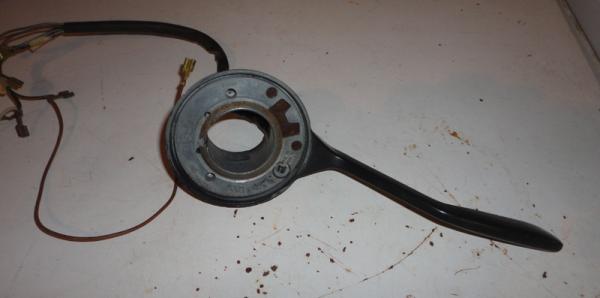
A quick check with the multi-meter says all the switches are working correctly so I will freshen it up at some point in the future and check it off my parts list.
BTW It was -31 Celsius here this morning  so stay warm my friends!
Cheers,
Hudson
a
__________________
Yes, I know,....... but it's mine you see..... 
Perhaps he was always a shyster, but we just chose to over look it for awhile. 
You build what you like and I will build what I like...it's all good 
You know that guy,
The one in the neighborhood who likes to hang around the garage while you are working and talk about back when he had that killer 1977 Chevy Mustang  
Last edited by old willy; 01-26-2022 at 08:54 PM..
|

01-27-2022, 04:24 PM
|
|
CC Member

|
|
|
Join Date: Mar 2012
Location: Mississauga,
Ont
Cobra Make, Engine: Midland, 302
Posts: 11
|
|

 Not Ranked
Sorry for the late response, however that angle on your intake should be 15 degrees My cars are carbureted and therefore installing the engine a level was used on the intake and adjustments to the engine mounts and transmission with no carb would ensure carb was level. Keep up the great progress, really enjoy your posts.
|

01-28-2022, 01:27 PM
|
 |
CC Member

|
|
|
Join Date: Oct 2017
Location: Baysville,
Ont
Cobra Make, Engine: Mine, small block FORD
Posts: 312
|
|

 Not Ranked
Hey there,
Thanks for the info, I will keep that angle in mind.
I guess I will be taking a bunch of stuff into consideration getting the engine in a happy spot. 
I am hoping to get more done this weekend and will post another update soon.
Cheers!
__________________
Yes, I know,....... but it's mine you see..... 
Perhaps he was always a shyster, but we just chose to over look it for awhile. 
You build what you like and I will build what I like...it's all good 
You know that guy,
The one in the neighborhood who likes to hang around the garage while you are working and talk about back when he had that killer 1977 Chevy Mustang  
|

02-13-2022, 02:35 PM
|
 |
CC Member

|
|
|
Join Date: Oct 2017
Location: Baysville,
Ont
Cobra Make, Engine: Mine, small block FORD
Posts: 312
|
|

 Not Ranked
 it's the little things
OK folks, another quick update…..
I did get down to solidly welding up the front with all the various gussets and such. These things always take more time than you think they will  .
I also need to report that my roadster has had a “roll over” incident right in the shop!  

Fortunately no one was hurt  , and honestly it made welding up a bunch of the bottom stuff both front and back a whole lot easier, a welding teacher years ago told me never to weld “out of position” if you can avoid it, so that’s what I did.
The chassis dropped right back into position perfectly on the table when I was done and I am sure this won’t be the last time I flip it over for welding purposes.
And on a side note, surprisingly I can still pick the chassis up off the floor by myself…. I am sure that won’t be the case in the end…..
With the gusset plates in the front suspension mounts I think it looks very 427 like from the side view….hmmmm

After all that my original plan was to get right to the engine mounts! but upon looking around at my growing collection of pieces I thought it was a better idea to finish up the suspension arms, not more fun, but a better idea  .
Everything was tacked but I knew that later on I will be happier if I can just pick them up again and bolt them in place finished. Also with spring coming and potential moisture issues I did not want to risk the areas I need to weld getting corroded  .
So they are done now, all the gussets and all the many anti rotation tabs on the arms and chassis mounts, all done…it’s a good feeling  .
I then went around the chassis and re-fit the arms again and tweaked the arms and mounts for a proper fit.
The heat of welding always does strange things to steel structure as it cools and I had a few little issues  .
I found it most noticeable in the front upper mounts as there were a couple of points with clusters of welds coming together, but then out came my trusty old Henrob torch and some ½ inch threaded rod and nuts. I managed to normalize the offending areas and push and pull things back where they should be. Again so I have fewer issues later.
It’s a bunch of fiddly work but not much to take pictures of, it really doesn’t look much different, it’s only when you fit the pieces together that you can really tell.
So that’s it for now, I will be moving on to the engine mounts and sorting out the transmission tail housing shifter location question.
I am still thinking about parts from MDL, there is a good answer I just need to find it.
Hopefully I will be getting an update from Shell Valley about a windshield assembly, last time we spoke the projection was for February but with supply chain issues who knows right now.
Cheers,
Hudson
a
__________________
Yes, I know,....... but it's mine you see..... 
Perhaps he was always a shyster, but we just chose to over look it for awhile. 
You build what you like and I will build what I like...it's all good 
You know that guy,
The one in the neighborhood who likes to hang around the garage while you are working and talk about back when he had that killer 1977 Chevy Mustang  
Last edited by old willy; 02-13-2022 at 03:32 PM..
|

02-13-2022, 04:42 PM
|
 |
CC Member

|
|
|
Join Date: Aug 2013
Location: Canandaigua,
NY
Cobra Make, Engine: SPF MKII Riverside Racer FIA
Posts: 2,505
|
|

 Not Ranked
Hudson,
Lot's of good work. If your Shell Valley windshield falls through, I have the brand new Superformance windshield and frame that came with my FIA. Not sure if it would fit your body or not. I have kept it boxed up for just in case I ever sold my race car and someone wants the windshield. at this point, I should probably just sell it and get it back into action. I am never going to re-install it.
Jim
__________________

|

02-13-2022, 06:26 PM
|
|
CC Member

|
|
|
Join Date: Jul 2003
Cobra Make, Engine: Unique Motorcars 289 USRRC, 1964 289 stroked to 331, toploader
Posts: 1,109
|
|

 Not Ranked
Great progress!
__________________
Paul
Unique Motorcars 289 USRRC
1964 289 5-bolt block
Toploader and 3.31 rear
|

02-16-2022, 12:49 PM
|
 |
CC Member

|
|
|
Join Date: Oct 2017
Location: Baysville,
Ont
Cobra Make, Engine: Mine, small block FORD
Posts: 312
|
|

 Not Ranked
Quote:
Originally Posted by 1795

Hudson,
Lot's of good work. If your Shell Valley windshield falls through, I have the brand new Superformance windshield and frame that came with my FIA. Not sure if it would fit your body or not. I have kept it boxed up for just in case I ever sold my race car and someone wants the windshield. at this point, I should probably just sell it and get it back into action. I am never going to re-install it.
Jim
|
Hey there,
Thanks Jim,
I will PM you about that. I am not sure about fitment but I am not sure about much to be honest 
I still don't know who made this body so I guess any good quality assembly is an option.
I am going to try and start answering my shifter and transmission mount questions tonight.....oh boy!
.
__________________
Yes, I know,....... but it's mine you see..... 
Perhaps he was always a shyster, but we just chose to over look it for awhile. 
You build what you like and I will build what I like...it's all good 
You know that guy,
The one in the neighborhood who likes to hang around the garage while you are working and talk about back when he had that killer 1977 Chevy Mustang  
|

03-06-2022, 08:49 PM
|
 |
CC Member

|
|
|
Join Date: Oct 2017
Location: Baysville,
Ont
Cobra Make, Engine: Mine, small block FORD
Posts: 312
|
|

 Not Ranked
 Overdue update
Hello all,
Time for yet another little update.
Progress has been somewhat slowed by the fact that COVID finally decided it was time to visit our home and let me tell ya, it’s not much fun. In fact that’s my official review, “not much fun”. 
I believe we had / have the newfangled omicron version and it is apparently not as virulent, woohoo! 
In fact 3 weeks ago I was saying to my coworkers that I was getting tired of the whole situation and I was willing to get it and get it over with……….wrong! 
We are not exactly sure how we got it but I am fairly certain it came via our oldest daughter’s household to my beautiful bride then to me.
I am OK enough; I did not get the symptoms my wife did, in fact I was sure she had strep throat or tonsillitis after a couple of days of wicked sore throat and running a fairly decent fever, we went to have that checked into and the strep test came back negative but the covid one came back positive…..dammm. 
A day or so later I was feeling it and my test came back positive too. And for the record we both have been vaccinated…twice. The other bummer is that is a slow time of year at work and I had booked the week off to get some roadster work done…..hmmm. 
I called my manager on Saturday to let her know my test results and got told to take another week off work that I just spent feeling mostly crappy.
It’s a funny thing this covid, yes, I guess they are “flu like” symptoms, headache, fever, muscle pain, general lethargy but it’s that last one that is lingering. I am due to be back at work tomorrow but honestly I haven’t made it through a day without at least one long nap in over a week! 
I did finally get out to the shop this afternoon and do some CAD but that’s been the thing of it, I just have no ambition to do anything, the walk to the shop looks daunting and it is easy to talk myself out of it…..”maybe tomorrow” I tell myself……. So like I said, I’m sleeping lots, and a lot of time sitting staring at some other hobby interests I have here in the house….as the kids say….”meh”
However before it all set in I did get a couple of things accomplished, I built the engine mounts and tacked them in, easy enough, straight off the drawings, as I am using the original style mount parts. This was always my plan as I figured it would put the engine in the correct location without too much fuss. It worked perfectly, no issues, I swapped the weirdly shaped late model oil pan and bolted the mounts onto the block and lifted it in place with my old custom Jet L-70 chain hoist.


So now on to the shifter question, and it’s time to make a real decision.
This did take some thinking and looking and measuring and walking away and thinking some more.
In the end I think I have a good solution and a few observations if anyone is interested. I am sure most of this info has been mentioned before but I never found it here so I will give you my notes if anyone is interested.
First up though, as for the question of engine angle I placed my digital level on the old F4B manifold and with it level I have just over a 3 degree drive line angle, and that seems to be about perfect based on the info you folks have provided. So I stopped worrying about that right away! Thanks friends. 
I tried both transmission tail housings and shift lugs. Now at first I thought my eyes were deceiving me or my engine mounts were wrong. The shifter box looks cockeyed! 
I checked the engine block and it’s pretty much level latterly, the trans mount looks about right but upon measuring it, the shifter box is tilted about 4 degrees to the left! I tried the s-10 tail housing and it’s the same WTF?
What is really going on is the bell housing is made to hold the whole transmission tilted to the left and the Mustang transmission mount is rotated back to the right to compensate but when you have the s-10 tail housing on the mount is now tilted to the left hmmmm, that sucks. 
I did a bit of Google research and did find some references to it on other car forums but the info seems a bit wishy, washy as there are a lot of applications for the T5 and guys doing swaps are mixing and matching parts a bunch, Mustang, Camaro, Astro van, AMC, S-10 yikes!
What I do know is Ford designed this particular bell housing to tilt the shifter towards the driver ( I guess) and the tail housing is made to compensate for the tilt and swapping on a tail housing that is not made that way results in a wonky looking transmission mount. Not the end of the world but something to note.
Working things back and forth and playing with the pieces I made another discovery. You can use the S-10 shift lug in the Mustang tail housing…   hmmmm.
I believe this is MDL’s little trick for their “front position” shifter housing as you can order the kit either rear shift using the Mustang lug or for a bit extra you get the front position kit. This also requires using one of their custom shifter mounts but more on that later.
So I started laying things out and even mocked up a platform so I could sort of sit in the correct-ish position and “check the feel” of the shift positions.

I marked up the mustang tailhousing so you could see how it the various options work out. Sorry it’s so dirty, I figured I wasn’t using it so why clean it.
So based on some CAD from the drawings the shifter would fall about 15 ish inches back from this bell housing.

The Mustang shifter is at about 19 ½ inches.
The yellow mark at the front is the S-10 location at 11 3/4 inches.
The next yellow mark back is option 3 that I don’t currently have, MDL’s custom tail housing in the rear position at about 13 ¼ inches.
The next mark back is about where the shifter should be give or take, 15 ½ inches based on my calculation and where folks say the original t-10 shifter was about 16 inches.
Then on the shifter housing cover there are a couple of small marks ahead of the shifter mount and that is about where it would be with the stock mustang location with one of MDL’s 2 inch forward offset T5 shifters.
The other mark at the front of the cover is a bit of a hybrid idea I have come up with.
This I like  …..From my sit experiments I quickly discovered that the S-10 tail housing was just way too far forward for my tastes, I guess I have weird short arms or something  .
I am kind of sorry I worried about finding one in the first place but somebody told me that was the trick setup to have so I found one.
The stock Mustang location is passable but you will be reaching back a bit more than I like, let’s just say awkward.
I could go with the MDL housing but again it’s forward. Now sure, I could add a 2 inch rear offset shifter but that really starts to add up, the housing kit is like $795 and the offset shifter is $275 ++.
If I had to I would, But I think there is another way and that is using the stock Mustang tail housing with the S-10 lug kit( it’s about 1 ½ shorter), that takes it to about 18 inches back and then off set 2 inches to the front is 16 inches  . Yes I will need to buy the MDL “front position” offset shifter but I can pass the S-10 tail housing and shift parts along to some other hot rod builder as it is a popular swap option it seems.
The other thing I like is the transmission mounting point. The MDL housing has the mount in the S-10 position which is about another 1 1/2 inches further rearward from the Mustang location and that is already 1 ¾ inches too far back, never mind the funky 4 degree angle.
I am sure I could make an offset transmission mount of some sort but if I don’t need to why would I.
I am slightly worried about the overall height with the offset shifter but I figure I can move the top of the tunnel up a bit if I need too and no one but me will notice.
So are you still with me? 
Having settled on that it was time to make a transmission mount, the original is very simple; I have the rubber piece already, a nice old school Ford part. After measuring things up and checking the plans I went with a slightly modified original style mounting with a ½ inch aluminum spacer between the rubber and transmission. If I need to adjust the engine angle in the future I can just vary the thickness of the spacer so it’s a good compromise I think.


The only thing I did not like was I needed to move the cross member back 1 ¾ inches. However the only thing this looks to interfere with is the brake handle mounting bracket and I have noted that on my drawing set.
Then I moved on to some preliminary work to mount the differential. I gutted and cleaned the alloy case I have as it is lighter to work with right now.

I think the cast one all up is about 80 pounds and getting it in and out of position and trying work out the finer mounting details will just be easier the lighter it is.
Honestly I don’t know if this will be the case I use in the end. I have both options and I have been told the real weight is in the gears, the difference between just the cases is about 12 pounds. If I was racing, 12 pounds is a lot, if you are looking to shed weight but for a road car, it’s not that big a deal, might even improve the balance, who knows. The original had a big cast iron lump back there  .
I know some builders really want the alloy case but I am told they are a bit trickier to set up as the case needs to be stretched open to set the side load, I had to do it to even get the carrier out. When it’s time to build up the differential for real I will give it more thought.
So that’s about it, the case physically fits in the space as I thought it would, it’s tight but it fits.

With my rear mounting plate stack up I might need to switch to a stamped steel rear cover but until it’s really mounted up solid I won’t know for sure but at least I have the option.
Hopefully next time I will have more to report about all that.
Stay well and happy my friends!
Hudson
.
__________________
Yes, I know,....... but it's mine you see..... 
Perhaps he was always a shyster, but we just chose to over look it for awhile. 
You build what you like and I will build what I like...it's all good 
You know that guy,
The one in the neighborhood who likes to hang around the garage while you are working and talk about back when he had that killer 1977 Chevy Mustang  
|

03-07-2022, 04:23 AM
|
 |
CC Member

|
|
|
Join Date: Aug 2013
Location: Canandaigua,
NY
Cobra Make, Engine: SPF MKII Riverside Racer FIA
Posts: 2,505
|
|

 Not Ranked
Hudson,
That is a lot of work accomplished post Covid! It has been a consistent theme among people that I know who have had it, no energy for a long time before it comes back. The weather is warming up, so that should help. Take care, and keep plugging along.
I will start working on packaging that windshield and getting a shipping estimate for you.
Jim
__________________

|

03-07-2022, 07:31 AM
|
|
CC Member

|
|
|
Join Date: Mar 2009
Location: Mendota,
IL
Cobra Make, Engine:
Posts: 697
|
|

 Not Ranked
Hudson I measured my Galaxie T10 4 speed. 15 1/2 inches from bellhousing to shifter pivot bolt (Hurst shifter). Keep in mind your bellhousing is deeper than an earlier bellhousing. If you could put my trans on your bellhousing the shifter would be more to the rear, by whatever the difference in the bellhousing hights would be.
|

03-19-2022, 09:46 AM
|
 |
CC Member

|
|
|
Join Date: Oct 2017
Location: Baysville,
Ont
Cobra Make, Engine: Mine, small block FORD
Posts: 312
|
|

 Not Ranked
 Slow progress and NEW shop gear
Hey gang!
Though I would post a little update, I still feel like I am dragging my ass around post covid but it’s getting better. 
The snow is melting and I have done a little bit more work but first I wanted to talk about that sexy topic……Shop Safety! 
Ok. Ok , not sexy, but important, sorry but this will not feature any graphic pictures of some recent injury or anything like that….
I recently upgraded some of my gear but it has been a long journey of learning.
As a kid my father had commercial construction companies, shops and employees but it was the 70’s and workplace safety was not something that I really witnessed first hand. It existed for sure ,
there is a picture of me as a little boy in one of my dad’s shops using a jigsaw and wearing a rather large goofy pair of safety glasses so I guess some thought was being given to it but not much.
Now people want to put hearing protection on their kids if they want to use a cordless drill in the next room! I think there are extremes, but I digress…..
As indestructible teenager I never thought about it, now I did start wearing glasses for distance when I was 14 so, safety glasses I guess?  But anything else…naaaa…..cuts, burns, scrapes  .
But I learned…slowly….My buddy’s dad owned the local body shop and the first time I bought some car paint that had hardener in it he took me aside and gave me a talking to about wearing a proper respirator and why, cyanide derivative! Yikes!  
In my late teens I had a very memorable experience ARC welding in nylon topped running shoes, yes you can guess what happened, the old guys in the shop had a good laugh watching me hop around trying to get that shoe off but I have never forgotten and never had nylon topped runners since! 
When I started working around aircraft I started understanding about hearing protection, I mean I wore them at the shooting range, and if you have never been to one, it’s nothing like TV and the movies a .45ACP is deafening  !!
But hanging around turbo props like Mitsubishi MU-2’s is equally painfully loud, so you learn, quickly.
Later when we were drag racing I discovered these newfangled form fitting little glove things at our local race shop, they were Ringers Resource gloves, nice,  they made a lot of sense trying to work on a hot engine, checking plugs and such,( hearing protection is also a good idea around those things too).
However I started wearing those gloves in the shop as well, cutting and grinding, for a while I was going through about a pair a month, expensive? Yes, but boy does it save your hands from cuts and burns.
Honestly, I have been very lucky, I have never hurt myself badly, cuts and scrapes sure, perhaps a couple of close calls I guess, but no big gashes or broken stuff and I can still hear OK too.
That part surprises me to be honest as I also use to attend a lot of loud concerts and played a bunch of loud electric guitar myself years ago and unlike the safety conscious kids today, nobody wore earplugs….if it’s too loud, your too dam old!  And yet I can still pretty much hear a pin drop….strange….
 OK, OK. I know, nice story guy, but where the hell is he going with this??  
However I have always had a habit of breathing in all the dusty crap, no lung issues yet that I know of, but since I have been back at this cutting and grinding thing more I seem to be more aware of it.
Every time I come back in the house I tend to blow a lot of “black stuff” out of my nose. 
My wife has also rightfully been on my case about it, as I also sometimes have that Droopy Dog look with a big dark area below my nose or just everywhere my safety glasses were not protecting. 
So after all that rambling ….. you all did want something to read, right?
My issue is always the stack up, if I wear a respirator or good N95 dust mask it pushes my safety glasses up rendering them mostly useless, if I put on the full face shield I can’t wear my ear defenders, yes I know…. but I don’t really like ear plugs. So would I rather be deaf or blind?
After a recent session cutting some 3/16 plate I blew my nose and went and started looking for better options, I know about positive air systems and there are some amazing full face setups with fans and filters, but I don’t want anything with a hose to trip over or too bulky or too expensive, I am only going to use it when I am cutting and grinding, then back to regular safety glasses.
This was the best option I found……..

The company is GVS and it is their elipse integra series model SPR550. My size is medium / large and no, I have no connection to them, I bought it fair and square. 
The goggle is attached to the respirator and the respirator area is very slim for better visibility. Also the goggle is ANZI Z87.1 rated so it is a real safety goggle, not just for dust and it is vented so it doesn’t fog up either.
I really like these, when they arrived I was just going to quickly test them out but ended up doing an extended cutting session, they are very comfortable, my ear defenders fit normally, I really like these.
So what I am saying here is if you are looking for something good and you don’t mind looking a bit goofy in the shop they are excellent!

And honestly, saying this as your friend, if you are still blowing black dust out of your nose…GROW UP! Get some protection man!  
I did get a bit of work done too, I laid out and fit up the rear mounting plate for the diff and after a couple of test fits and my new goggle thing arrived I cut out the center and trimmed up the sides, so far, so good, my diff mounting plan is working.


Next up I will work on the front diff mounts. I am waiting on a polyurethane set but I have the original rubber ones for mock up purposes in the meantime.
I hope to post more soon.
And as always I have a question for the group. 
Hey you there, you with the 289…..what diameter is your driveshaft?
Cheers,
Hudson
.
__________________
Yes, I know,....... but it's mine you see..... 
Perhaps he was always a shyster, but we just chose to over look it for awhile. 
You build what you like and I will build what I like...it's all good 
You know that guy,
The one in the neighborhood who likes to hang around the garage while you are working and talk about back when he had that killer 1977 Chevy Mustang  
Last edited by old willy; 09-20-2023 at 11:48 AM..
|

03-19-2022, 10:26 AM
|
 |
CC Member

|
|
|
Join Date: Jan 2007
Location: SEQUIM,
WA
Cobra Make, Engine:
Posts: 139
|
|

 Not Ranked
Chevy Astro/Safari van T5 tailhousing would put the shifter back about 2 1/4" from the S10, close to the second mark.
__________________
Jim Nichols
Last edited by jknich; 03-19-2022 at 10:48 AM..
|

03-19-2022, 12:49 PM
|
 |
CC Member

|
|
|
Join Date: Aug 2013
Location: Canandaigua,
NY
Cobra Make, Engine: SPF MKII Riverside Racer FIA
Posts: 2,505
|
|

 Not Ranked
Hudson,
The diameter of my driveshaft? Isn't that getting a little personal? 
If you really want to know, mine is 2.5"
Jim
p.s., I haven't forgotten about the windshield, just been a little busy and figured that you did not need it immediately. I will have the shipping info to you shortly.
__________________

|

03-21-2022, 06:28 PM
|
 |
CC Member

|
|
|
Join Date: Oct 2017
Location: Baysville,
Ont
Cobra Make, Engine: Mine, small block FORD
Posts: 312
|
|

 Not Ranked

Hey Jim and Jim!
Thanks for the info on the astro van tail housing, there are just so many T5 options, it was a very versatile transmission, wow always something new to learn.
And as always thanks for the great info Jim, I am just glad you are not bragging about how long your drive shaft is :-)
I was looking at my available parts in the shop and trying to decide what to go with.
I need to get an out put yoke for the transmission and I have 2 options for the differential yoke end of things 1310 series joints or 1330 series.
I also have the ends off a 3 inch driveshaft assembly but I have not tried removing the yokes yet, I was thinking I would do it in the old lathe but if it's too much of a fight or just plain ole' ugly I will order some new ones in 2 1/2 size most likely in the 1310 size joints. The 3 inch 1330 stuff just looks like it belongs to a truck, no that you can really see it in the end. Hmmmmm
Oh ya, let me know when you are ready, you are right, no big rush I am going to work on the pedal box next then I could go back to those chassis type things or I might mock up / build my foot boxes. As I need them to fit up some of the tubes and well then...lets just say there is always lots to do...
I am just trying to think a couple of steps ahead is all :-)
.
__________________
Yes, I know,....... but it's mine you see..... 
Perhaps he was always a shyster, but we just chose to over look it for awhile. 
You build what you like and I will build what I like...it's all good 
You know that guy,
The one in the neighborhood who likes to hang around the garage while you are working and talk about back when he had that killer 1977 Chevy Mustang  
|

04-10-2022, 09:30 PM
|
 |
CC Member

|
|
|
Join Date: Oct 2017
Location: Baysville,
Ont
Cobra Make, Engine: Mine, small block FORD
Posts: 312
|
|

 Not Ranked
 Oh no! another update
Hello all!
Time for another little update. I have been feeling more like myself again and slowly getting back into working on project X but as always trying to juggle all the other things of life, I am sure you all understand.
Well there is still no sign of the front diff mounts I ordered about a month ago, I have tried to cancel the order twice and look elsewhere but that doesn’t seem to work either Amazon…grrrr…..  it is however closer to the current listed delivery date so I will be patient and give them till then.
It’s just the world right now, I am having a hard time getting certain things at work and believe it or not I tried to pick up a bucket of chicken at KFC on Friday night and when it was my turn to order the guy said “sorry we are out of chicken”  Wow!! What can you even say at that point? 
I went ahead and used the “good” used rubber mounts I have and built some supports, not the most elegant looking things but they will work and I kept the cross member in the original location as there are some other things that attach to it like the seat belt mounts, seat track mounts and inner roll bar support so I felt it best in the long run not to re position it.
The mounts are just tacked to the cross member for now until the new mounts arrive, just in case I need to tweak something.
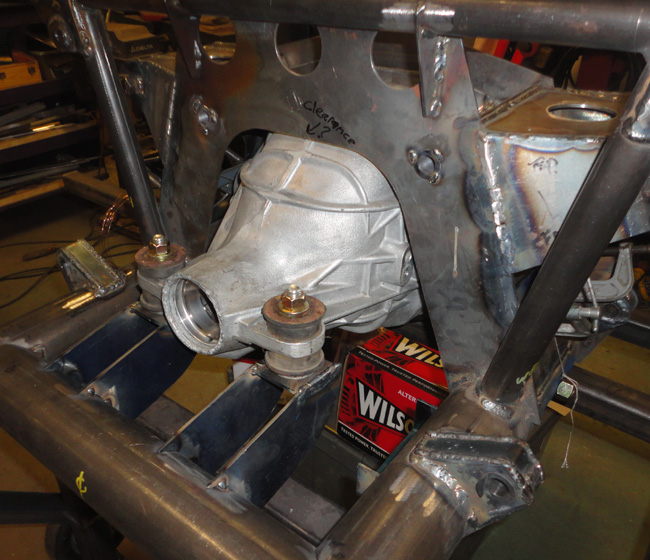
I then turned me attention to the pedal box area. I laid out and cut the cowl hoop supports and pieces for the pedal box and tacked it together so I could fit up the pedal parts. I turned the side spacers and fit them up with the cross tube and added the pedals for a look see, NICE! 
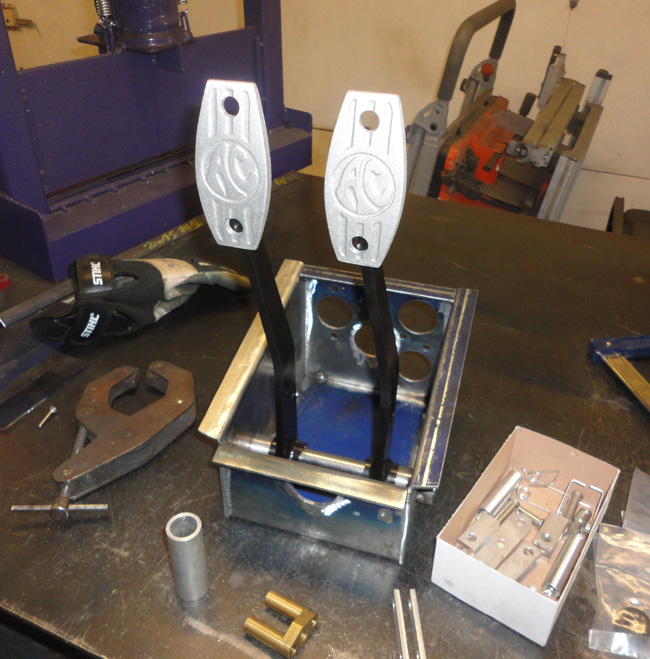
I then got my box of bits from CSX parts, very nice stuff, the only issues were they accidentally sent me 2 clutch pedal arms, not a big deal as I have the dimensions on the plans and I own a drill.
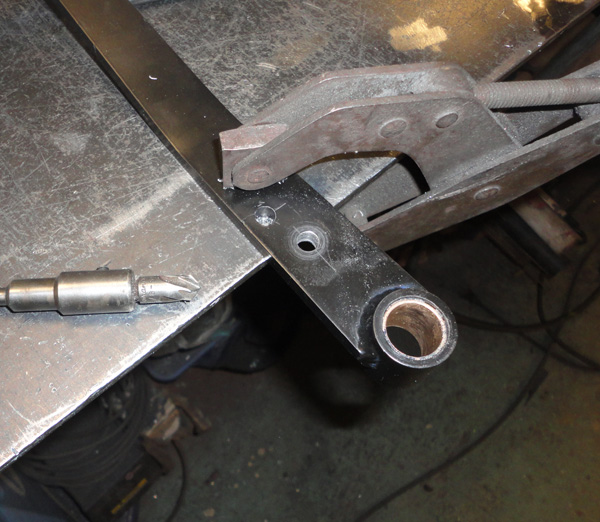
Also the spacer tube for between the pedals was about ½ inch too long. That kind of threw me off and had me rechecking all my measurements and looking at the pedals, they sure do look close together but checking out some pictures of un-molested original cars they really look to be that close together.
So the only thing I can assume is these parts must be coming from a modern recreation of some sort perhaps a Superformance? I turned it down to the size on the drawings and fit up the rest of the parts everything seems to work just fine….at least what I have…..
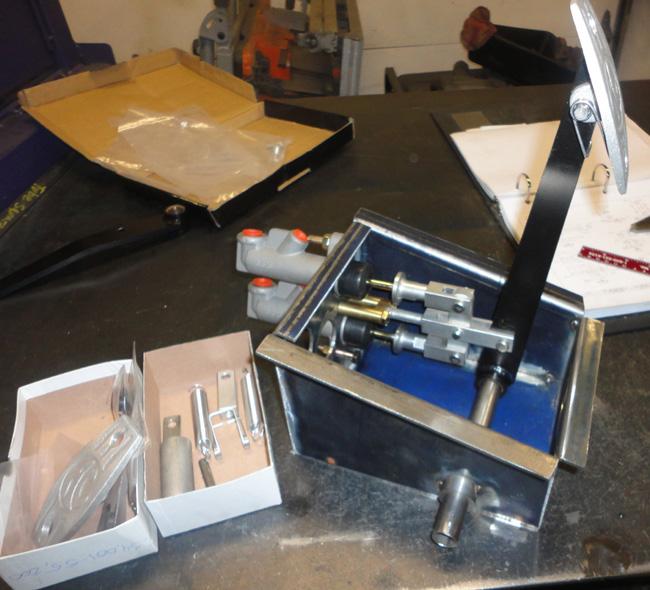
You will notice there is no clutch master cylinder yet, it’s coming ….I hope….. 
So after I had the brake pedal in it what I can only assume is the correct position as dictated by the balance bar assembly I am surprised at the near vertical position of the pedal arm. Is this correct? The pedals seem to be tilted up way too much.
I can’t find any side pictures of this area because it is down in the foot box. Help please….
Doing some bench testing it looks like the pedal would hit the front of the foot box before you could bottom out the master cylinders?
I rechecked all the pedal box dimensions twice and was even thinking of moving the cross shaft position ahead a quarter of an inch or so to move the pedal back but in the end I decided to try drilling another hole in the “clutch” arm on the same center line as the clutch pivot, the brake one is almost ¼ inch further back.
I swapped the arms back in and this coupled with un-threading the master cylinder clevises 1/8 inch moves the pedal back about 1 ¾ inches. It looks better to me but without being in the car it’s really hard to tell.
Before….

After……

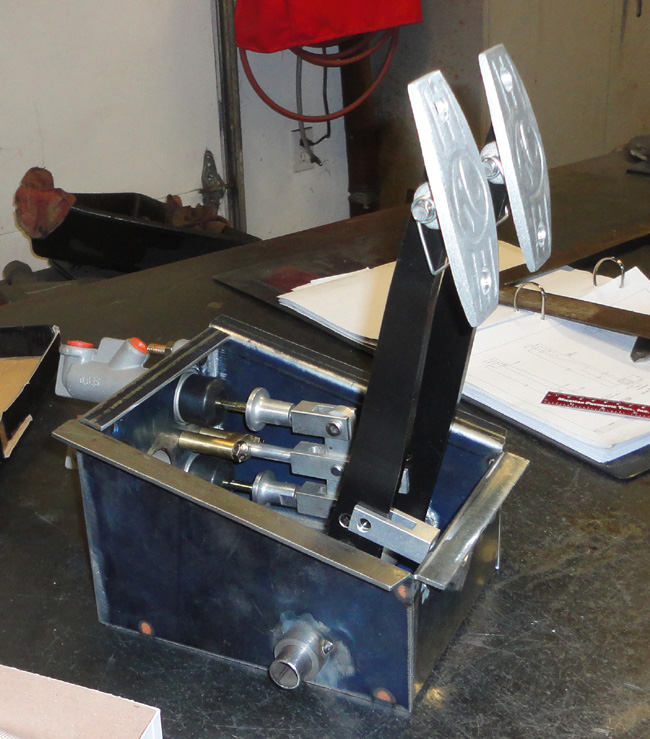
To my eye it looks like I could bottom out the master cylinders before the pedal runs into the foot box this way. It may be unnecessary but if things go wrong and you need that last extra bit of pedal…….. 
As I said before I don’t know how this is meant to look so this is my educated guess, also the pedal face looks to be in a better relationship to my foot.
The other thing I like about doing it this way is if I am wrong, I can just switch the pedal arms and be right back to the before picture.
So still waiting for parts I went ahead with making more parts  .
I need the front outriggers to hold the pedal box mounting tube after I bench test the missing clutch master cylinder set up. So just draw, cut, fold, drill and check them off the list, done!
This weekend I got out to the lab and decided it was time to try and make the rear out rigger box assemblies! It’s a nice folded up design and I am sure AC cars had handy templates made but I figured I had 2 options.
I could try and do it in one folded piece of steel or I could cheat and cut out the parts and weld them together at the corners.
Well I am pleased to say after a bit of back and forth I managed to get a working layout and bent up the very interesting tapered box sections for the back.

Looking at the flanges I assume AC cars spot welded them together but I don’t have one of those so some 5/16 holes and plug welds will be close enough for me. It always amazes me how strong this type of structure is, a flat piece of 16 gauge steel is rather flexible but put a couple of bends in it and voilà! Strength!
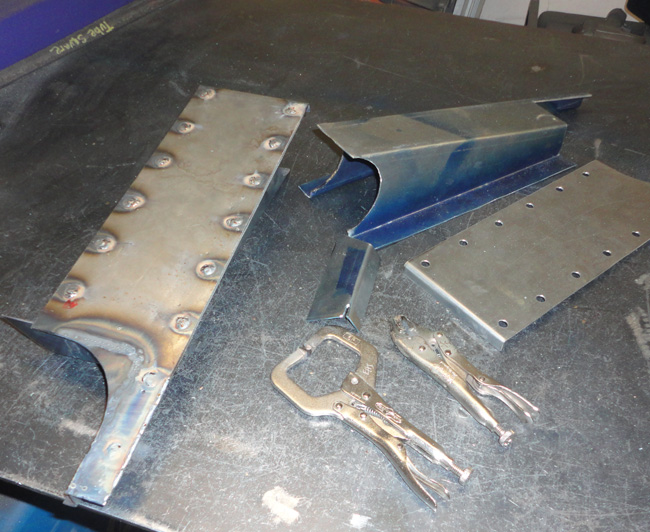
I added the endplates and welded everything up. I thought it would be nice to end today on a good note so I rechecked the measurements, cleaned up and tack welded the outriggers to the chassis!
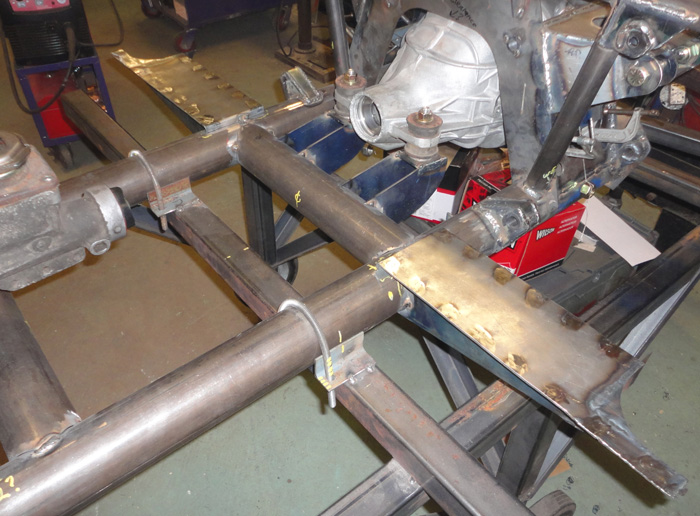
The only thing I don’t currently like is that the outer seat belt mounts just weld to the thin end of this structure.
I think I will add a bit more reinforcement when I add them later but for now it feels good to be adding pieces outward from the chassis, soon there might even be a floor or something!
Thanks for all the encouragement I hope I can post more soon.
Cheers,
Hudson
.
__________________
Yes, I know,....... but it's mine you see..... 
Perhaps he was always a shyster, but we just chose to over look it for awhile. 
You build what you like and I will build what I like...it's all good 
You know that guy,
The one in the neighborhood who likes to hang around the garage while you are working and talk about back when he had that killer 1977 Chevy Mustang  
Last edited by old willy; 04-10-2022 at 09:40 PM..
|

04-11-2022, 08:21 AM
|
|
CC Member

|
|
|
Join Date: Mar 2009
Location: Mendota,
IL
Cobra Make, Engine:
Posts: 697
|
|

 Not Ranked
Hudson as it sits what is your pinion angle? Is the pinion flange going to clear the cross tube? Pinion looks up a lot in the front. Does it match the down angle of the trans shaft?
|

04-11-2022, 05:02 PM
|
 |
CC Member

|
|
|
Join Date: Oct 2017
Location: Baysville,
Ont
Cobra Make, Engine: Mine, small block FORD
Posts: 312
|
|

 Not Ranked
 And another thing......
Hey there!
Some good observations. I did do some measuring when I was deciding on the cross member location and it looks like the flange and U joint should clear the tube. This may be yet another reason to go with the 1310 series driveshaft stuff. If I think it is too tight I am willing to inset the top of the tube a bit.
As for the angle, both the engine/trans combo and the differential are sitting at 3 degrees in relation to the chassis currently. That is also why I am holding off welding the diff brackets until I have the urethane mount kit in and tightened down, might need to adjust it a bit.
Looking at the picture I posted I can see why you asked  , the diff case looks to be sitting at way more of an angle.
I just walked out to the shop and double checked both angles again, just in case.
I guess this is what my wife jokingly refers to as an "opticians illusion" , it is most likely due to the angle of the shot and the fact I take my pictures out there whith a little old Sony pocket camera. I use it because I wouldn't feel so bad if it accidentally gets dropped or chrushed or something.
Cheers,
Hudson
__________________
Yes, I know,....... but it's mine you see..... 
Perhaps he was always a shyster, but we just chose to over look it for awhile. 
You build what you like and I will build what I like...it's all good 
You know that guy,
The one in the neighborhood who likes to hang around the garage while you are working and talk about back when he had that killer 1977 Chevy Mustang  
|

04-11-2022, 06:50 PM
|
|
CC Member

|
|
|
Join Date: Mar 2009
Location: Mendota,
IL
Cobra Make, Engine:
Posts: 697
|
|

 Not Ranked
After posting I had to go look at mine. I have the cobra rear mounted with no guts in the case. It looks like the pinion has a bunch of up angle also. I was wondering my pinion was going to clear. On the floor I have a Jag and a 8.8. I also have some 9 inch fords about cutting down and making independent. I was going to see if I could make it so it had plug in axles like the 8.8. I might also look into seeing if I can make a front mount that would bolt into the original cobra front mount.
Any chance you could take a picture from the side. I want to see how the axles align with the side holes?
You are making me want to work on mine!
|

04-12-2022, 01:54 PM
|
 |
CC Member

|
|
|
Join Date: Oct 2017
Location: Baysville,
Ont
Cobra Make, Engine: Mine, small block FORD
Posts: 312
|
|

 Not Ranked
Hello my friend,
Just a quick reply while I am having a coffee...at work...., yes by all means get working on your project!
I will try and get you a picture later when I get home but for now I can say the axle holes are exactly centered on the oblong holes in the rear suspension tower. I did that to avoid any clearance issues with those large CV joints.
I have slid one in and everything fits so far. But I will get a pic or two for you as well.
I believe I also just saw your post asking for spring lengths too. I will check....
__________________
Yes, I know,....... but it's mine you see..... 
Perhaps he was always a shyster, but we just chose to over look it for awhile. 
You build what you like and I will build what I like...it's all good 
You know that guy,
The one in the neighborhood who likes to hang around the garage while you are working and talk about back when he had that killer 1977 Chevy Mustang  
|

04-20-2022, 08:16 PM
|
 |
CC Member

|
|
|
Join Date: Oct 2017
Location: Baysville,
Ont
Cobra Make, Engine: Mine, small block FORD
Posts: 312
|
|

 Not Ranked
 another little update
Hello all,
Just another quick up date, for now.
It’s been a busy few days here with Easter and visiting family, a wonderful time. 
First up, the side picture you were asking for of the differential case in place. Sorry for the delay. I tried to get a clear shot from the side but I still have a piece of steel clamped at the horizontal center line and the string along the vertical center line. This is so I can easily see it is centered as I am adjusting the mountings. The reason it is still there is because I am still waiting for my new front diff mounts  and wondering if I will need to adjust anything.
But as far as the install goes I am really trying to keep the axle centered in the existing hole in the rear tower. But it makes getting a clear picture hard….sorry.

I did get a bit more work done however, I am also still waiting for my clutch master cylinder so I have still not installed the pedal box assembly yet but I turned my attention to the rear frame area.
The drawings give me the position in space for the 2 rear corner tubes so I made a temporary brace and tacked them to it to hold them in place, then fitted up the lower round tubes and upper square tubes. It was fairly straight forward really and I went ahead a welded this all up.
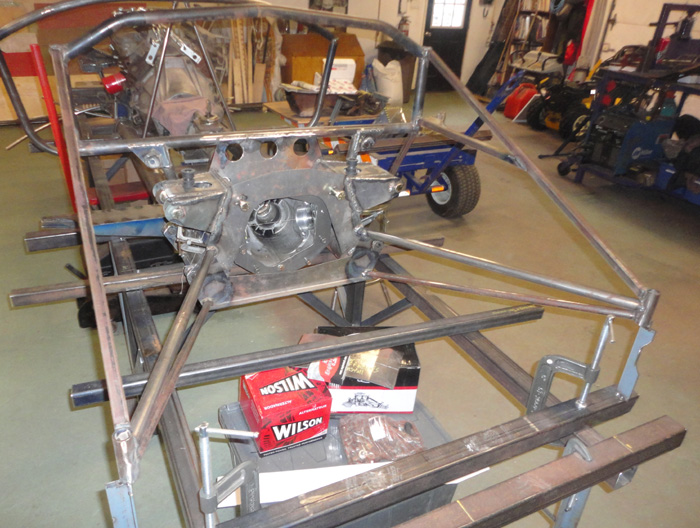
This is another reason I am glad I kept the basic rear tower assembly intact, it really allows me to work right off the drawings without needing to modify stuff to fit the previous things I needed to modify. It could become a vicious circle and in the end leave me wondering why I bought the drawings in the first place instead of just creating a complete chassis of my own design. 
Come to think of it that is what I wold have done 20 years ago but now I want it to be more “ correct” now.
I also found a bit of time to get started on the front bumper mounts, hopefully I can get them in place soon then I think it might be time for another trial body fitting, perhaps.
And finally another question if anyone can check this for me.
I have just made up the tubes that hold the front bumper. I would like to confirm the size of the bolts or threaded rods that hold this all together. The overriders to the tubes to the mounts.
My drawing set has these at 3/8 or .375 inch inner diameter but this looks a bit small to me. Don’t have my bumpers yet to check and yes I could bore them out later but it would be much easier to do it now on the old lathe if this dimension is wrong.
Perhaps 3/8 is correct, I just don’t know. If someone could confirm this I would really appreciate it.
Cheers,
Hudson
.
__________________
Yes, I know,....... but it's mine you see..... 
Perhaps he was always a shyster, but we just chose to over look it for awhile. 
You build what you like and I will build what I like...it's all good 
You know that guy,
The one in the neighborhood who likes to hang around the garage while you are working and talk about back when he had that killer 1977 Chevy Mustang  
|
 Posting Rules
|
You may not post new threads
You may not post replies
You may not post attachments
You may not edit your posts
HTML code is Off
|
|
|
All times are GMT -7. The time now is 04:56 PM.
Links monetized by VigLink
|


