 
 Main Menu
|
 Nevada Classics
|
 Advertise at CC
|
| S |
M |
T |
W |
T |
F |
S |
| |
|
|
|
|
|
1 |
| 2 |
3 |
4 |
5 |
6 |
7 |
8 |
| 9 |
10 |
11 |
12 |
13 |
14 |
15 |
| 16 |
17 |
18 |
19 |
20 |
21 |
22 |
| 23 |
24 |
25 |
26 |
27 |
28 |
|
|
 CC Advertisers
|
|
 3Likes 3Likes

03-12-2008, 12:45 PM
|
 |
CC Member

|
|
|
Join Date: Mar 2006
Location: San Marcos california,
CA
Cobra Make, Engine: 1989 KCC from South Africa Right Hand Drive
Posts: 1,605
|
|

 Not Ranked
Patrick I will bet that ,that guage by your knee is going to bug the sh!!!t out of you once you are using the car. Its going to be in the way of your knee? Great thread.
|

04-13-2008, 08:50 PM
|
 |
CC Member

|
|
|
Join Date: Feb 2006
Location: IGH, MN,
mn
Cobra Make, Engine: scratch build self design 4.6l DOHC
Posts: 769
|
|

 Not Ranked
 Yeah!!! finaly finished that dam dash
Well, I don't know if it will be worth the effort I put in to it, but I have finally finished that crazy dash of mine. lets see eight weeks, 2 gal. of bondo, six cans of foam, countless hours of sanding, about 1.5 gal of resin, Oh and let's not forget two surgeries and a short hospital stay. but it is done for now, and it fits. Laid up two layers of glass over the plug and pulled it off and the laid three layers from the underside then trimmed.


Well, off to work on something else. Hey any Ideas on what to use to bond the hood, trunk, and doors to the metal frames. I'm thinking that goo they use to bond car panels together what is it called. Patrick |

04-13-2008, 09:50 PM
|
|
CC Member

|
|
|
Join Date: Jun 2005
Location: Prescott,
Az
Cobra Make, Engine: Starting a Scratch Build - 289 FIA Car
Posts: 82
|
|

 Not Ranked
Patrick:
You may want to look at a product called Fusor. Send me an Email (oldboy001@charter.net) and I'll send to product information. A little expensive, but well worth it.
Scott
If you get a chance could you put a picture or two of your tube bender in your gallery?
|

04-13-2008, 10:39 PM
|
 |
CC Member

|
|
|
Join Date: Jan 2001
Location: Sunbury,
VIC
Cobra Make, Engine: Rat Rod Racer, LS1 & T56
Posts: 5,391
|
|

 Not Ranked
Check out Sikaflex: Sikaflex
Cheers
__________________
Mike Murphy
Melbourne Australia
|

04-13-2008, 11:45 PM
|
|
Senior Club Cobra Member

|
|
|
Join Date: Feb 2008
Location: Jacksonville,
FL
Cobra Make, Engine: VSE alum. frame, FFR carbonfiber body (under construction)
Posts: 293
|
|

 Not Ranked
|

04-25-2008, 09:26 PM
|
 |
CC Member

|
|
|
Join Date: Feb 2006
Location: IGH, MN,
mn
Cobra Make, Engine: scratch build self design 4.6l DOHC
Posts: 769
|
|

 Not Ranked
 Messing around
|

04-26-2008, 09:21 AM
|
 |
Evryday is a roadstr day

|
|
|
Join Date: Jan 2004
Location: North Jakarta, Indonesia,
Oh
Cobra Make, Engine: RHD Hurricane street roadster HM1081 aging nicely in the garage
Posts: 5,725
|
|

 Not Ranked
Hey Patrick, as usual, the dash and tunnel cover is very slick but was wondering, didn't you have a provision for removing or servicing the trannie from the top side? Is that still on the cards?
__________________
 aka Fuzzy ............... "It is not the return ON my investment that I am concerned about; it is the return OF my investment"....  ...from Will Rogers
Last edited by fastraxsg; 04-26-2008 at 09:24 AM..
|

04-26-2008, 11:23 AM
|
 |
CC Member

|
|
|
Join Date: Feb 2006
Location: IGH, MN,
mn
Cobra Make, Engine: scratch build self design 4.6l DOHC
Posts: 769
|
|

 Not Ranked
Ken,
With all the gauges being electric and a couple of large connectors, I plan to be able to remove the whole piece as one large assembly. That way there will be nothing in the way for tranny removal. You have to think this kind of build about five or six steps ahead and sometimes thats not far enough ahead.
Patrick
|

05-01-2008, 10:00 PM
|
 |
CC Member

|
|
|
Join Date: Feb 2006
Location: IGH, MN,
mn
Cobra Make, Engine: scratch build self design 4.6l DOHC
Posts: 769
|
|

 Not Ranked
 Lots of little pieces
After spending all that time making panels for my car I didn't want to simply rivet them to the tubing. Not my style plus I didn't want all those holes in my chassis. So I spent an immense am out of time making little 1"x1" tabs with threaded holes to fix the panels to with screws. I haven't put the panels back on yet, but the tabs were tacked in place screwed to the panels so they do still fit,
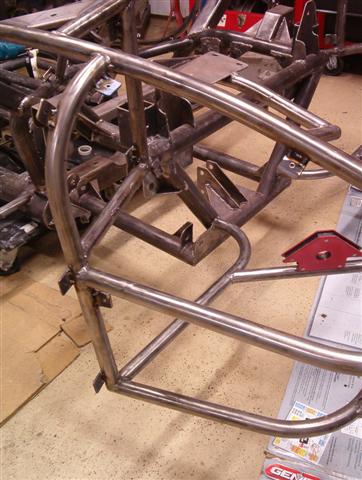
there are over fifty of them welded to the back half of the chassis. I can't wait to do the rest of the chassis at least that will all be metal.
Patrick |

05-26-2008, 01:44 PM
|
 |
CC Member

|
|
|
Join Date: Feb 2006
Location: IGH, MN,
mn
Cobra Make, Engine: scratch build self design 4.6l DOHC
Posts: 769
|
|

 Not Ranked
 Help need more affermation!
Have been in a slump lately and could use some encouragement that everything will workout just fine. Put the body back on the frame and wouldn't you know the door frames wouldn't fit. So after cutting out the door jams that I had done last fall I made molds in the car and glassed up some new ones.


Then back to the doors now with new jams the door frames had to be adjusted to fit again (just modified the pin catches for more clearance). Finally after getting the door frames to work smoothly again, I could make some tabs for glassing the door skins to. Now to get up the nerve to start fixing the skins to the frames.
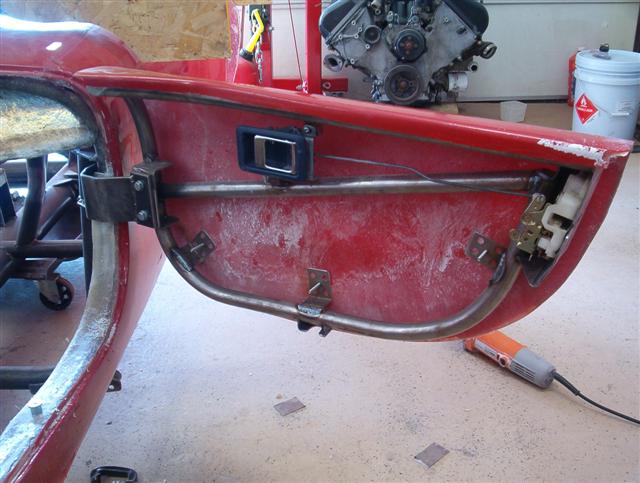
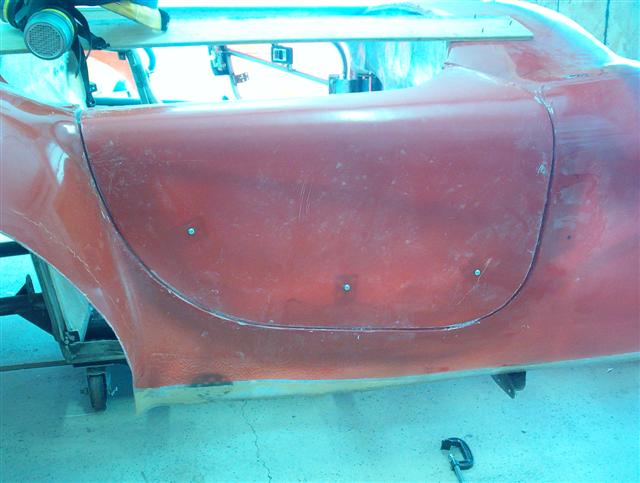
Man this is taking way longer than I thought; Patrick |

06-15-2008, 07:53 PM
|
 |
CC Member

|
|
|
Join Date: Jun 2004
Location: Amarillo,
TX
Cobra Make, Engine: Scratch build......a little every day.
Posts: 563
|
|

 Not Ranked
Have you thought anymore about the adhesive to bond the metal tubes and panels together? I'm at that stage myself.
Dave
__________________
55 mph is unsafe at any speed. Huh?
|

06-15-2008, 08:29 PM
|
 |
Senior Club Cobra Member

|
|
|
Join Date: Sep 2000
Location: Holderness, NH, US of A,
NH
Cobra Make, Engine: CSX 4772 old iron FE
Posts: 5,499
|
|

 Not Ranked
I think the Fusor stuff that was mentioned is what GM uses to bond panels together. Supposed to be good stuff. Good work Dave, glue that puppy together!
|

06-21-2008, 09:33 PM
|
 |
CC Member

|
|
|
Join Date: Feb 2006
Location: IGH, MN,
mn
Cobra Make, Engine: scratch build self design 4.6l DOHC
Posts: 769
|
|

 Not Ranked
 Damm this is taking forever
Well it's been almost a month between posts without a whole lot of progress.
My guy at the auto body supply store recommended a urethane window adhesive. Said something about flexibility for differences in expansion rates.
Now as far as what to glue into place is what has been taking the most time, after one failed attempt I had to go with plan B. Don't ask for train wreck pics they do not exist, but I will not work with foam ever again.
I did manage to get the inner door panels made and the glue is setting as I type.
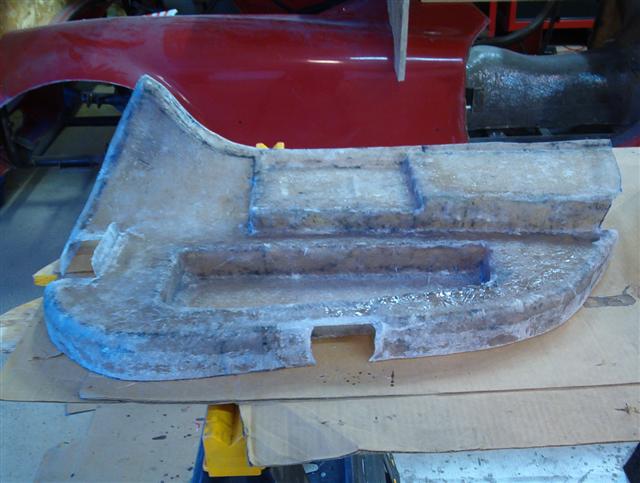
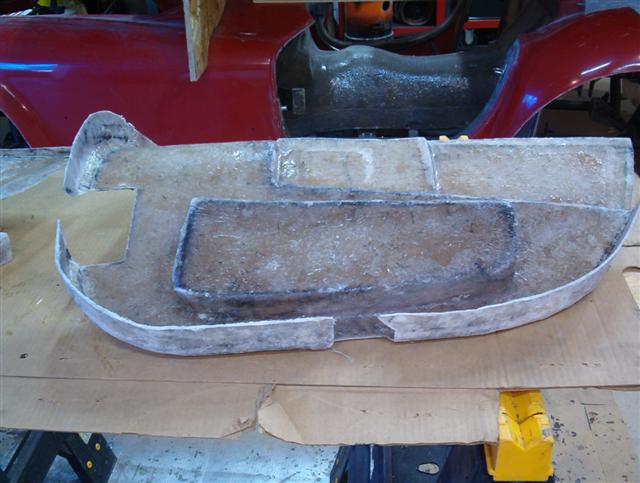
So tomorrow I hope to glass the seams and put these doors to bed. The skins were glued and glassed to the frames, I also coated the frames with POR15 because I will never get a chance to do anything to it again.
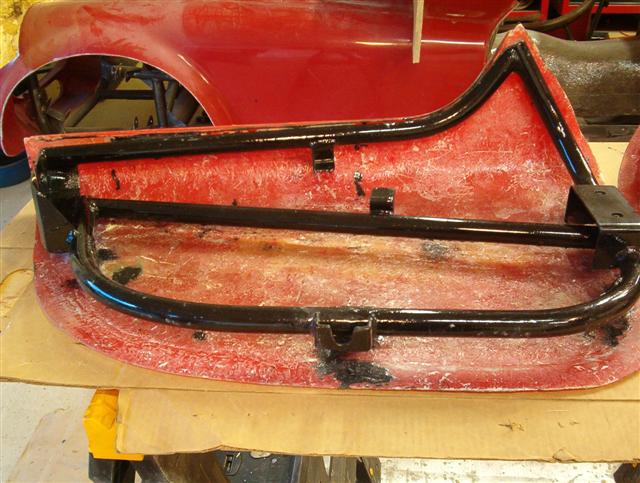
Give me a couple of days and I may get these done and refitted to the car and I will update you then.
Patrick |

06-23-2008, 08:07 PM
|
 |
CC Member

|
|
|
Join Date: Feb 2006
Location: IGH, MN,
mn
Cobra Make, Engine: scratch build self design 4.6l DOHC
Posts: 769
|
|

 Not Ranked
 Close out on doors
Da-am was that fun NOT, but hey they are done! Now I can't tell you how much filler and sanding these will take to finish but I have a base.
So here is the pics of the doors in full rough.
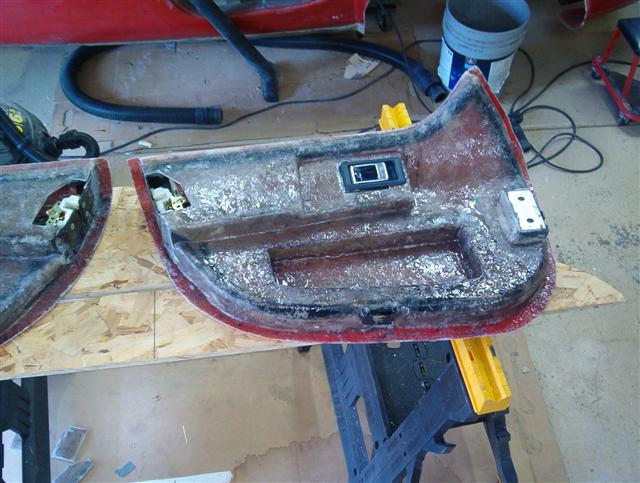
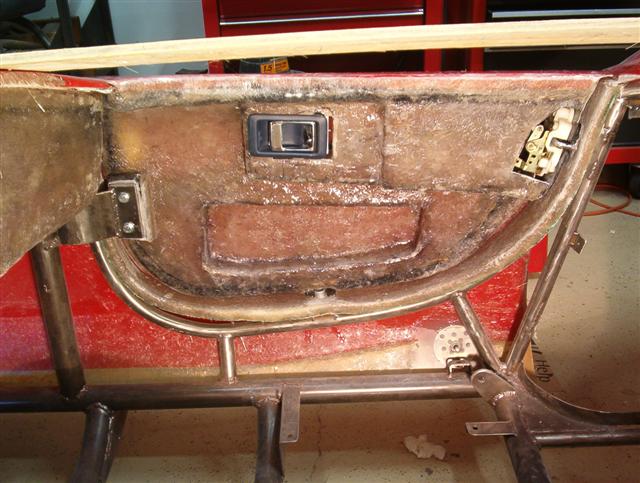
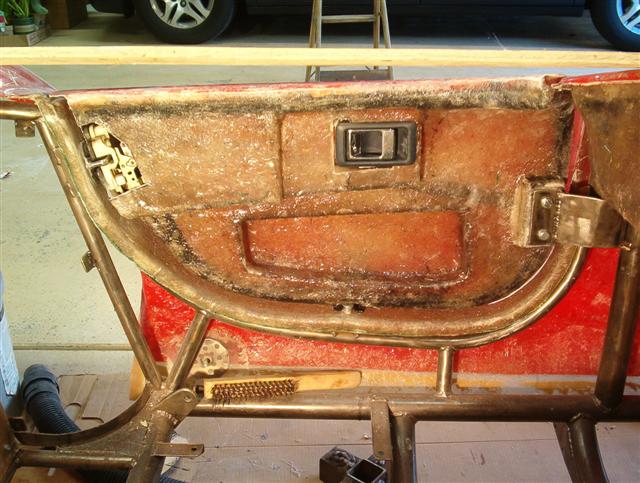
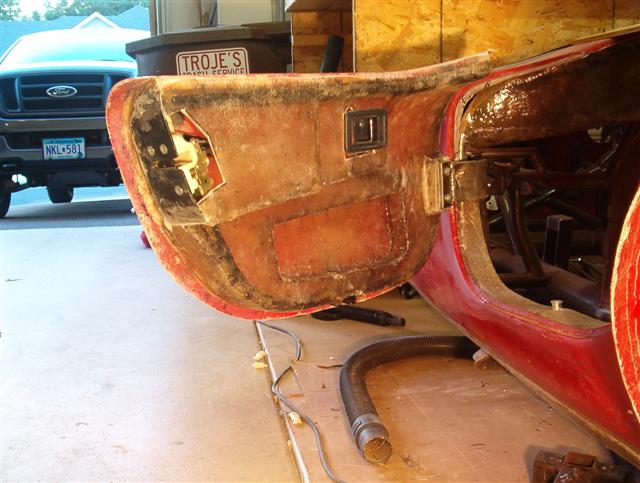
Now it's up to all of you lurkers to post up a comment;
Patrick |

06-23-2008, 10:16 PM
|
 |
CC Member

|
|
|
Join Date: Feb 2006
Location: Gore. New Zealand.,
SI
Cobra Make, Engine: DIY Coupe, F/T ,MkIV.
Posts: 808
|
|

 Not Ranked
I just hope there was no resin on the handle of that wire brush when you left it there! 
__________________
Jac Mac
|

06-23-2008, 11:26 PM
|
|
CC Member

|
|
|
Join Date: Oct 2006
Location: Yorba Linda,
ca
Cobra Make, Engine:
Posts: 254
|
|

 Not Ranked
 Who cares what it looks like
You are going to cover this all up with upholstery panels anyway... right?
Brian
|

07-05-2008, 10:47 PM
|
 |
CC Member

|
|
|
Join Date: Feb 2006
Location: IGH, MN,
mn
Cobra Make, Engine: scratch build self design 4.6l DOHC
Posts: 769
|
|

 Not Ranked
 Crossed a very large bridge
Well I've done it I have finished the major fiberglass fabrication of my build, panels done, dash done, doors done, hood and trunk done!


I have quite the inventory of items created with fiberglass for someone who had little expeirance with this stuff I think I did pretty good.

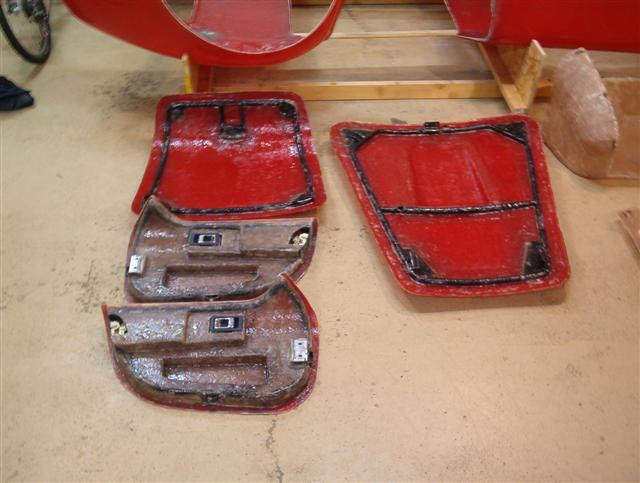
The body is tucked away back on the ceiling, I hope not to see it down till bodywork part of this project. I have a couple of loose ends to clean up on the chassis and it's off to powdercoat then I may get to start putting this thing together for real.
Patrick |

07-06-2008, 07:13 AM
|
 |
CC Member

|
|
|
Join Date: May 2005
Location: Marietta,
GA
Cobra Make, Engine: 92 Classic Roadsters, 408CI Clevor, T-56
Posts: 194
|
|

 Not Ranked
Your project makes my 5 year basement finishing project look like a tinker toy project for a 5 year old. Good Job and very inspiring!!!
__________________
Mike
Classic Roadsters Cobra, 408 CI Clevor, T-56
|

07-06-2008, 04:32 PM
|
 |
CC Member

|
|
|
Join Date: Feb 2006
Location: Gilroy,
CA
Cobra Make, Engine: SPF 2291, Whipple Blown & Injected 4V ModMotor
Posts: 2,737
|
|

 Not Ranked
Quote:
Originally Posted by autoxmike

... very inspiring!!!
|
+1
Patrick,
I'm blown away each time I look at your pics. Awesome job and really, really inspiring.
Ed
__________________
 Help them do what they would have done if they had known what they could do.
|

07-06-2008, 10:25 PM
|
|
Senior Club Cobra Member

|
|
|
Join Date: May 2006
Location: Manteca,
Ca.
Cobra Make, Engine: None, sold it
Posts: 2,439
|
|

 Not Ranked
Patrick,
I wish I had the (you know whats) to take on a build like yours. I did help (minimal) a guy build a KR2 airplane once. He used what he called glass sphears for the filler. It is kind of like bondo for fiberglass. If I remember correctly (of course this was over 20 years ago) it was fairly easy to work with.
We did use blocks of foam glued together and then shaped for his engine shroud. Of course he had blue prints to go by.
Great job, Terry
|
 Posting Rules
|
You may not post new threads
You may not post replies
You may not post attachments
You may not edit your posts
HTML code is Off
|
|
|
All times are GMT -7. The time now is 04:55 AM.
Links monetized by VigLink
|


