 
 Main Menu
|
|
Nevada Classics
|
|
Advertise at CC
|
| S |
M |
T |
W |
T |
F |
S |
| |
|
|
|
|
|
1 |
| 2 |
3 |
4 |
5 |
6 |
7 |
8 |
| 9 |
10 |
11 |
12 |
13 |
14 |
15 |
| 16 |
17 |
18 |
19 |
20 |
21 |
22 |
| 23 |
24 |
25 |
26 |
27 |
28 |
|
|
|
CC Advertisers
|
|
 323Likes 323Likes

07-04-2017, 06:43 PM
|
|
CC Member

|
|
|
Join Date: Aug 2008
Location: Tahoe/Truckee,
ca
Cobra Make, Engine: Ford Racing 363/8-stack injection, SPFR0012
Posts: 260
|
|

 Not Ranked
Have fun at the track, as you know, any day at the track is a good day. Also keep an eye on that MSD coil, that was the second thing to fail @ 400 miles on 0012, first was the starter @ 125. 1600 miles still working out some bugs with the injection, and electrical. Loving ever mile though.
Mark
Last edited by Moto One; 07-04-2017 at 06:46 PM..
|
07-05-2017, 08:15 AM
|
 |
CC Member
|
|
|
Join Date: Sep 2002
Cobra Make, Engine: SPF#0760
Posts: 3,407
|
|
Not Ranked
Not as big a problem as in the past with the newer coils but the vibration of the engine not good for coils and coil wire to distributor appears excessively long.
__________________
Wiring Diagrams: SPF MKII, MKIII, GT40, CSX7000, CSX8000, Corvette Grand Sport, and Shelby Sebring, Bondurant & Cinema Tribute Cars.
Owners Manuals: SPF MKII, CSX7000, CSX8000, Sebring, Bondurant, Cinema Tribute Cars $ GT40s..
Large, easy to read and trace schematics with part numbers, wire colors, wire gauge, fuses, and electrical upgrade information. Trouble-shooting and replacement part numbers for those roadside repair adventures.
SPFWiringDiagrams@Comcast.net
|
07-05-2017, 09:40 AM
|
 |
CC Member
|
|
|
Join Date: Aug 2013
Location: Canandaigua,
NY
Cobra Make, Engine: SPF MKII Riverside Racer FIA
Posts: 2,505
|
|
Not Ranked
Good point Blas, probably should shorten that wire a little. Thanks.
Jim
__________________

|
07-06-2017, 01:39 PM
|
|
CC Member
|
|
|
Join Date: Aug 2013
Location: Canandaigua,
NY
Cobra Make, Engine: SPF MKII Riverside Racer FIA
Posts: 2,505
|
|
Not Ranked
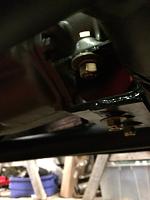
Coil wire shortened so as to reduce resistance and increase spark. Also, when I wired my MSD the ground is to the battery and I connected the hot wire to the other side of the battery disconnect/kill switch to limit voltage spikes and interference, and also to ensure that when the kill switch is engaged that no power is still being provided to the MSD box.
Going through the painstakingly slow process of planning the layout of fuel line and oil cooler lines. Not a lot of room to work with. Was originally going to place the fuel filter in the engine compartment, but due to space considerations and the need to have the remote oil filter in approximately the same place, decided on placing the fuel filter in the boot and it is plumbed in prior to the fuel pump. That will be it for this weekend. Getting some track time in at an SCCA race at Watkins Glen, need to keep honing the skills as I get ready for the Vintage Grand Prix there in September with SVRA.
Jim
__________________
Last edited by 1795; 07-06-2017 at 01:40 PM..
Reason: damn auto-correct!
|
07-06-2017, 05:58 PM
|
|
CC Member
|
|
|
Join Date: Aug 2008
Location: Tahoe/Truckee,
ca
Cobra Make, Engine: Ford Racing 363/8-stack injection, SPFR0012
Posts: 260
|
|
Not Ranked
I'll be interested in seeing how you route the oil cooler lines. I won't say the reason, but the engine installer didn't hook that system up, they just looped the line from one side to the other. Wondered why the oil temp was running high, and the cooler was cool.
Mark |
07-06-2017, 07:08 PM
|
|
CC Member
|
|
|
Join Date: Aug 2013
Location: Canandaigua,
NY
Cobra Make, Engine: SPF MKII Riverside Racer FIA
Posts: 2,505
|
|
Not Ranked
Mark, will post pictures as I do it. My plan is to go through the lower left side (driver's side) lower radiator hose opening in the tower, as opposed to the center of the tower. I can see no access points to either ride of the radiator up high that do not contain support structures
Do you have a remote oil filter, or is it on the block? You will need a remote oil filter and adaptor to run the oil cooler.
Jim
__________________
|
07-07-2017, 12:24 PM
|
|
CC Member
|
|
|
Join Date: Aug 2008
Location: Tahoe/Truckee,
ca
Cobra Make, Engine: Ford Racing 363/8-stack injection, SPFR0012
Posts: 260
|
|
Not Ranked
Have the adaptor, I'm also going to get a thermostat to add to the system (we have some cold morning/evenings here. I also was looking at the right side, shortest route to the engine.
Mark.
|
07-13-2017, 07:26 PM
|
|
CC Member
|
|
|
Join Date: Aug 2013
Location: Canandaigua,
NY
Cobra Make, Engine: SPF MKII Riverside Racer FIA
Posts: 2,505
|
|
Not Ranked
 Starting to wrap things up
It's starting to get close to wrapping things up. Took some time off to race my MGB at a vintage SCCA event at Watkins Glen Saturday and Sunday. First time on the track this year and it felt pretty good. Went a little cautious the first time trial, but still came in first in my group and ahead of some cars in the group ahead of me (we are a small group, had 20 cars on the track, with everything from Bugeye Sprites to Jaguar XKE's, Mustangs and Corvettes) as we run as a mixed group. Pushed the limits on the next time trial and beat my best time at the Glen. Finished first again. That MGB finished in front of all four cylinder cars, even those with larger engines and I even passed a TR8! Unfortunately at the end of that last trial my oil pressure started to drop a little, so I pulled off the track. Checked and there was a little oil coming out of the oil fill cap on the valve cover. Lost about 1/2 quart, but when I topped off the engine the oil pressure came back. Tried it the next morning and oil pressure was good, drove up to the false grid for the first race and when I turned the engine off there was a clunk and it seized. Racing was done. will take a look at it after I am done with the cobra.
Now onto the Cobra. Have been working on the transmission mount, as the stock mount is for a Tremec and the Top loader has a different mounting point. Finally got the adaptor completed and tested it out and it fits!
The poly mount was pretty thick, so I had to drop the bracket about 1 1/2". Will tighten everything up tomorrow, want to sleep on it before fully tightening everything. The tail seems to line up with the differential and sits about an inch higher. They both appear to be in the same plane.
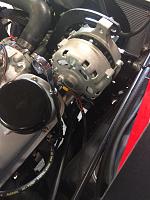
Also worked on installing the alternator, had to change brackets and move the alternator to a high position from the original low position due to the forward tubes in the engine compartment, and to allow for the hose from the bottom of the Harrison tank to access the water pump.
 
Back to work tomorrow.
Jim
__________________
Last edited by 1795; 07-14-2017 at 05:20 AM..
|
07-13-2017, 09:49 PM
|
|
CC Member
|
|
|
Join Date: Aug 2008
Location: Tahoe/Truckee,
ca
Cobra Make, Engine: Ford Racing 363/8-stack injection, SPFR0012
Posts: 260
|
|
Not Ranked
To bad about the MG. Are you going to have hood clearance with the placement of the Alt? I know things were really tight on 0012. Also notice the tall oil fill tubs.
Mark.
|
07-14-2017, 05:22 AM
|
|
CC Member
|
|
|
Join Date: Aug 2013
Location: Canandaigua,
NY
Cobra Make, Engine: SPF MKII Riverside Racer FIA
Posts: 2,505
|
|
Not Ranked
Mark,
The alternator should fit, I have seen other 289's with the alternator mounted in that manner. The tall oil fill tubes may need to be cut down a little more. I think that the right side will fit, but the left side looks a little tall and may need to be cut down some more.
Jim
__________________
|
07-14-2017, 06:09 AM
|
|
CC Member
|
|
|
Join Date: Sep 2002
Cobra Make, Engine: SPF#0760
Posts: 3,407
|
|
Not Ranked
In your Manual Package, in the chassis ownership document, lessons learned section, it has a few notes on the alternator bracket.
You have any photos of the trans mount adapter piece you made? Also, in the Service Bulletins, info on driveshaft alignment.... check them out. Will you be adding a more robust safety hoop for the driveshaft?
Blas
__________________
Wiring Diagrams: SPF MKII, MKIII, GT40, CSX7000, CSX8000, Corvette Grand Sport, and Shelby Sebring, Bondurant & Cinema Tribute Cars.
Owners Manuals: SPF MKII, CSX7000, CSX8000, Sebring, Bondurant, Cinema Tribute Cars $ GT40s..
Large, easy to read and trace schematics with part numbers, wire colors, wire gauge, fuses, and electrical upgrade information. Trouble-shooting and replacement part numbers for those roadside repair adventures.
SPFWiringDiagrams@Comcast.net
|
07-14-2017, 07:50 AM
|
|
CC Member
|
|
|
Join Date: Aug 2013
Location: Canandaigua,
NY
Cobra Make, Engine: SPF MKII Riverside Racer FIA
Posts: 2,505
|
|
Not Ranked
Blas,
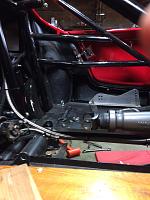
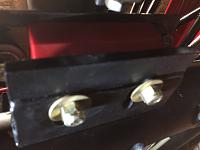
I did not take any photos of the transmission bracket beforehand, but am including a few more here. Each install will have to be custom made due to the particulars of the tail housing. Mine was off of a Galaxie, so I had to add a plate to the top of the poly mount, which was for a Mustang as the mounting points on the Galaxie are wider than on a Mustang tail housing.

Due to the size of the poly support, I had to fashion a deeper bracket than others have had to use as well. I used two 3/8" steel plates and a piece of 2" angle iron then had them wedded together. Bolt holes were drilled into the top plate where it attaches to the transmission mount cross member and I put slots in the bottom plate for making adjustments.
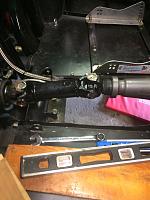
The existing driveshaft hoop looks pretty substantial to me, no plans on upgrading it. I did add a steel plate below it to lessen the chance of the driveshaft dropping to the track.
Jim
__________________
|
07-14-2017, 08:06 AM
|
 |
CC Member
|
|
|
Join Date: Jul 2006
Location: Redding,
CA
Cobra Make, Engine: FFR chassis and suspension, Mr. Bruce 289 FIA body
Posts: 1,066
|
|
Not Ranked
This is such an awesome, inspiring build.
|
07-18-2017, 02:51 PM
|
|
CC Member
|
|
|
Join Date: Aug 2013
Location: Canandaigua,
NY
Cobra Make, Engine: SPF MKII Riverside Racer FIA
Posts: 2,505
|
|
Not Ranked
Bill,
I am flattered to receive such a compliment from you. Progress has been a little slower, waiting on parts. Made a stupid mistake that is holding things up a little. Had to order some 8AN fuel line fittings and some 10AN oil cooler line fittings; however, I ordered the 8AN fittings first and had 8AN stuck on my mind when I ordered the oil line fittings. Luckily Summit is great about returns, but it will take a couple of weeks before I have them back.
Will have the drive shaft tomorrow and install that so that I can work on buttoning up the cockpit. That will be slow work as I will have to cut the inner panel behind the seats to accommodate the upgraded roll cage.
I focused today on finishing the plumbing for the radiator and Harrison tank. Filled it with water and water wetter, as race organizations do not like antifreeze as it is hard to remove from the track.
 
As I was filling the system, it occurred to me that i had better install the water temp line before I filled the system too much to avoid water rushing out of the fitting hole. The water temp line and oil tempt lines were coiled up together and when I unwrapped them I noticed that they were identical, with no labeling. I thought that I might be able to trace the lines back to the gauges, and then noticed that the wires crossed themselves going through the firewall. Luckily at that point my brain kicked in and I boiled a cup of water and then inserted one end of a line into the hot water and watched to see which temp gauge started to rise. Problem solved.
Tomorrow I will start to focus on the fuel system and accelerator pedal hookup to the carb. It really is starting to get close. A couple of minor wiring things that need to be finished and it will be ready for a start-up, once the oil cooler lines are in place...
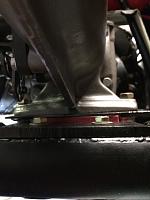
While I was under the car i took a photo of the SFI label on the bell housing.

Time for some dinner and a beer.
Jim
__________________
|
07-18-2017, 03:28 PM
|
|
CC Member
|
|
|
Join Date: Jul 2006
Location: Redding,
CA
Cobra Make, Engine: FFR chassis and suspension, Mr. Bruce 289 FIA body
Posts: 1,066
|
|
Not Ranked
Yeah, I would have done the same thing with the temp gauges to determine which is which. Can't wait to see the final product and pics from every angle.
|
07-19-2017, 03:50 PM
|
|
CC Member
|
|
|
Join Date: Aug 2013
Location: Canandaigua,
NY
Cobra Make, Engine: SPF MKII Riverside Racer FIA
Posts: 2,505
|
|
Not Ranked
Marching on
Quote:
Originally Posted by Bill D

Yeah, I would have done the same thing with the temp gauges to determine which is which. Can't wait to see the final product and pics from every angle.
|
Bill, knowing that we are on the same page is encouraging to me.
So, today I finally got my driveshaft and hurried home to make sure that it fit; which it did! I put the transmission in neutral and spun the rear wheels, no binding or odd movements of the driveshaft.

So, I painted it and re-installed it after it dried.
I then went on to finish plumbing the fuel line to the carb. I do hate cutting stainless steel reinforced fuel line and inserting fittings. My fingers feel like I had acupuncture. But it is done, and I do not need to worry about that again on this car.
  
I also finished wiring in the alternator and then hooked the battery up and the little light on the transponder came on when I switched the cut-off switch on, and off when the power was disconnected.
Have to work tomorrow and stop by to see my aging mom, she is going to be 92 this fall and is a tough cookie. Battling cancer and not letting it stop her.
Will be back to the car on Friday.
Jim
__________________
Last edited by 1795; 07-19-2017 at 03:53 PM..
Reason: mistake
|
07-19-2017, 04:24 PM
|
|
CC Member
|
|
|
Join Date: Sep 2002
Cobra Make, Engine: SPF#0760
Posts: 3,407
|
|
Not Ranked
Consider a heat shield on the fuel line as it comes up the fenderwell so close to the exhaust manifold. A simple piece of aluminum to deflect the heat. Use the same mounting bolts you used to mount the flex tube fuel line....
__________________
Wiring Diagrams: SPF MKII, MKIII, GT40, CSX7000, CSX8000, Corvette Grand Sport, and Shelby Sebring, Bondurant & Cinema Tribute Cars.
Owners Manuals: SPF MKII, CSX7000, CSX8000, Sebring, Bondurant, Cinema Tribute Cars $ GT40s..
Large, easy to read and trace schematics with part numbers, wire colors, wire gauge, fuses, and electrical upgrade information. Trouble-shooting and replacement part numbers for those roadside repair adventures.
SPFWiringDiagrams@Comcast.net
|
07-19-2017, 04:54 PM
|
|
CC Member
|
|
|
Join Date: Aug 2013
Location: Canandaigua,
NY
Cobra Make, Engine: SPF MKII Riverside Racer FIA
Posts: 2,505
|
|
Not Ranked
Blas,
Thanks for the suggestion. I will see what i can come up with.
Had to go where I did with the fuel line to allow for enough room for the remote oil filter and lines. Not a whole hell of a lot of room to work with.
Jim
__________________
|
07-19-2017, 06:19 PM
|
|
CC Member
|
|
|
Join Date: Aug 2008
Location: Tahoe/Truckee,
ca
Cobra Make, Engine: Ford Racing 363/8-stack injection, SPFR0012
Posts: 260
|
|
Not Ranked
Jim, this is just getting better by the day, wish your Mom well for us.
Mark
|
07-19-2017, 06:37 PM
|
|
CC Member
|
|
|
Join Date: Aug 2013
Location: Canandaigua,
NY
Cobra Make, Engine: SPF MKII Riverside Racer FIA
Posts: 2,505
|
|
Not Ranked
Thank Mark, will do.
__________________
|
 Posting Rules
|
You may not post new threads
You may not post replies
You may not post attachments
You may not edit your posts
HTML code is Off
|
|
|
All times are GMT -7. The time now is 03:35 PM.
Links monetized by VigLink
|


 Linear Mode


