Welcome to Club Cobra! The World's largest
non biased Shelby Cobra related site!
- » Representation from nearly all
Cobra/Daytona/GT40 manufacturers
- » Help from all over the world for your
questions
- » Build logs for you and all members
- » Blogs
- » Image Gallery
- » Many thousands of members and nearly 1
million posts!
YES! I want to register an account for free right now!
p.s.: For registered members this ad will NOT show
 
 Main Menu
|
 Nevada Classics
|
 Advertise at CC
|
 December 2024
|
| S |
M |
T |
W |
T |
F |
S |
| 1 |
2 |
3 |
4 |
5 |
6 |
7 |
| 8 |
9 |
10 |
11 |
12 |
13 |
14 |
| 15 |
16 |
17 |
18 |
19 |
20 |
21 |
| 22 |
23 |
24 |
25 |
26 |
27 |
28 |
| 29 |
30 |
31 |
|
|
|
|
|
 CC Advertisers
|
|
 3Likes 3Likes
-
 1
Post By Aussie Mike
-
 1
Post By PeterAllen
-
 1
Post By PeterAllen

07-19-2014, 10:58 PM
|
 |
CC Member

|
|
|
Join Date: Jul 2011
Location: Sydney,
NSW
Cobra Make, Engine: Puckett 250 GTO - LS1
Posts: 567
|
|

 Not Ranked
 Bonnet (hood) frame designs?
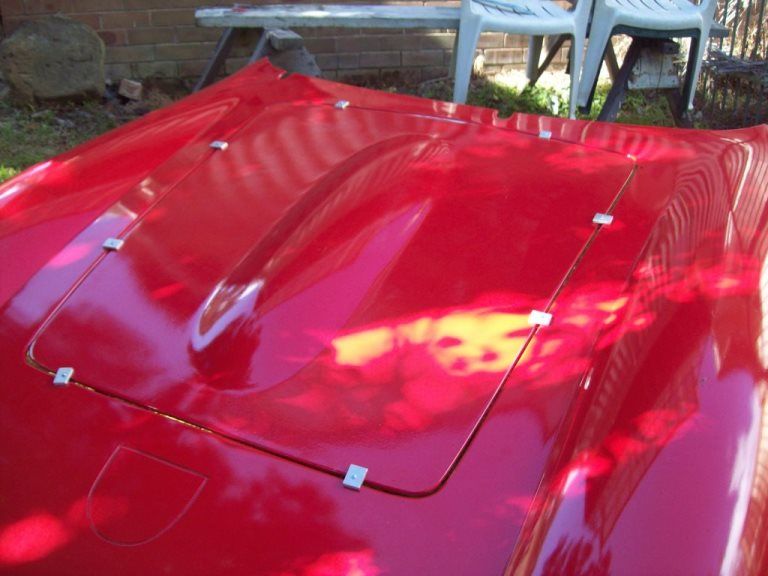
My GTO front section was laid with the bonnet included - there was a groove indicating where a cut was to be later made to separate the items. I initially thought this was a clever idea as it would ensure alignment; as it has turned out, it's not.
With no strengthening lip/return on the edge of the bonnet (nor have the front guards for that matter), and a likely 15-20 year passing since it was cut out, I now find the longer edges don't match up at all - something like an 8mm bow.
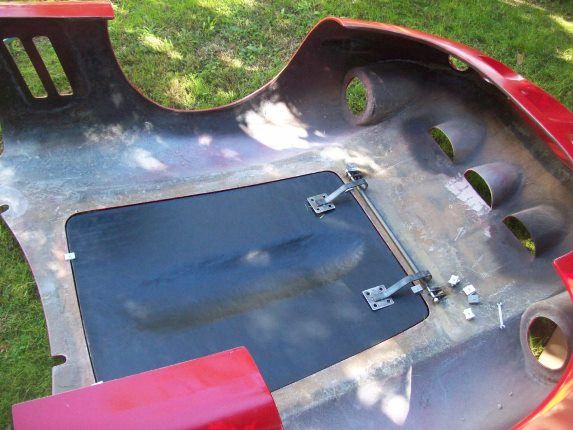
I'm trying to decide on what design of rib or frame I need to fibreglass/attach to the underside of the bonnet to pull it into shape.
I would appreciate any comments and photos which indicate what others have done to ensure the stability of the bonnet shape. Thanks.
Last edited by PeterAllen; 07-19-2014 at 11:21 PM..
|
-
Advertising


07-20-2014, 02:13 AM
|
|
CC Member

|
|
|
Join Date: Jun 2006
Location: Newcastle, Warners Bay,
NSW
Cobra Make, Engine: RMC . 393 Dart alloy block Stroked 351 alloy heads ..all the goodies plus a pre oiler. al
Posts: 1,495
|
|

 Not Ranked
Just a suggestion...Make a wood "spine" to the correct curve. clear of the edges. Then glass in a reinforcing lip...thick. That might hold the bonnet to its correct shape.
Metal ribs glassed in could work also.
|

07-20-2014, 02:43 AM
|
|
CC Member

|
|
|
Join Date: Jun 2001
Location: munno para west,
sa
Cobra Make, Engine: absolute pace chassis #50 L98 & 6 speed auto
Posts: 1,141
|
|

 Not Ranked
on the fibreglass panels on our race car I glass hessian strips into the panel it makes them quiet stiff.you can buy it in rolls from craft shops or ebay
|

07-21-2014, 06:42 PM
|
 |
CC Member

|
|
|
Join Date: Jul 2011
Location: Sydney,
NSW
Cobra Make, Engine: Puckett 250 GTO - LS1
Posts: 567
|
|

 Not Ranked
Quote:
Originally Posted by Rob. Smith

Just a suggestion...Make a wood "spine" to the correct curve. clear of the edges. Then glass in a reinforcing lip...thick. That might hold the bonnet to its correct shape.
Metal ribs glassed in could work also.
|
Rob. The bonnet is the best part of 5mm thick (?) and I think it would need a very substantial rib. I would also be worried about the long term adhesion to the existing material if under constant stress.
Quote:
Originally Posted by deano59

on the fibreglass panels on our race car I glass hessian strips into the panel it makes them quiet stiff.you can buy it in rolls from craft shops or ebay
|
Dean. Kinda as above. My problem is compounded by the substantial amount of material already in the bonnet.
I think I might attach a rib to the existing bonnot to give it a new (correct) profile and then make a mould and pop out a new bonnet incorporating ribbing or hessian.
I HATE BODYWORK... |

07-21-2014, 09:07 PM
|
 |
CC Member

|
|
|
Join Date: Jan 2001
Location: Sunbury,
VIC
Cobra Make, Engine: Rat Rod Racer, LS1 & T56
Posts: 5,391
|
|

 Not Ranked
Quote:
Originally Posted by PeterAllen

I HATE BODYWORK...
|
I can heartily agree with that statement. I'm happiest, welding, machining and turning spanners. Sanding and filling sucks.
__________________
Mike Murphy
Melbourne Australia
|

07-21-2014, 09:52 PM
|
 |
CC Member

|
|
|
Join Date: Aug 2009
Location: Adelaide,
SA
Cobra Make, Engine: AP 289FIA 'English' spec.
Posts: 13,152
|
|

 Not Ranked
Is it feasible to add one or two (adjustable?) supports along the length of each side of the bonnet opening so that it's correct shape when shut? Sure wouldn't have any rattles.
Cheers,
Glen
|

07-21-2014, 09:59 PM
|
 |
CC Member

|
|
|
Join Date: Jan 2001
Location: Sunbury,
VIC
Cobra Make, Engine: Rat Rod Racer, LS1 & T56
Posts: 5,391
|
|

 Not Ranked
Have you looked at using heat to reshape the bonnet curve. I believe Andrew Cornett had some success straightening out the sills on his CR using clamps and heat.
Cheers
__________________
Mike Murphy
Melbourne Australia
|

07-22-2014, 08:28 PM
|
 |
CC Member

|
|
|
Join Date: Jul 2011
Location: Sydney,
NSW
Cobra Make, Engine: Puckett 250 GTO - LS1
Posts: 567
|
|

 Not Ranked
A bit of a rethink.
I removed the front section and positioned the bonnet using some clamps I made up - similar to butt weld clamps. It all aligned pretty well which means the opening for the bonnet is the problem. It seems that when I flared the guards to match the sill I should have ensured the bonnet opening didn't distort, which it has. Arrrr...
I'm going to lay some fibreglass rope along the edge of the bonnet and juxtaposed along the guard while the bonnet is clamped in position and the front section off the car.
If, when I refit, the front section doesn't align with the mounting points on the unibody you will hear me scream wherever you are.


Last edited by PeterAllen; 07-22-2014 at 08:40 PM..
|

07-23-2014, 03:02 PM
|
|
CC Member

|
|
|
Join Date: Dec 2013
Cobra Make, Engine: Evans chassis, jag fr. & rear.
Posts: 149
|
|

 Not Ranked
Try this,
Mount the nose cone on the car. Make a couple of ribs to go right across the underside. One at the front near the light holes, one or two near the middle and one at the rear. Glass these in place. Remove the nose cone and invert. The ribs will hold the shape of the cone in relation to your chassis. Then do your bonnet. When the bonnet is finished remove the ribs. I have a good trick for glassing upside down.
|

07-23-2014, 10:29 PM
|
|
CC Member

|
|
|
Join Date: Jun 2001
Location: munno para west,
sa
Cobra Make, Engine: absolute pace chassis #50 L98 & 6 speed auto
Posts: 1,141
|
|

 Not Ranked
would love too see a pic of the whole car actually :-)
|

07-26-2014, 07:41 PM
|
 |
CC Member

|
|
|
Join Date: Jun 2014
Location: Perth,
W.A
Cobra Make, Engine:
Posts: 52
|
|

 Not Ranked
Have you had a look at how GM build the early model Corvettes? They have been building fiberglass bodies for over 60 years.Google C2 Corvette hood and see how they are made, 2 pieces top and bottom sections bonded together.Looking at your hood and front end I think that you will always have problems with sagging due to no support or reinforcement. Hope you can come up with a solution.
|

07-26-2014, 09:06 PM
|
 |
CC Member

|
|
|
Join Date: Jul 2011
Location: Sydney,
NSW
Cobra Make, Engine: Puckett 250 GTO - LS1
Posts: 567
|
|

 Not Ranked

Many thanks, 'I love youse all'.
I'm optimistic I've identified and corrected the problem. It was not the bonnet but the original Datsun guard mounting points. In its forty years the car appears to have had a few knocks and not always been rebuilt to original specs. I've been all over the car with plum bobs and lasers to ensure the suspension pick-up points are all okay but I didn't even consider the body mounting points. In my defence I can only say that for the last thirty years I've been the only male in the household so logic and rational analysis have slipped from my skill base.
So, with the aid of a block of wood and an Irish screwdriver I have repositioned the mounting points on the tops of the inner guards. The guard lips now sit lower and align with the bonnet.
Cobrakiller - The kit did came with a fibreglass frame glued to the underside of the bonnet (and a similar concept on the boot {trunk} lid). I discarded them both as the whole thing was way too heavy. The fibreglassing on this particular kit is very thick, 3-5mm, and there is no gelcoat so I tend to think it was some kind of prototype. I don't know if this thickness is typical for road cars (?) but with the racing cars I owned and worked on (when I was single and had a life) the fibreglass was half, or less, that thickness but with strategically placed lips and ribs.
Last edited by PeterAllen; 07-26-2014 at 09:15 PM..
|
 Posting Rules
|
You may not post new threads
You may not post replies
You may not post attachments
You may not edit your posts
HTML code is Off
|
|
|
All times are GMT -7. The time now is 07:36 PM.
|
|


 3Likes


 Linear Mode


